> ## Documentation Index
> Fetch the complete documentation index at: https://docs.novu.co/llms.txt
> Use this file to discover all available pages before exploring further.
# Set up the Microsoft Teams bot
> Create the Azure app, bot, and Teams package, then save the bot credentials on the Novu MS Teams integration.
Complete this setup once for your product. After the integration exists in Novu, [connect each customer tenant](/platform/integrations/chat/ms-teams-connect) and register channel or user destinations.
## Prerequisites
* Access to [Azure Portal](https://portal.azure.com/) with App Registration permissions.
* Access to [Microsoft Teams Developer Portal](https://dev.teams.microsoft.com/home)
* Administrator privileges for granting API permissions
* Access to [Novu dashboard](https://dashboard.novu.co)
## Azure and Teams configuration
Before you can configure Novu, you must create the infrastructure that hosts your bot. This involves two distinct portals:
* **Azure portal**: To create the identity (App Registration) and infrastructure (Bot Service).
* **Teams Developer Portal**: To create the app package that your customers can install.
### Create the app identity (Azure AD)
First, create a multi-tenant identity for your bot.
Sign in at the [Azure Portal](https://portal.azure.com/).
In the menu, click **Microsoft Entra ID** (formerly Azure Active Directory).
In the Manage section, click **App registrations**.
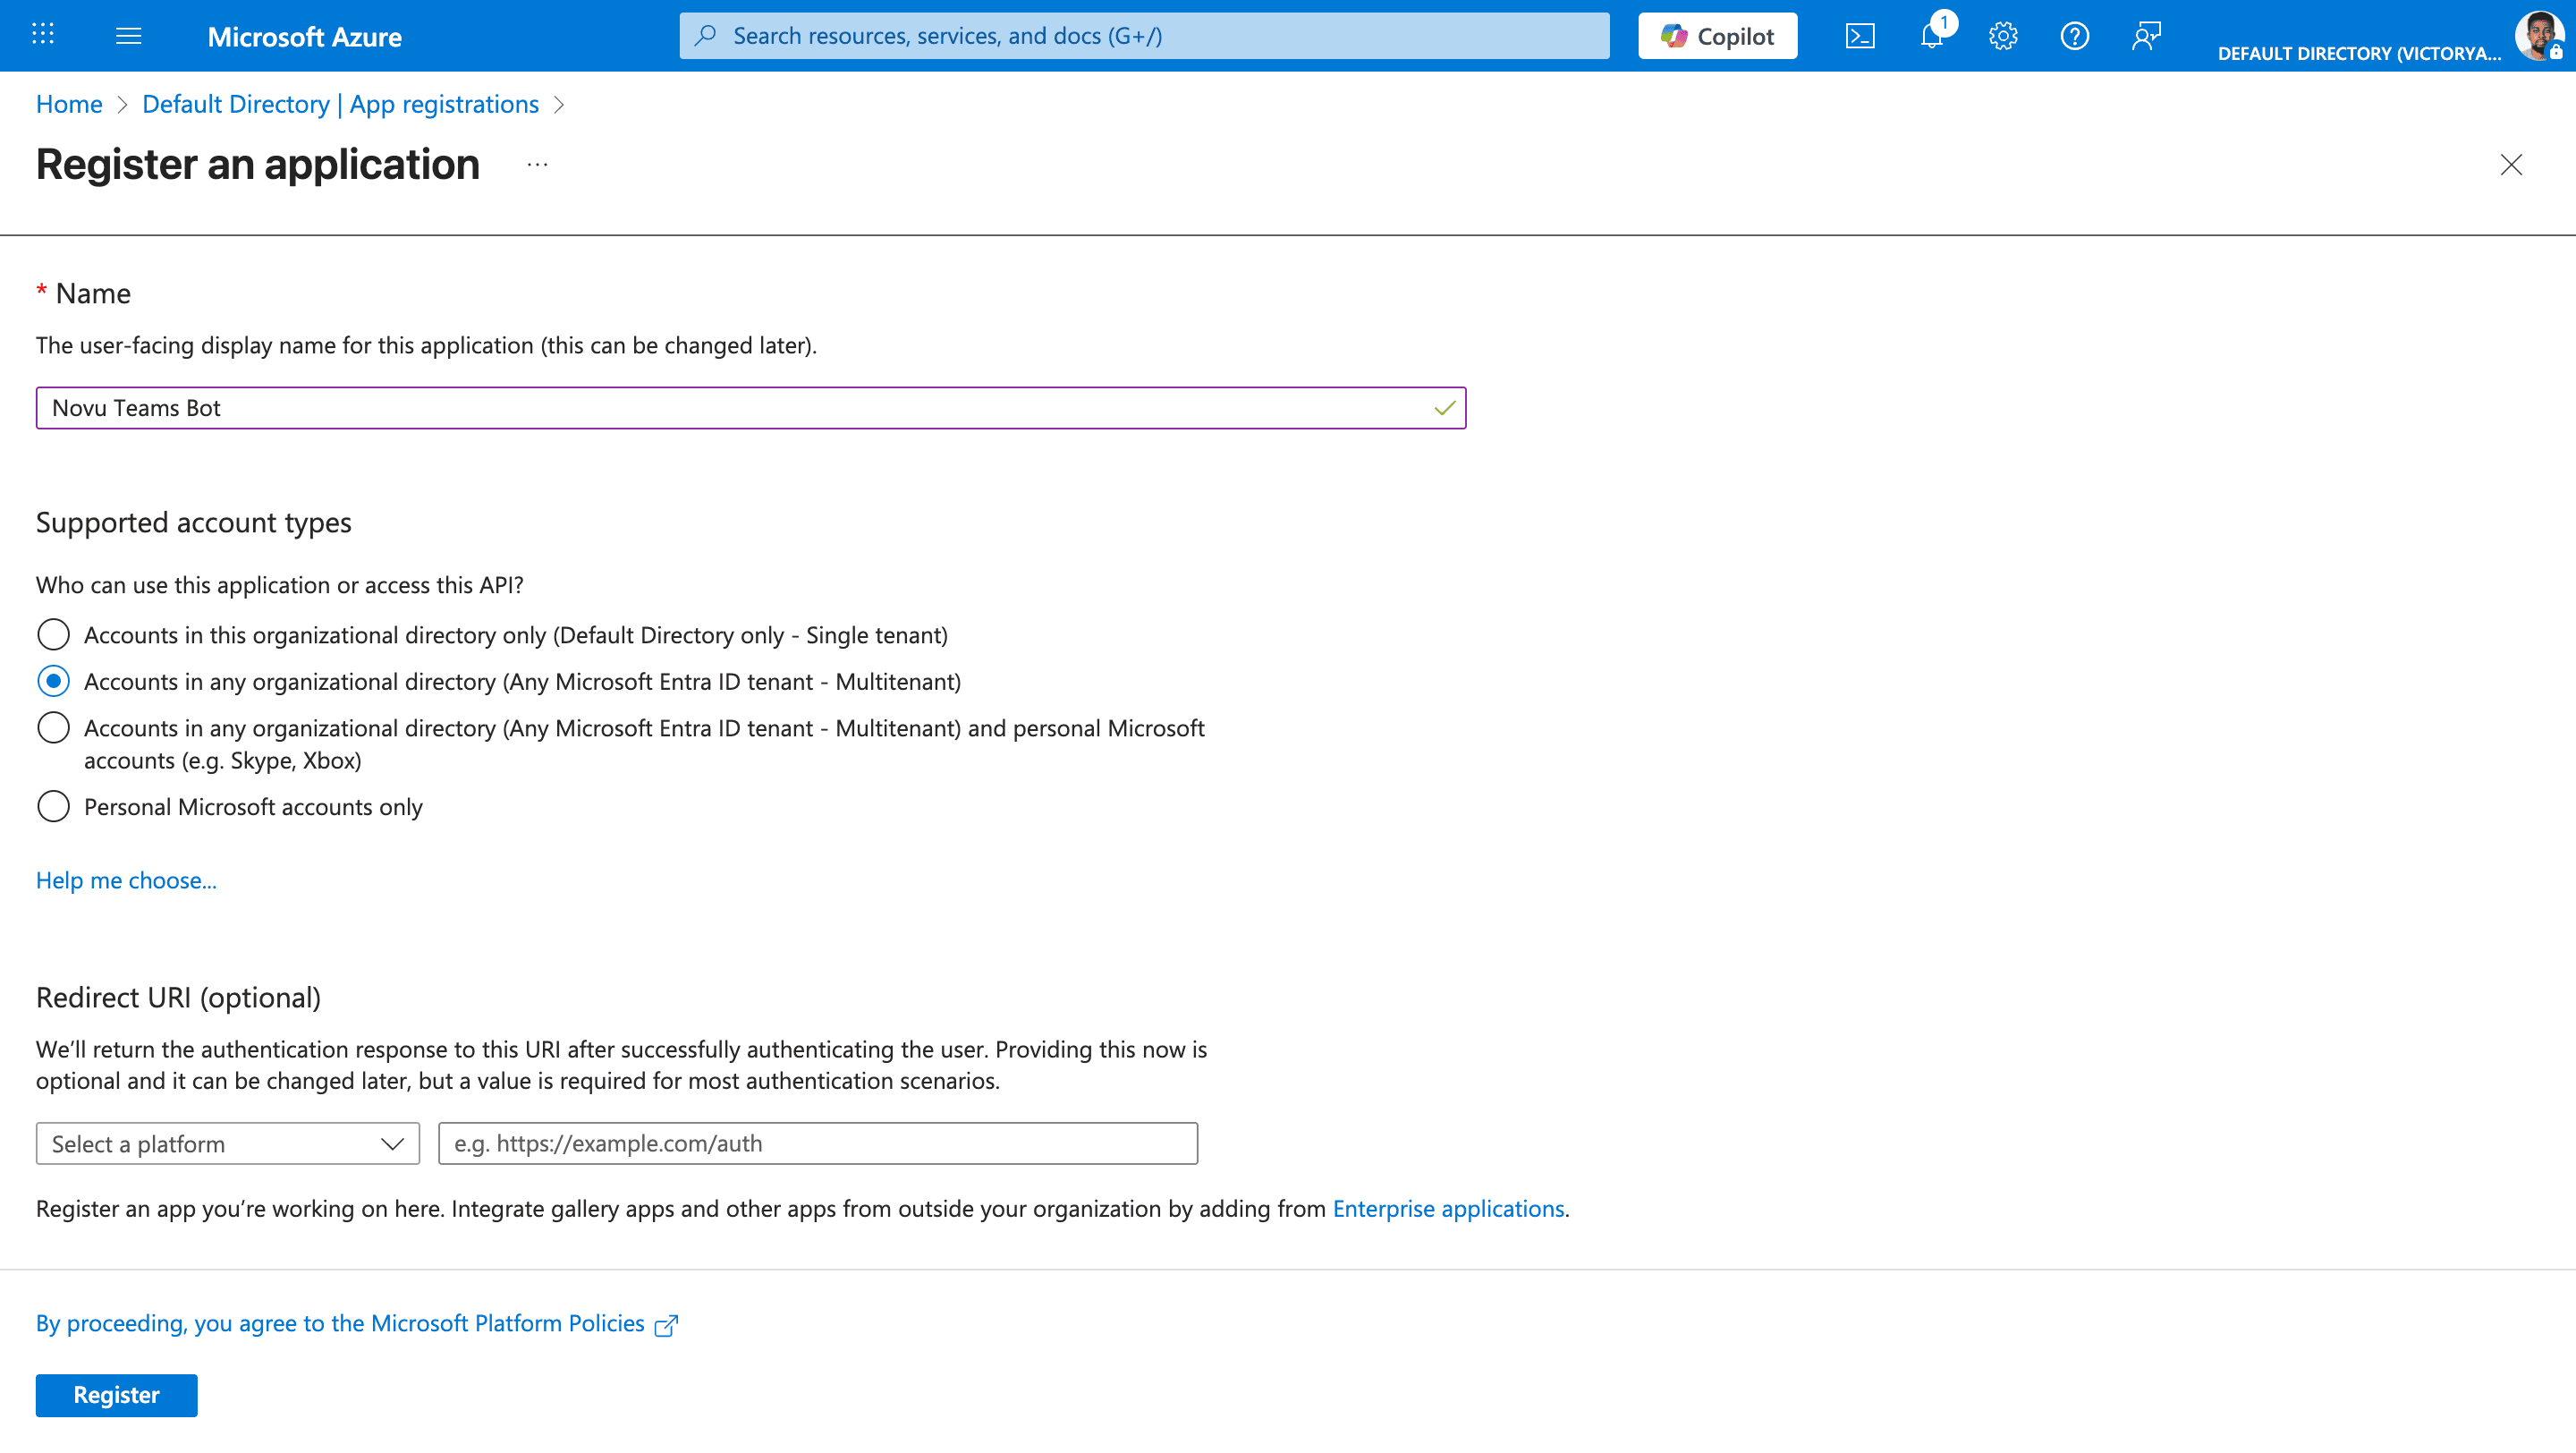
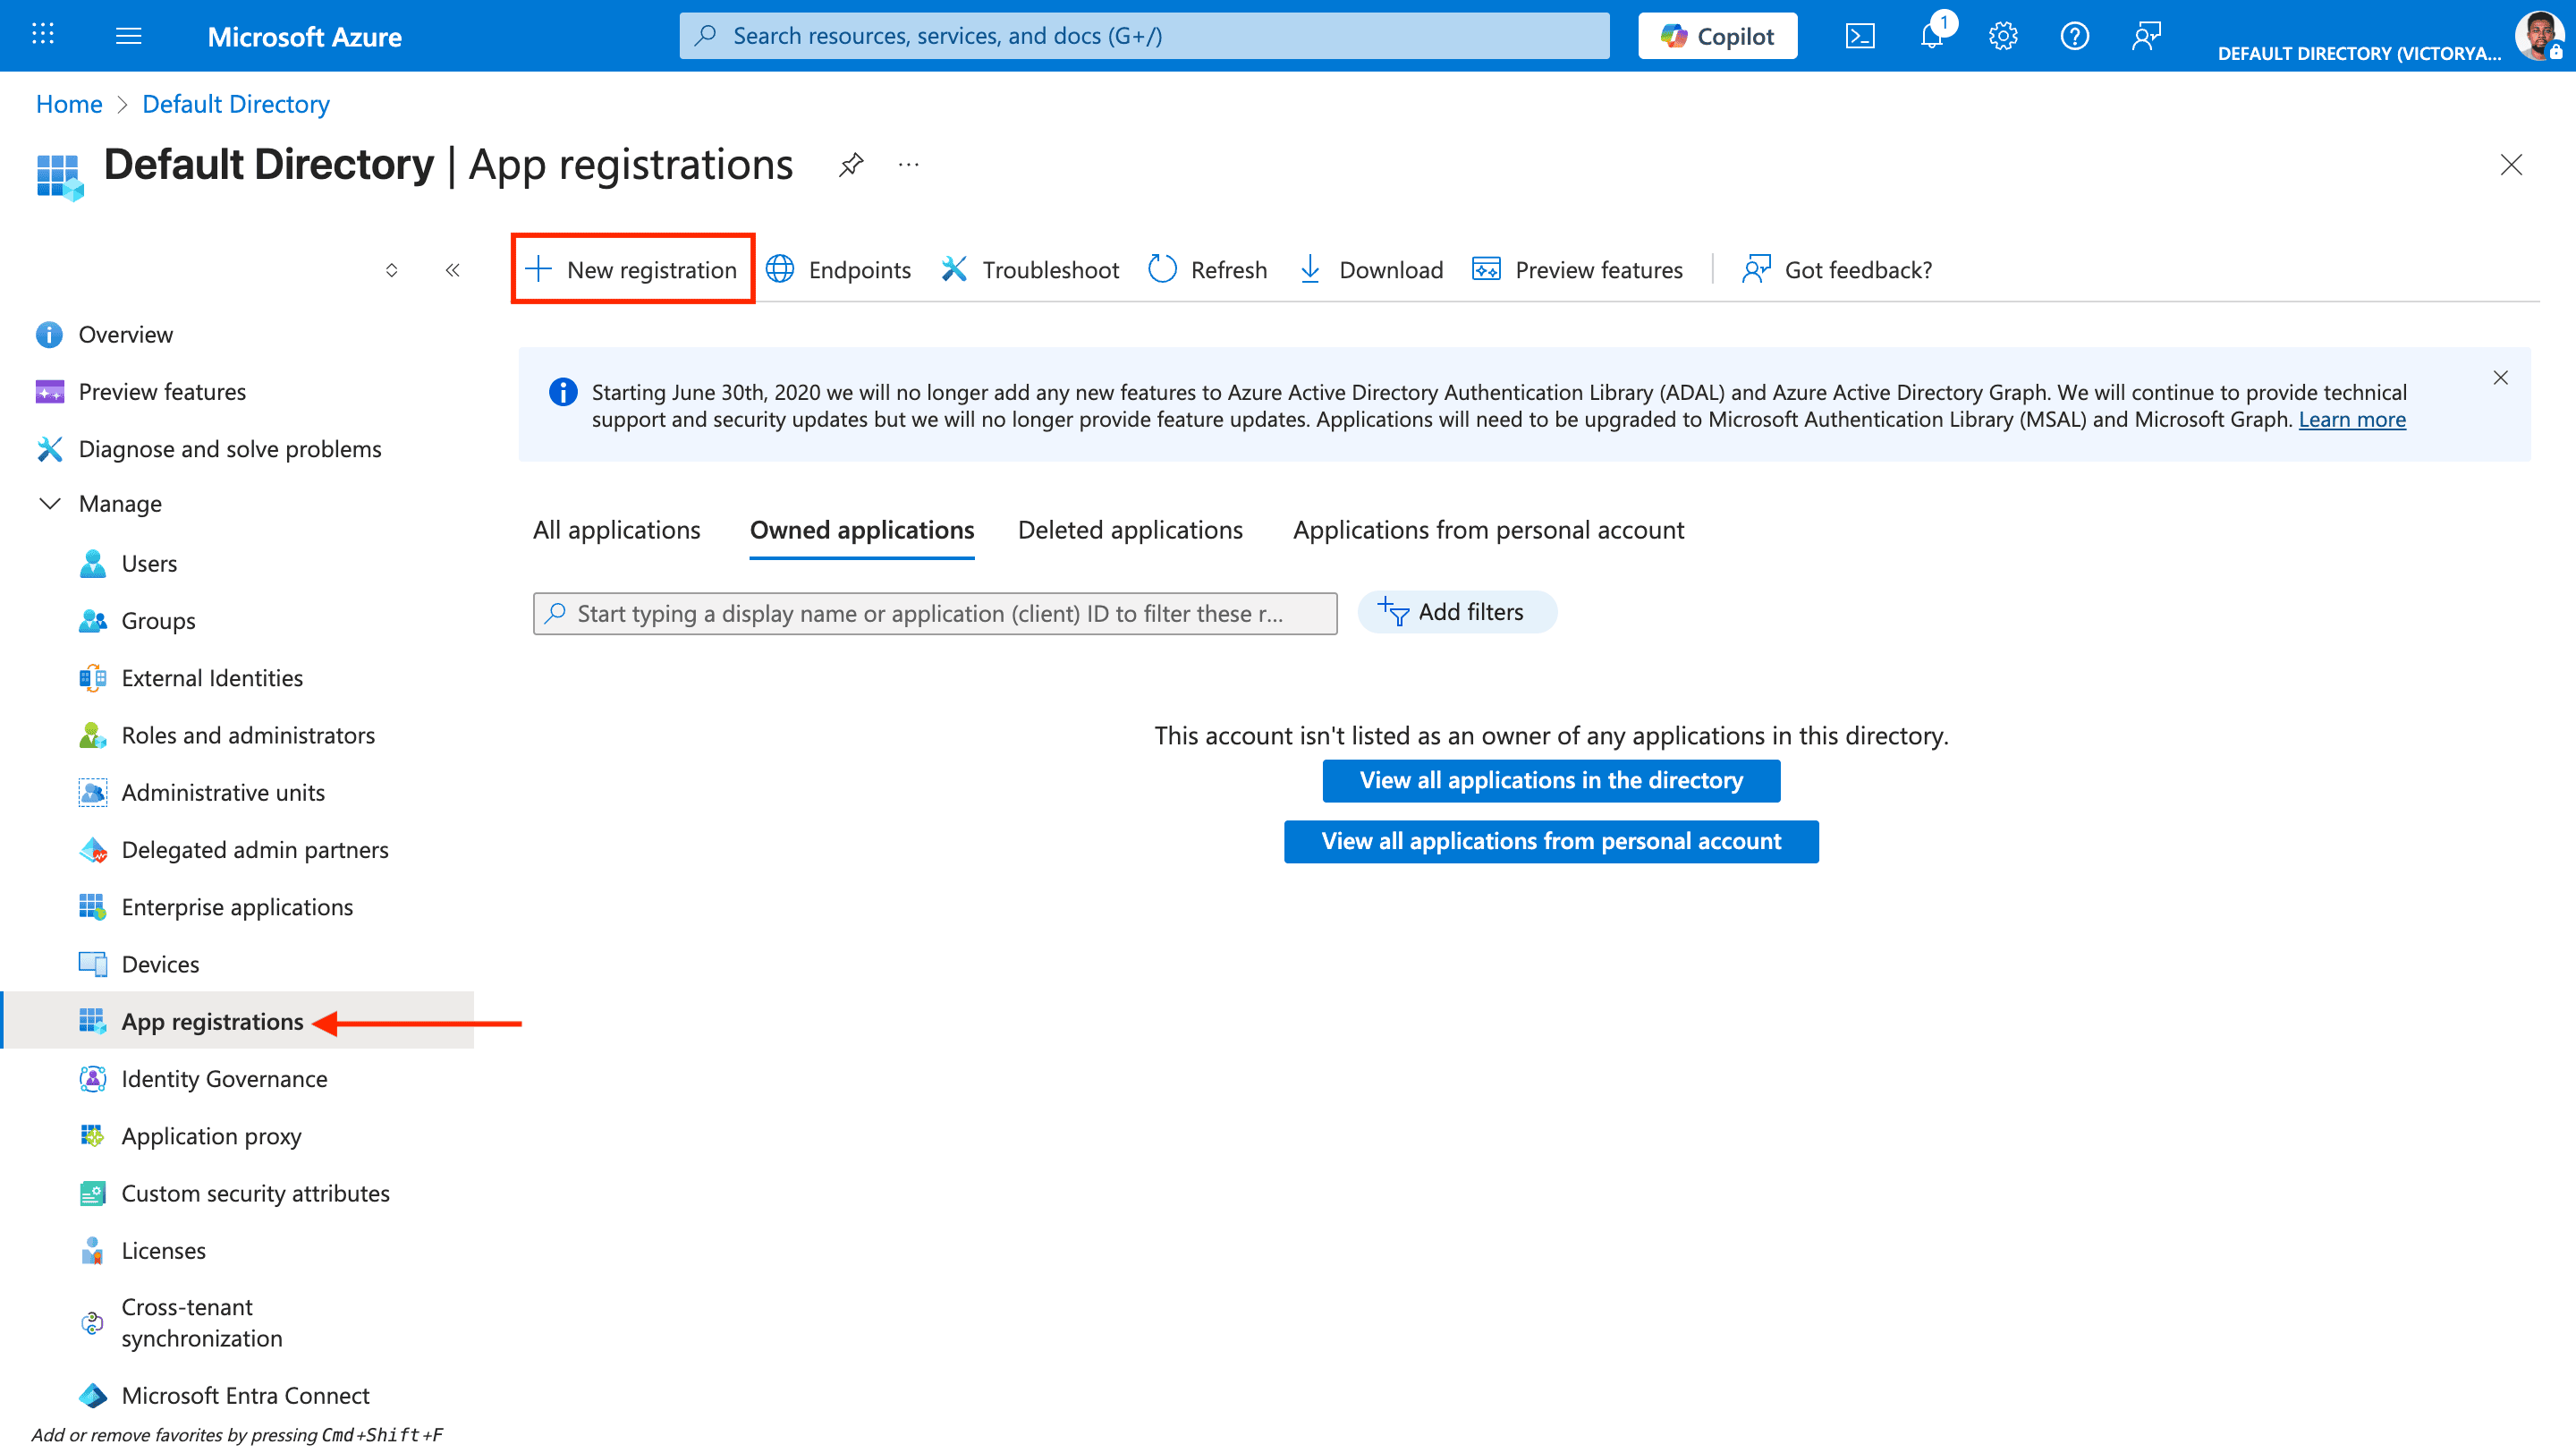 * **Name**: Enter any name of your choice.
* **Supported account types**: Select **Accounts in any organizational directory (Any Microsoft Entra ID directory - Multitenant)**.
* **Name**: Enter any name of your choice.
* **Supported account types**: Select **Accounts in any organizational directory (Any Microsoft Entra ID directory - Multitenant)**.
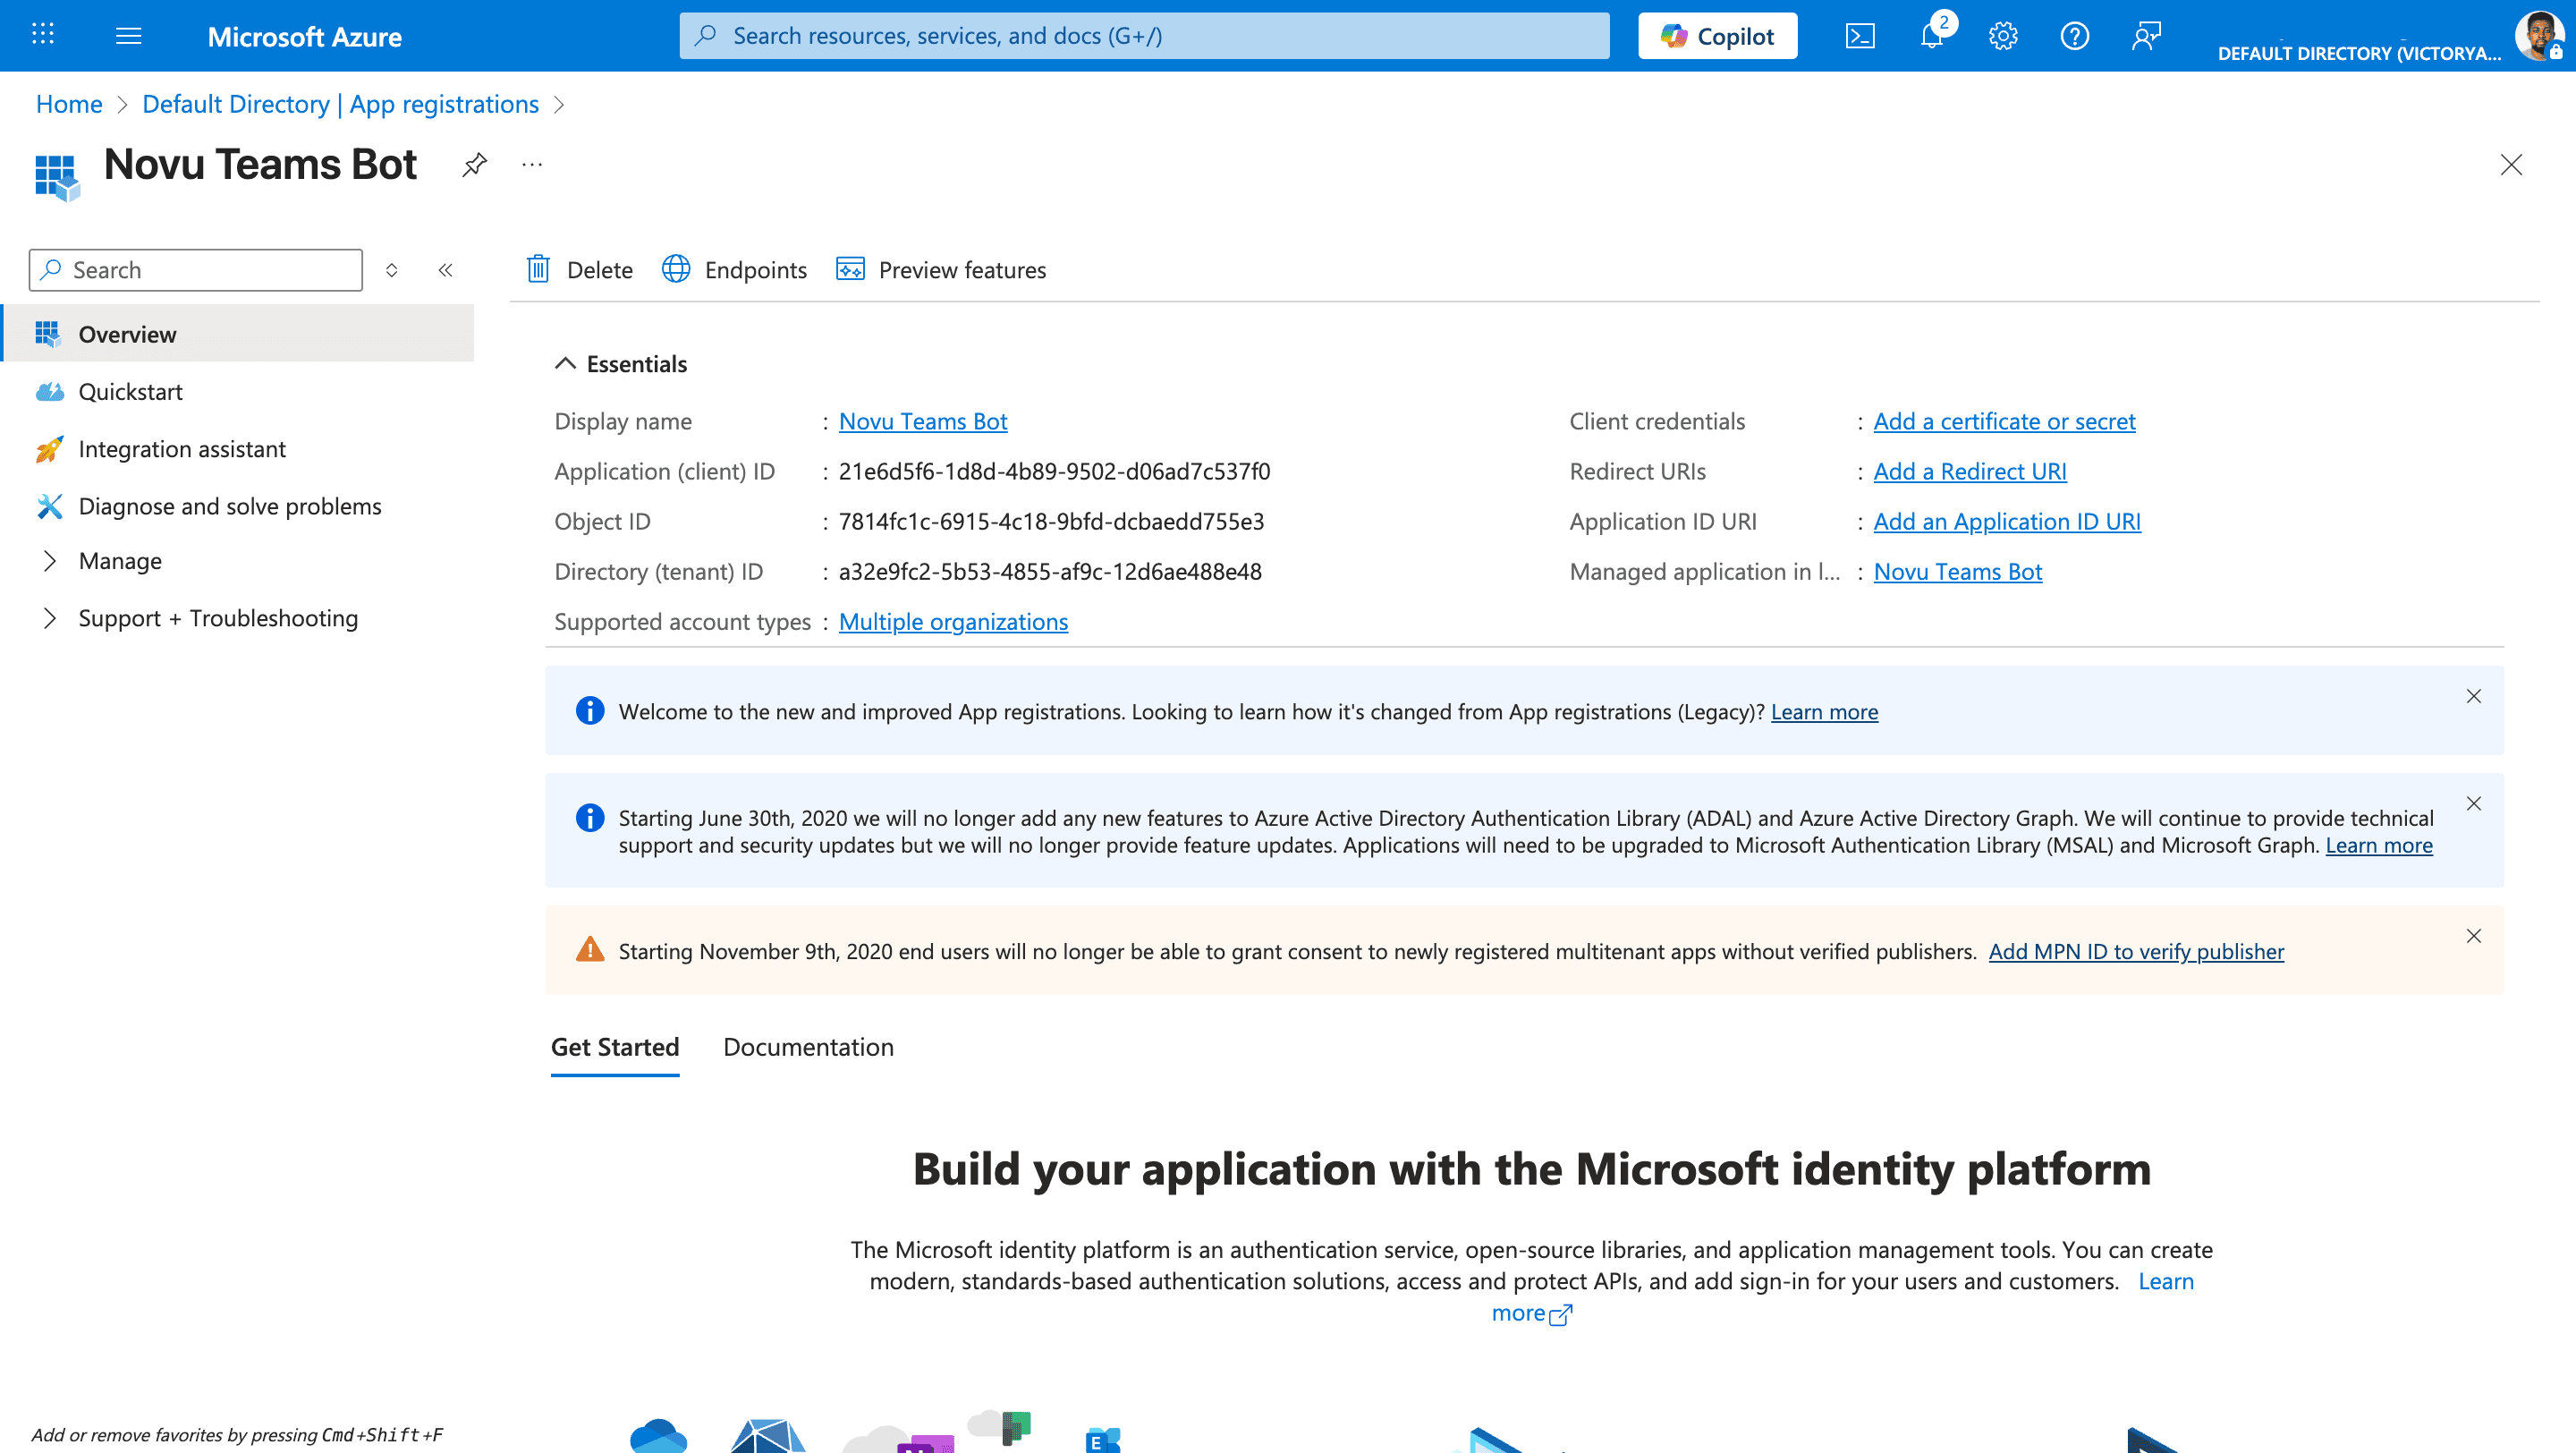 After creating the app, note the Application (client) ID and Directory (tenant) ID. You need these values to configure Microsoft Teams in Novu.
### Configure client secret
On your new app's overview page, click **Certificates & secrets**.
After creating the app, note the Application (client) ID and Directory (tenant) ID. You need these values to configure Microsoft Teams in Novu.
### Configure client secret
On your new app's overview page, click **Certificates & secrets**.
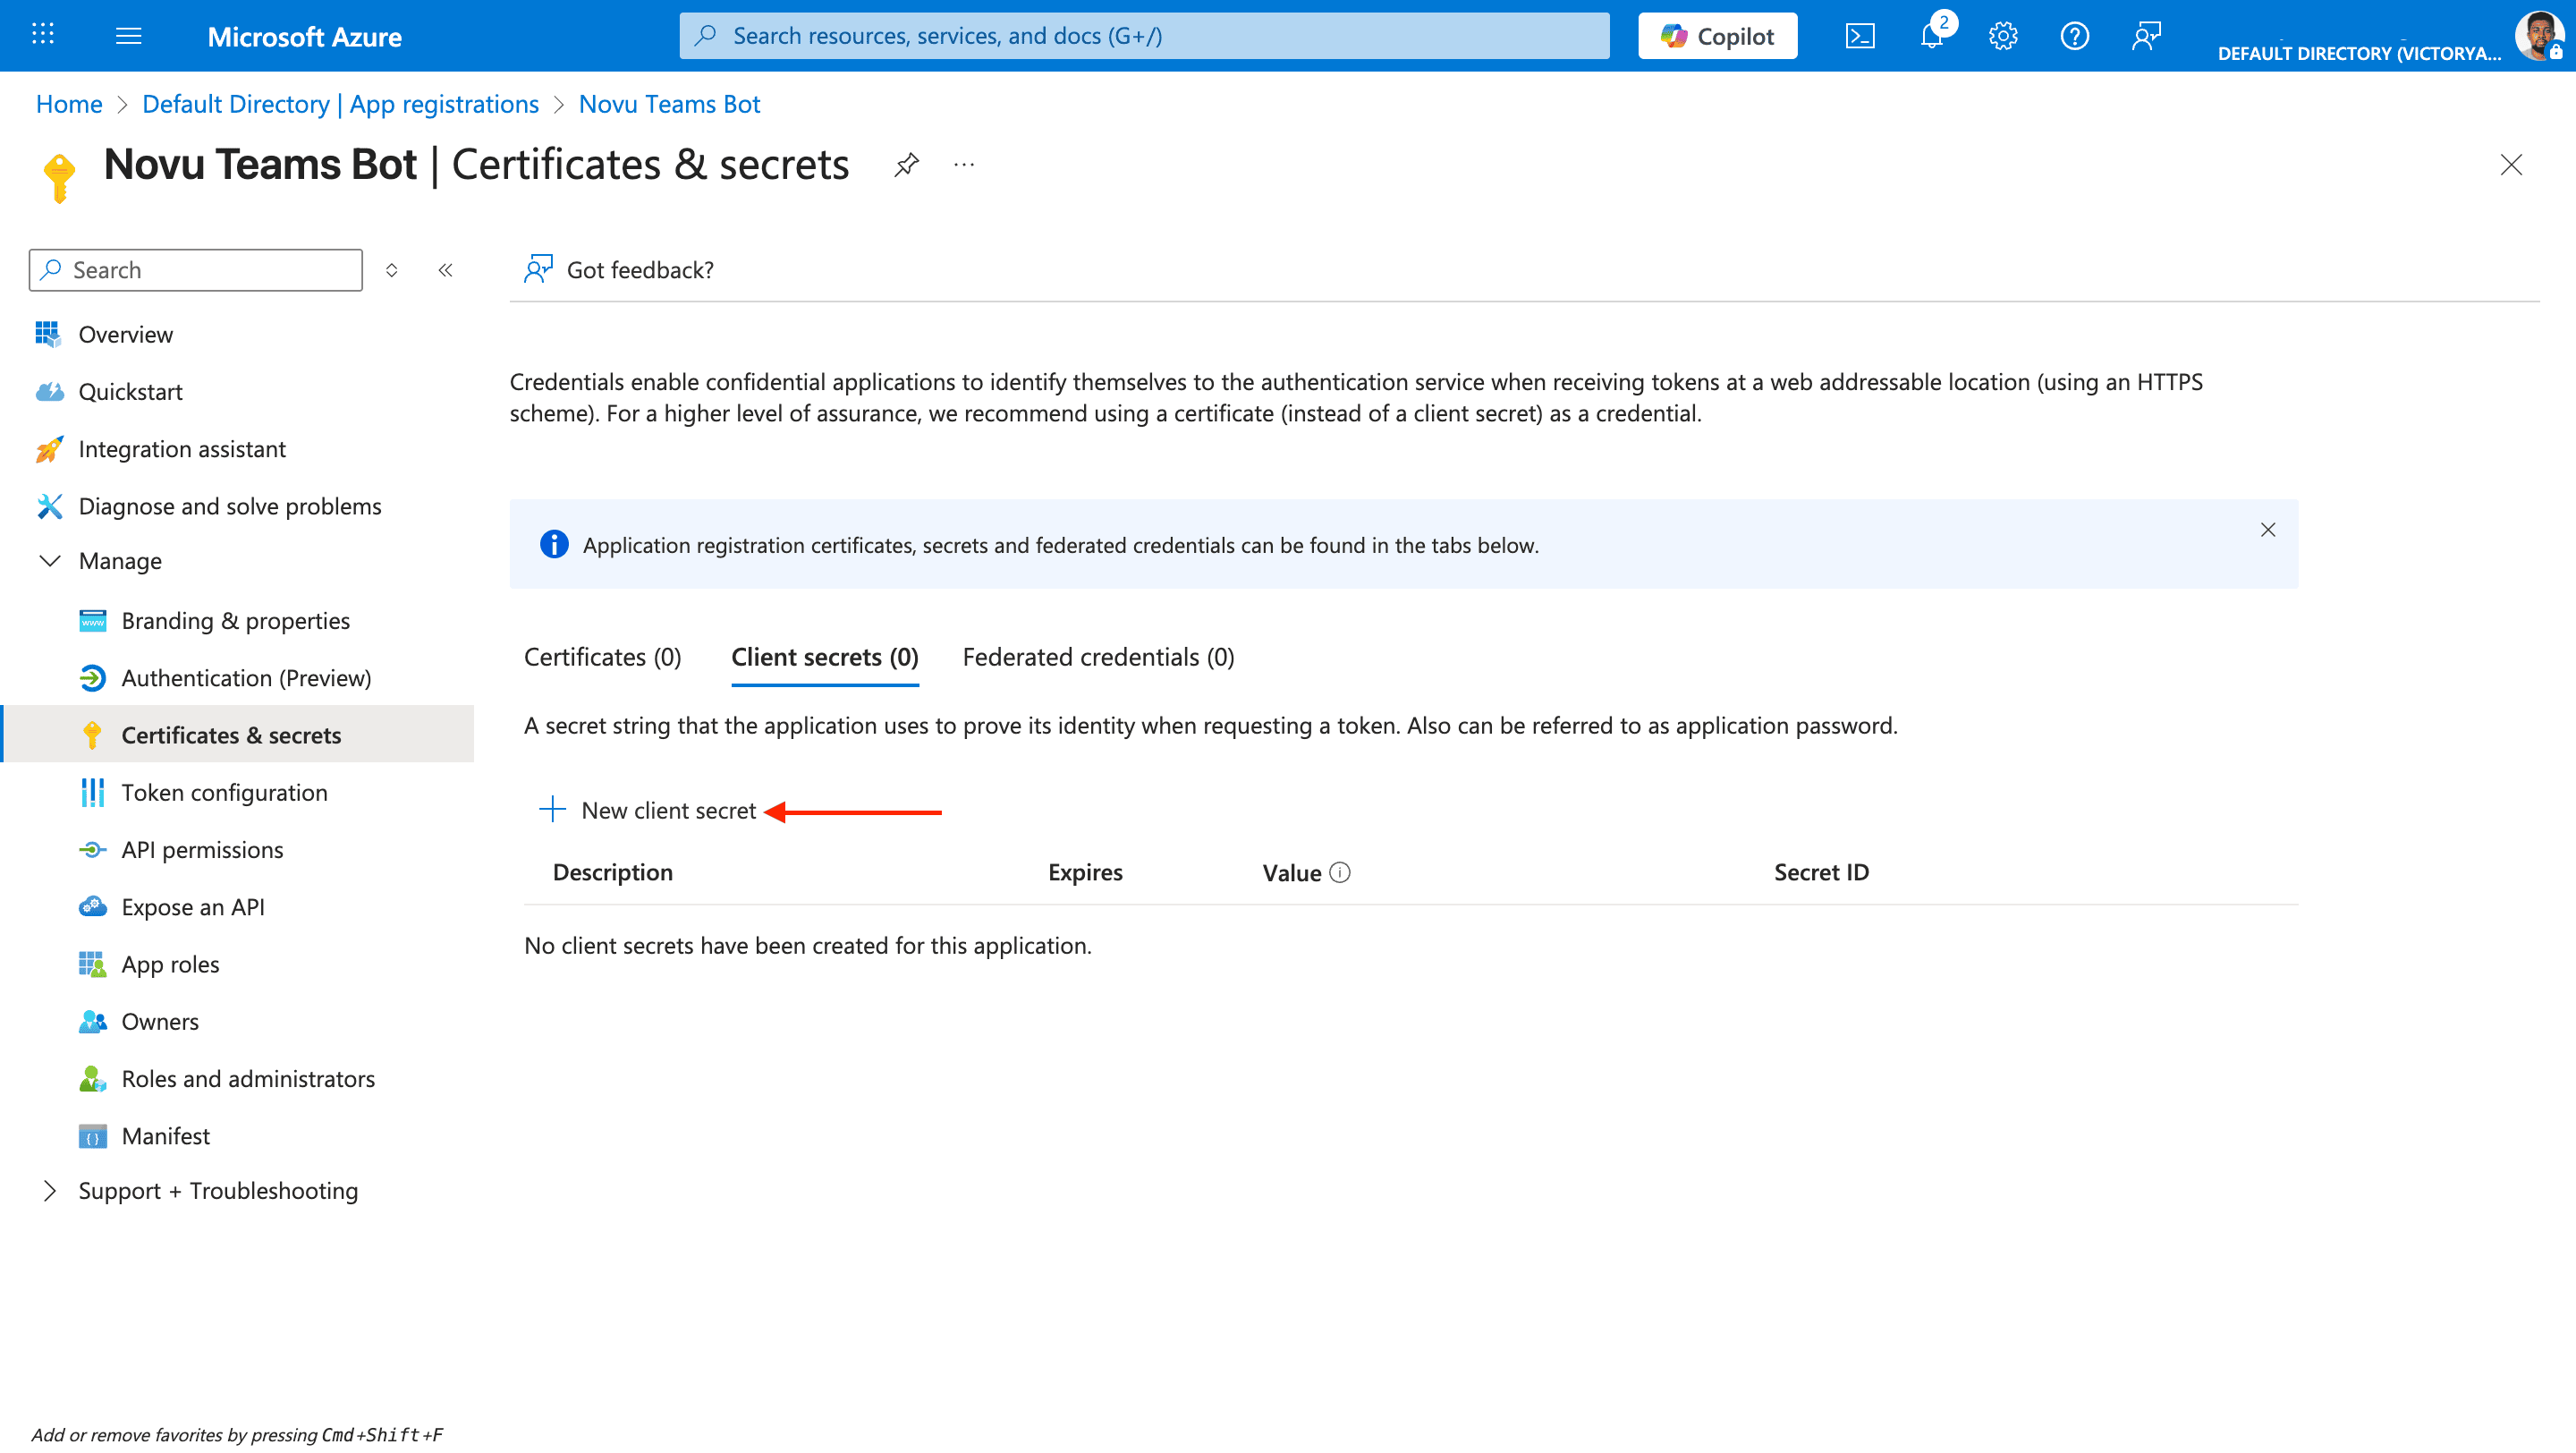 Summarize what this app registration is used for.
Choose an expiration that aligns with your credential rotation policy.
Summarize what this app registration is used for.
Choose an expiration that aligns with your credential rotation policy.
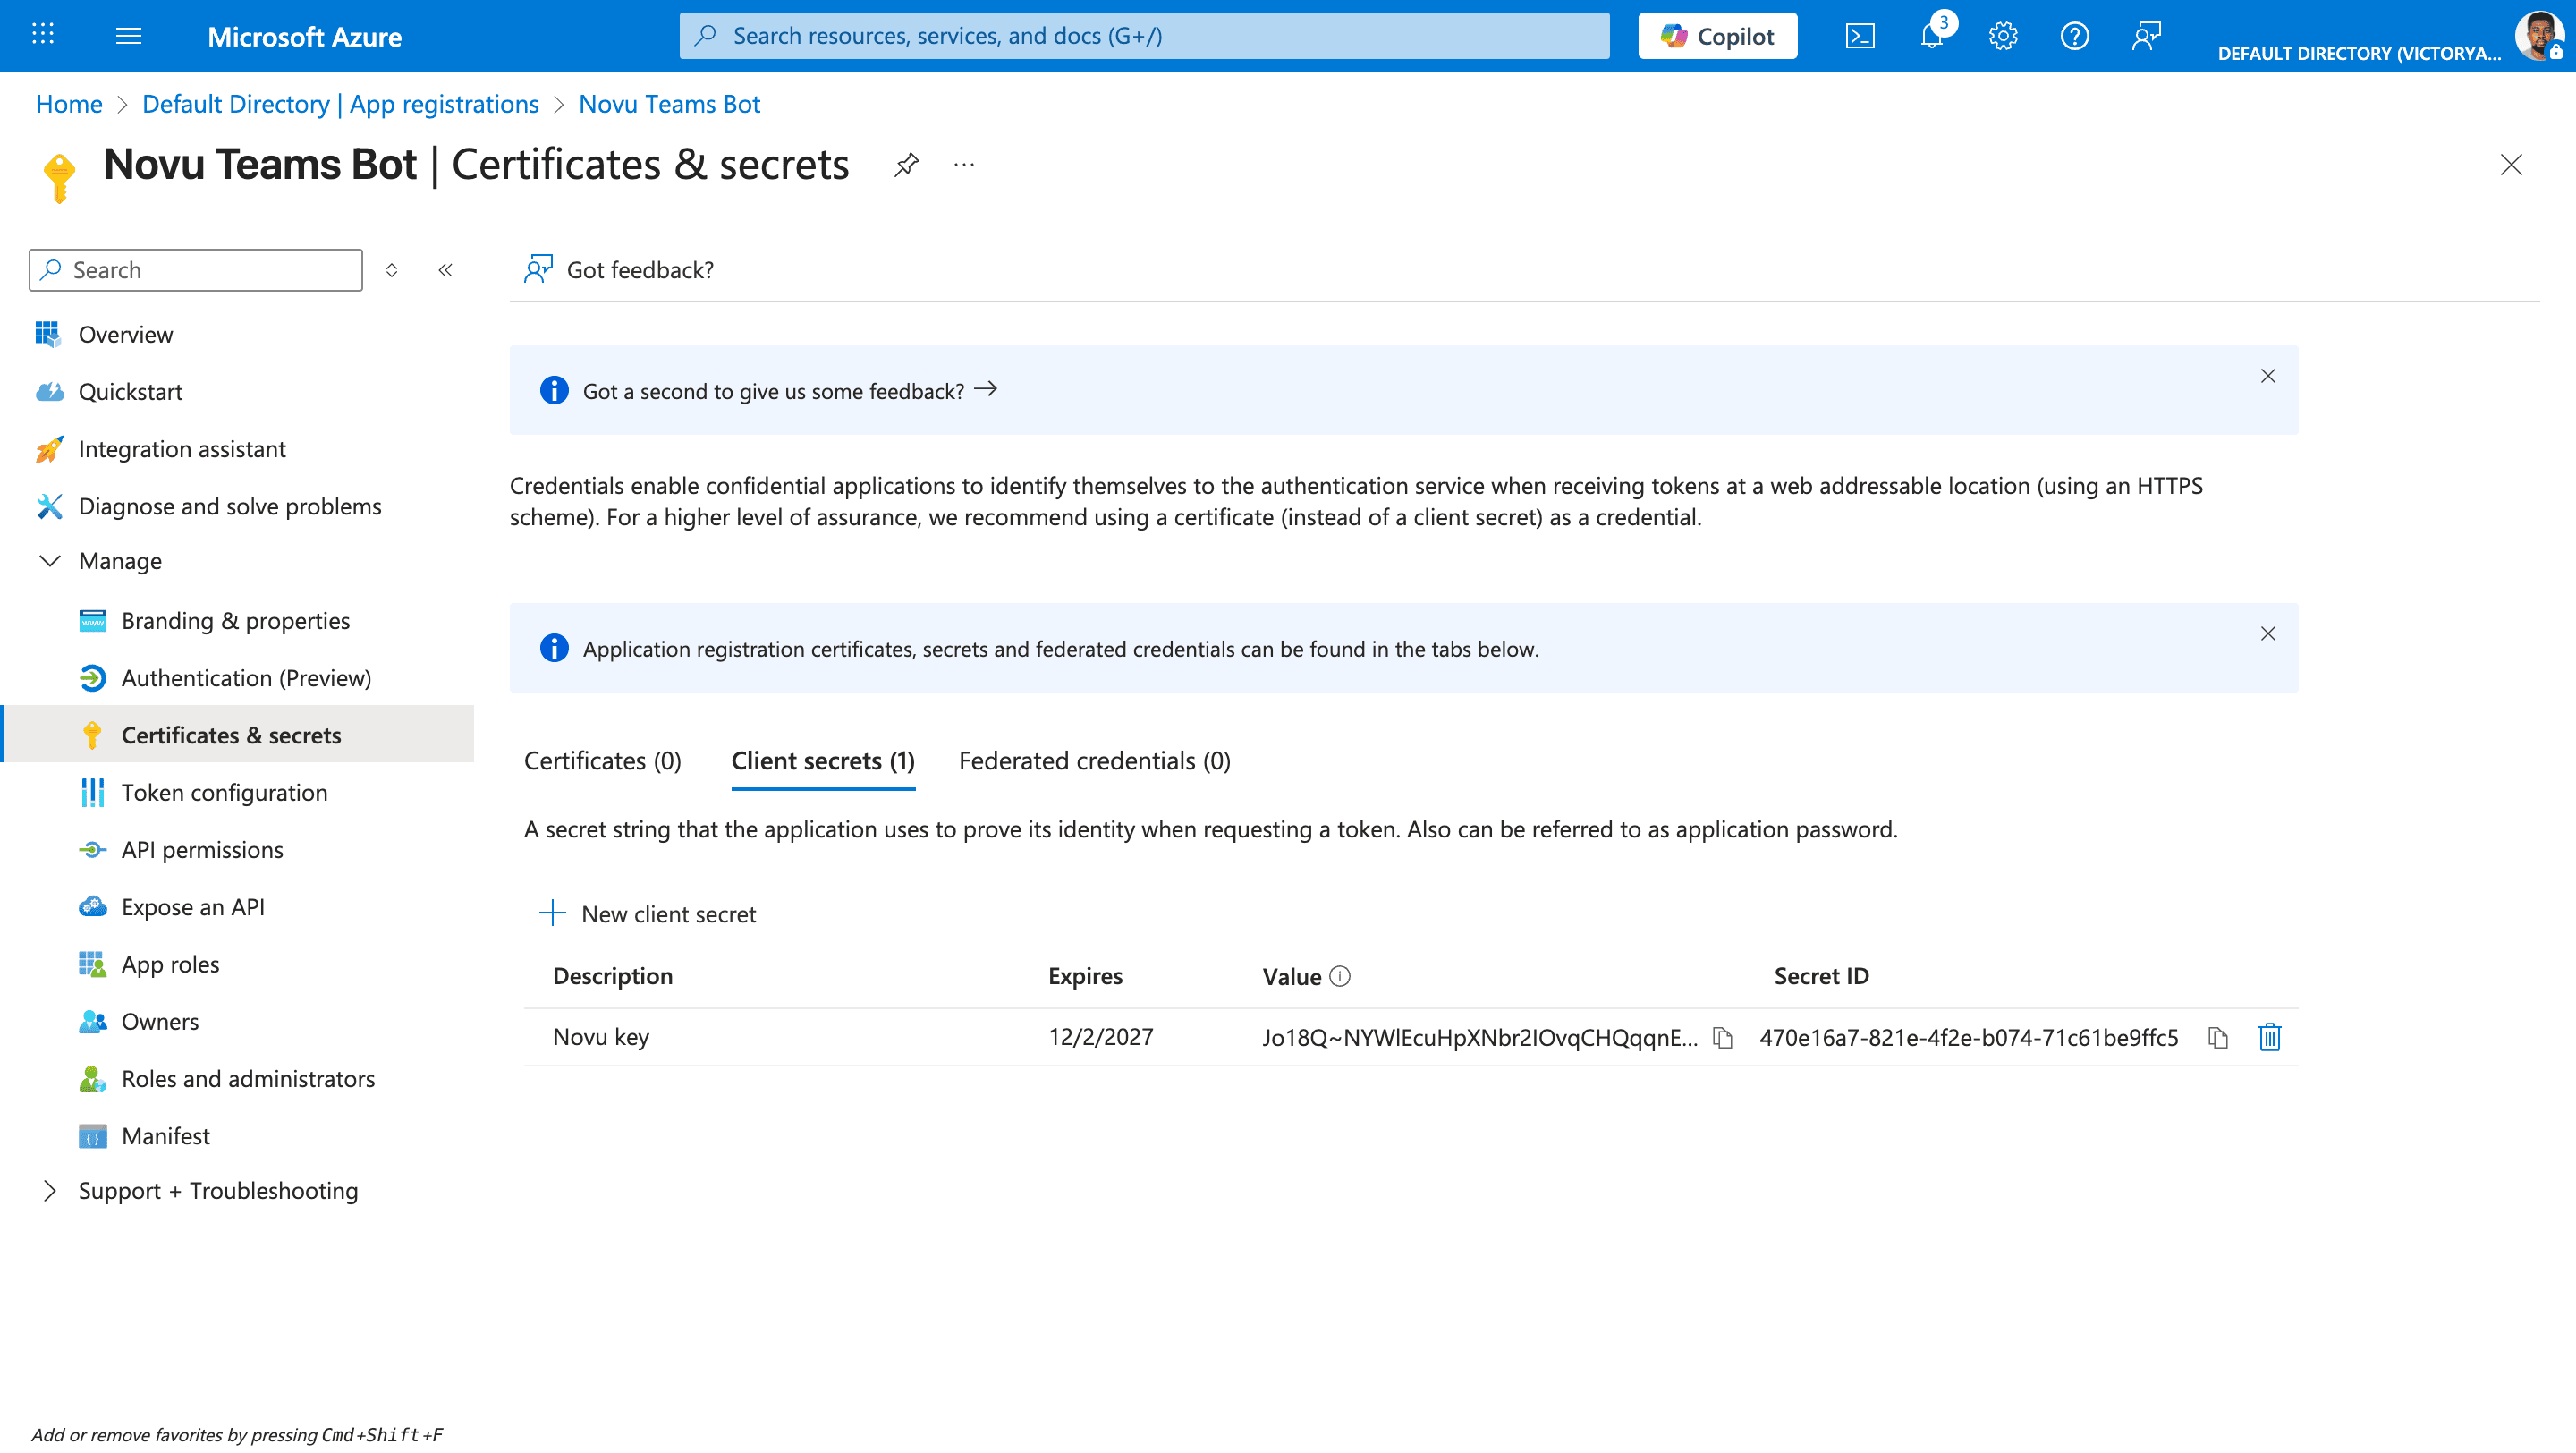 Copy the value. This value becomes your `BOT_APP_SECRET`, and you’ll paste it into Novu. You can view the secret only once right after you create it, so save it before you leave the page.
### Add Novu’s redirect URI
When a tenant administrator accepts admin consent, Microsoft redirects the browser to Novu at this URL. Register it in **Azure** on your app registration during setup - before any organization connects Teams.
This is not the optional **Redirect URL** on the Novu integration. That Novu field only controls where the administrator is sent in **your application** after Novu finishes processing the callback.
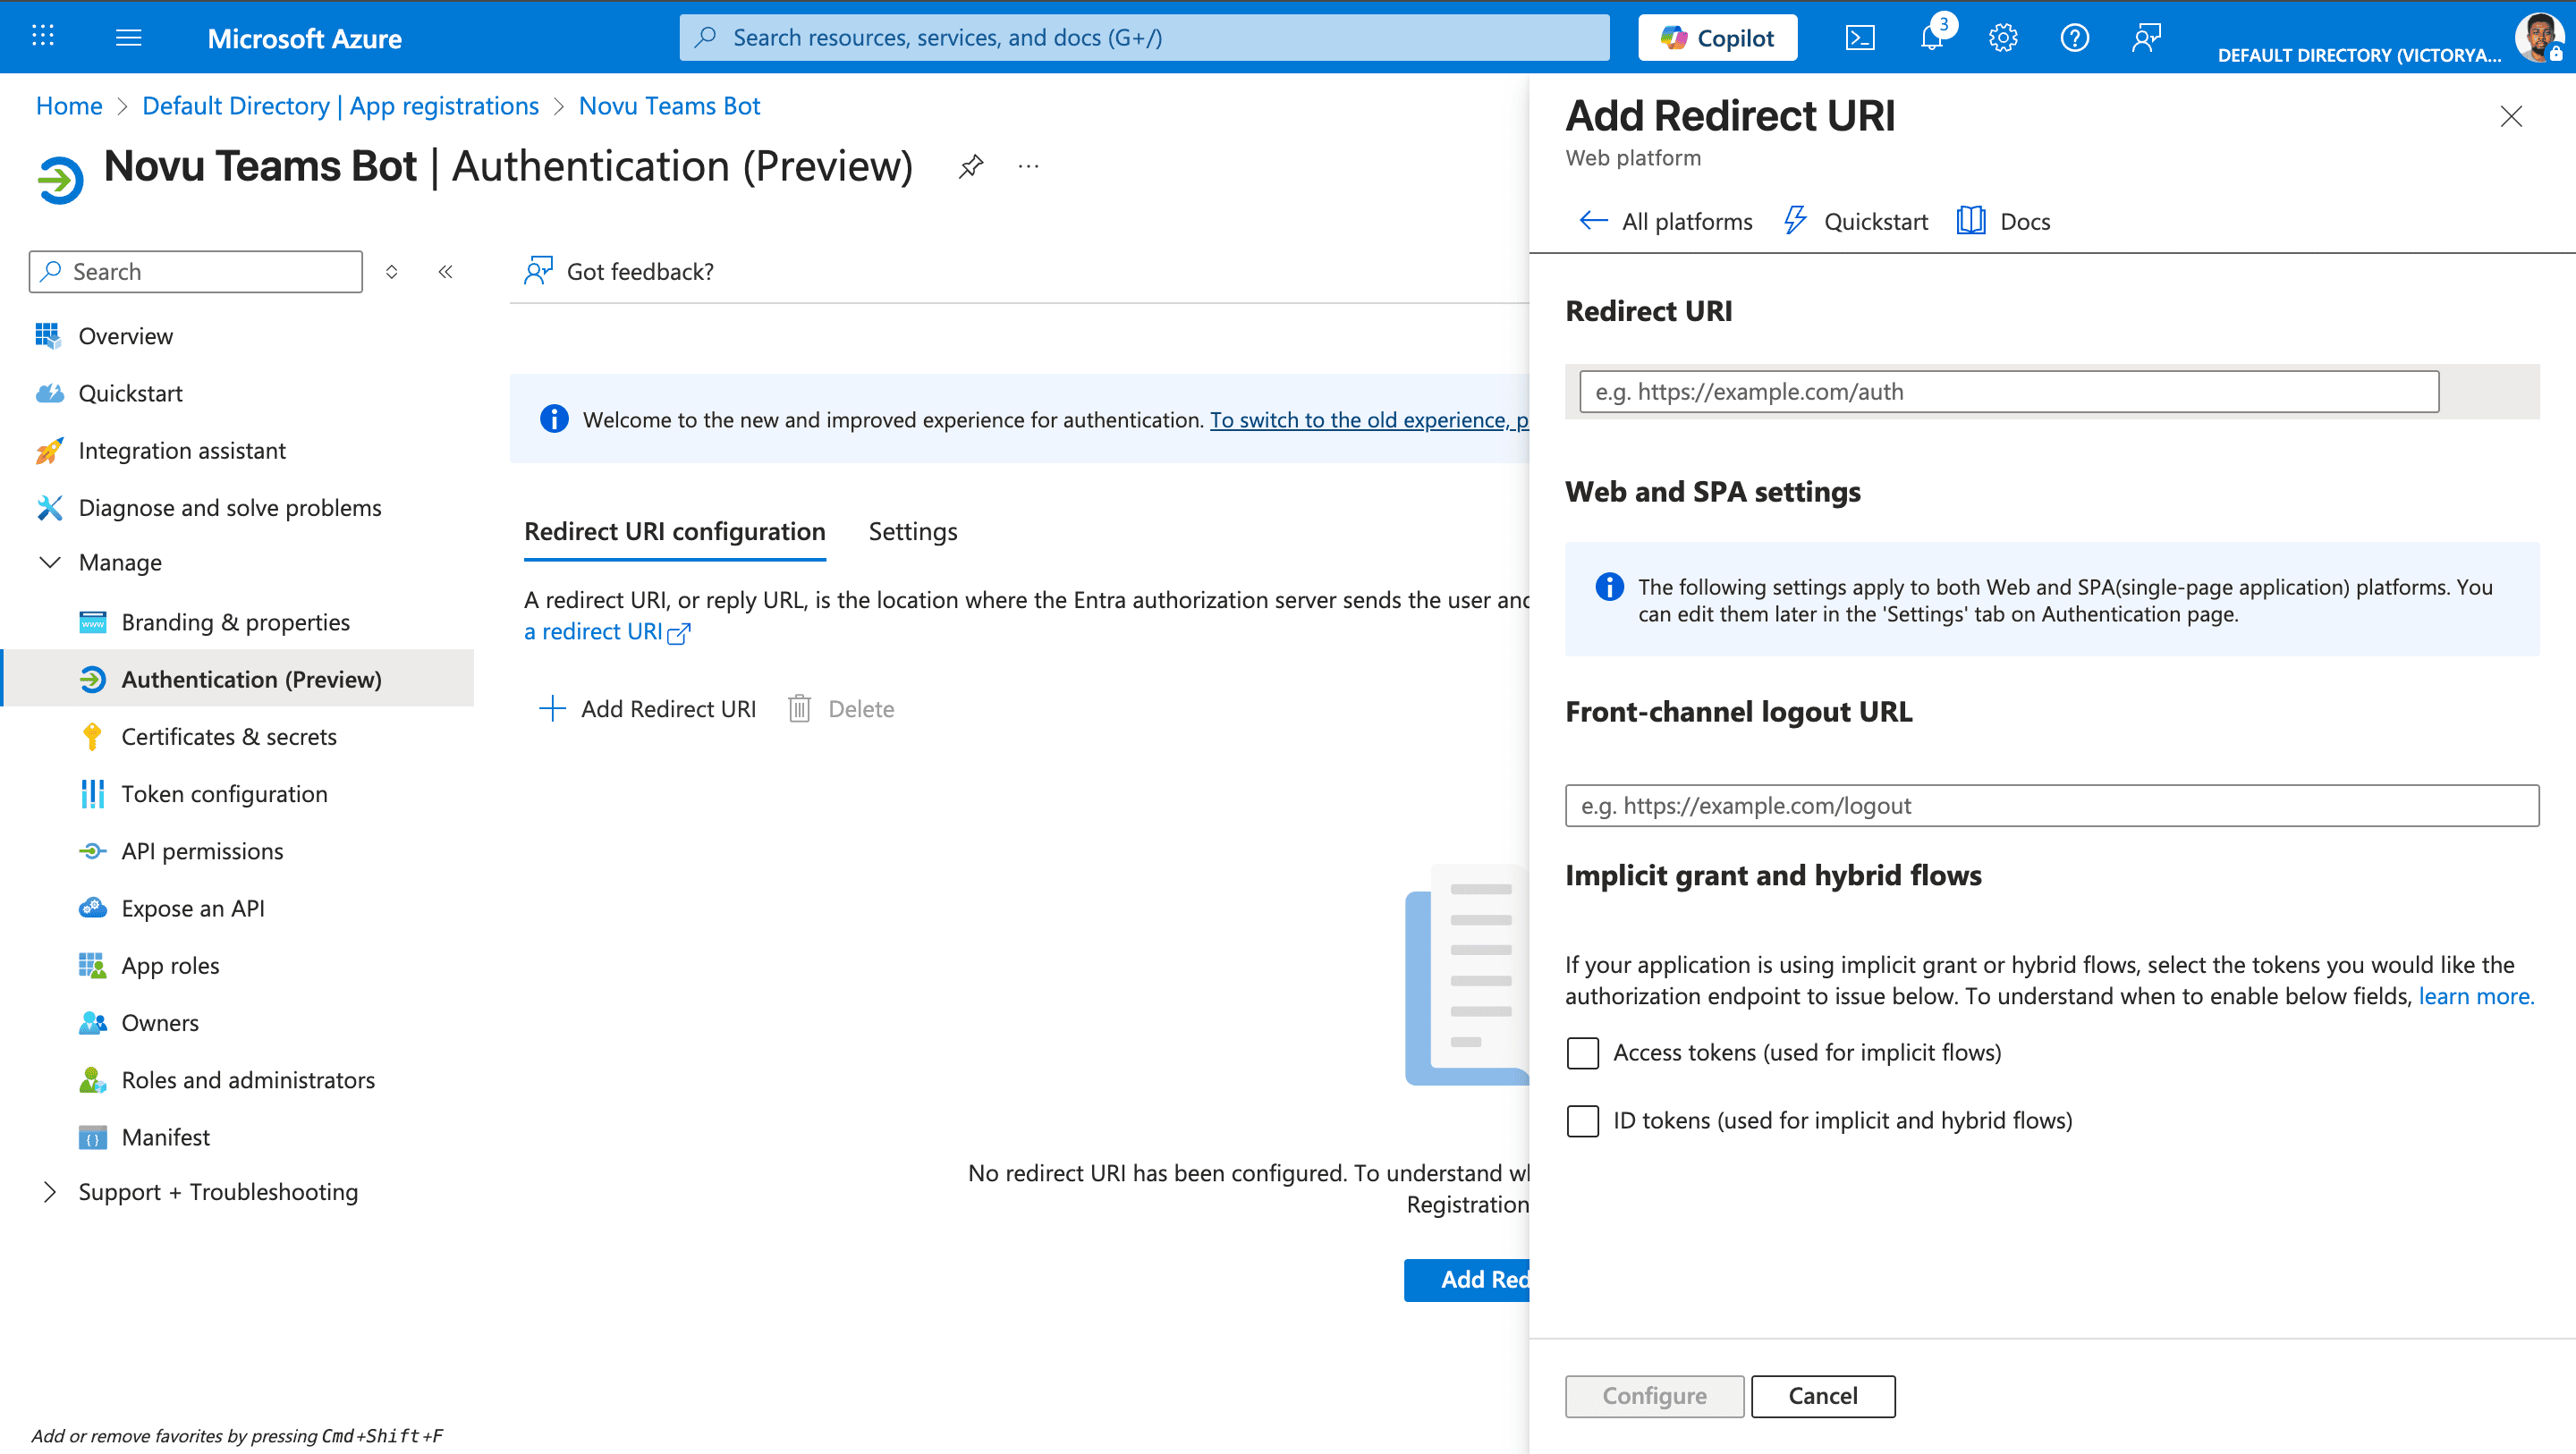
In the app registration sidebar, open **Authentication (Preview)**.
Add the redirect URI shown in the Novu integration settings.
In the menu that appears, click **Web**.
In the **Redirect URI** field, set the redirect URI to the Novu OAuth callback URL:
* US region
```bash theme={null}
https://api.novu.co/v1/integrations/chat/oauth/callback
```
* EU region
```bash theme={null}
https://eu.api.novu.co/v1/integrations/chat/oauth/callback
```
Copy the value. This value becomes your `BOT_APP_SECRET`, and you’ll paste it into Novu. You can view the secret only once right after you create it, so save it before you leave the page.
### Add Novu’s redirect URI
When a tenant administrator accepts admin consent, Microsoft redirects the browser to Novu at this URL. Register it in **Azure** on your app registration during setup - before any organization connects Teams.
This is not the optional **Redirect URL** on the Novu integration. That Novu field only controls where the administrator is sent in **your application** after Novu finishes processing the callback.
In the app registration sidebar, open **Authentication (Preview)**.
Add the redirect URI shown in the Novu integration settings.
In the menu that appears, click **Web**.
In the **Redirect URI** field, set the redirect URI to the Novu OAuth callback URL:
* US region
```bash theme={null}
https://api.novu.co/v1/integrations/chat/oauth/callback
```
* EU region
```bash theme={null}
https://eu.api.novu.co/v1/integrations/chat/oauth/callback
```
 Complete the remaining required fields in the configuration form.
### Add Microsoft Graph app permissions
These permissions let your app list teams and channels and decide where to send messages.
In the app registration sidebar, click **API permissions**.
Search for and add the required Microsoft Graph permission.
Complete the remaining required fields in the configuration form.
### Add Microsoft Graph app permissions
These permissions let your app list teams and channels and decide where to send messages.
In the app registration sidebar, click **API permissions**.
Search for and add the required Microsoft Graph permission.
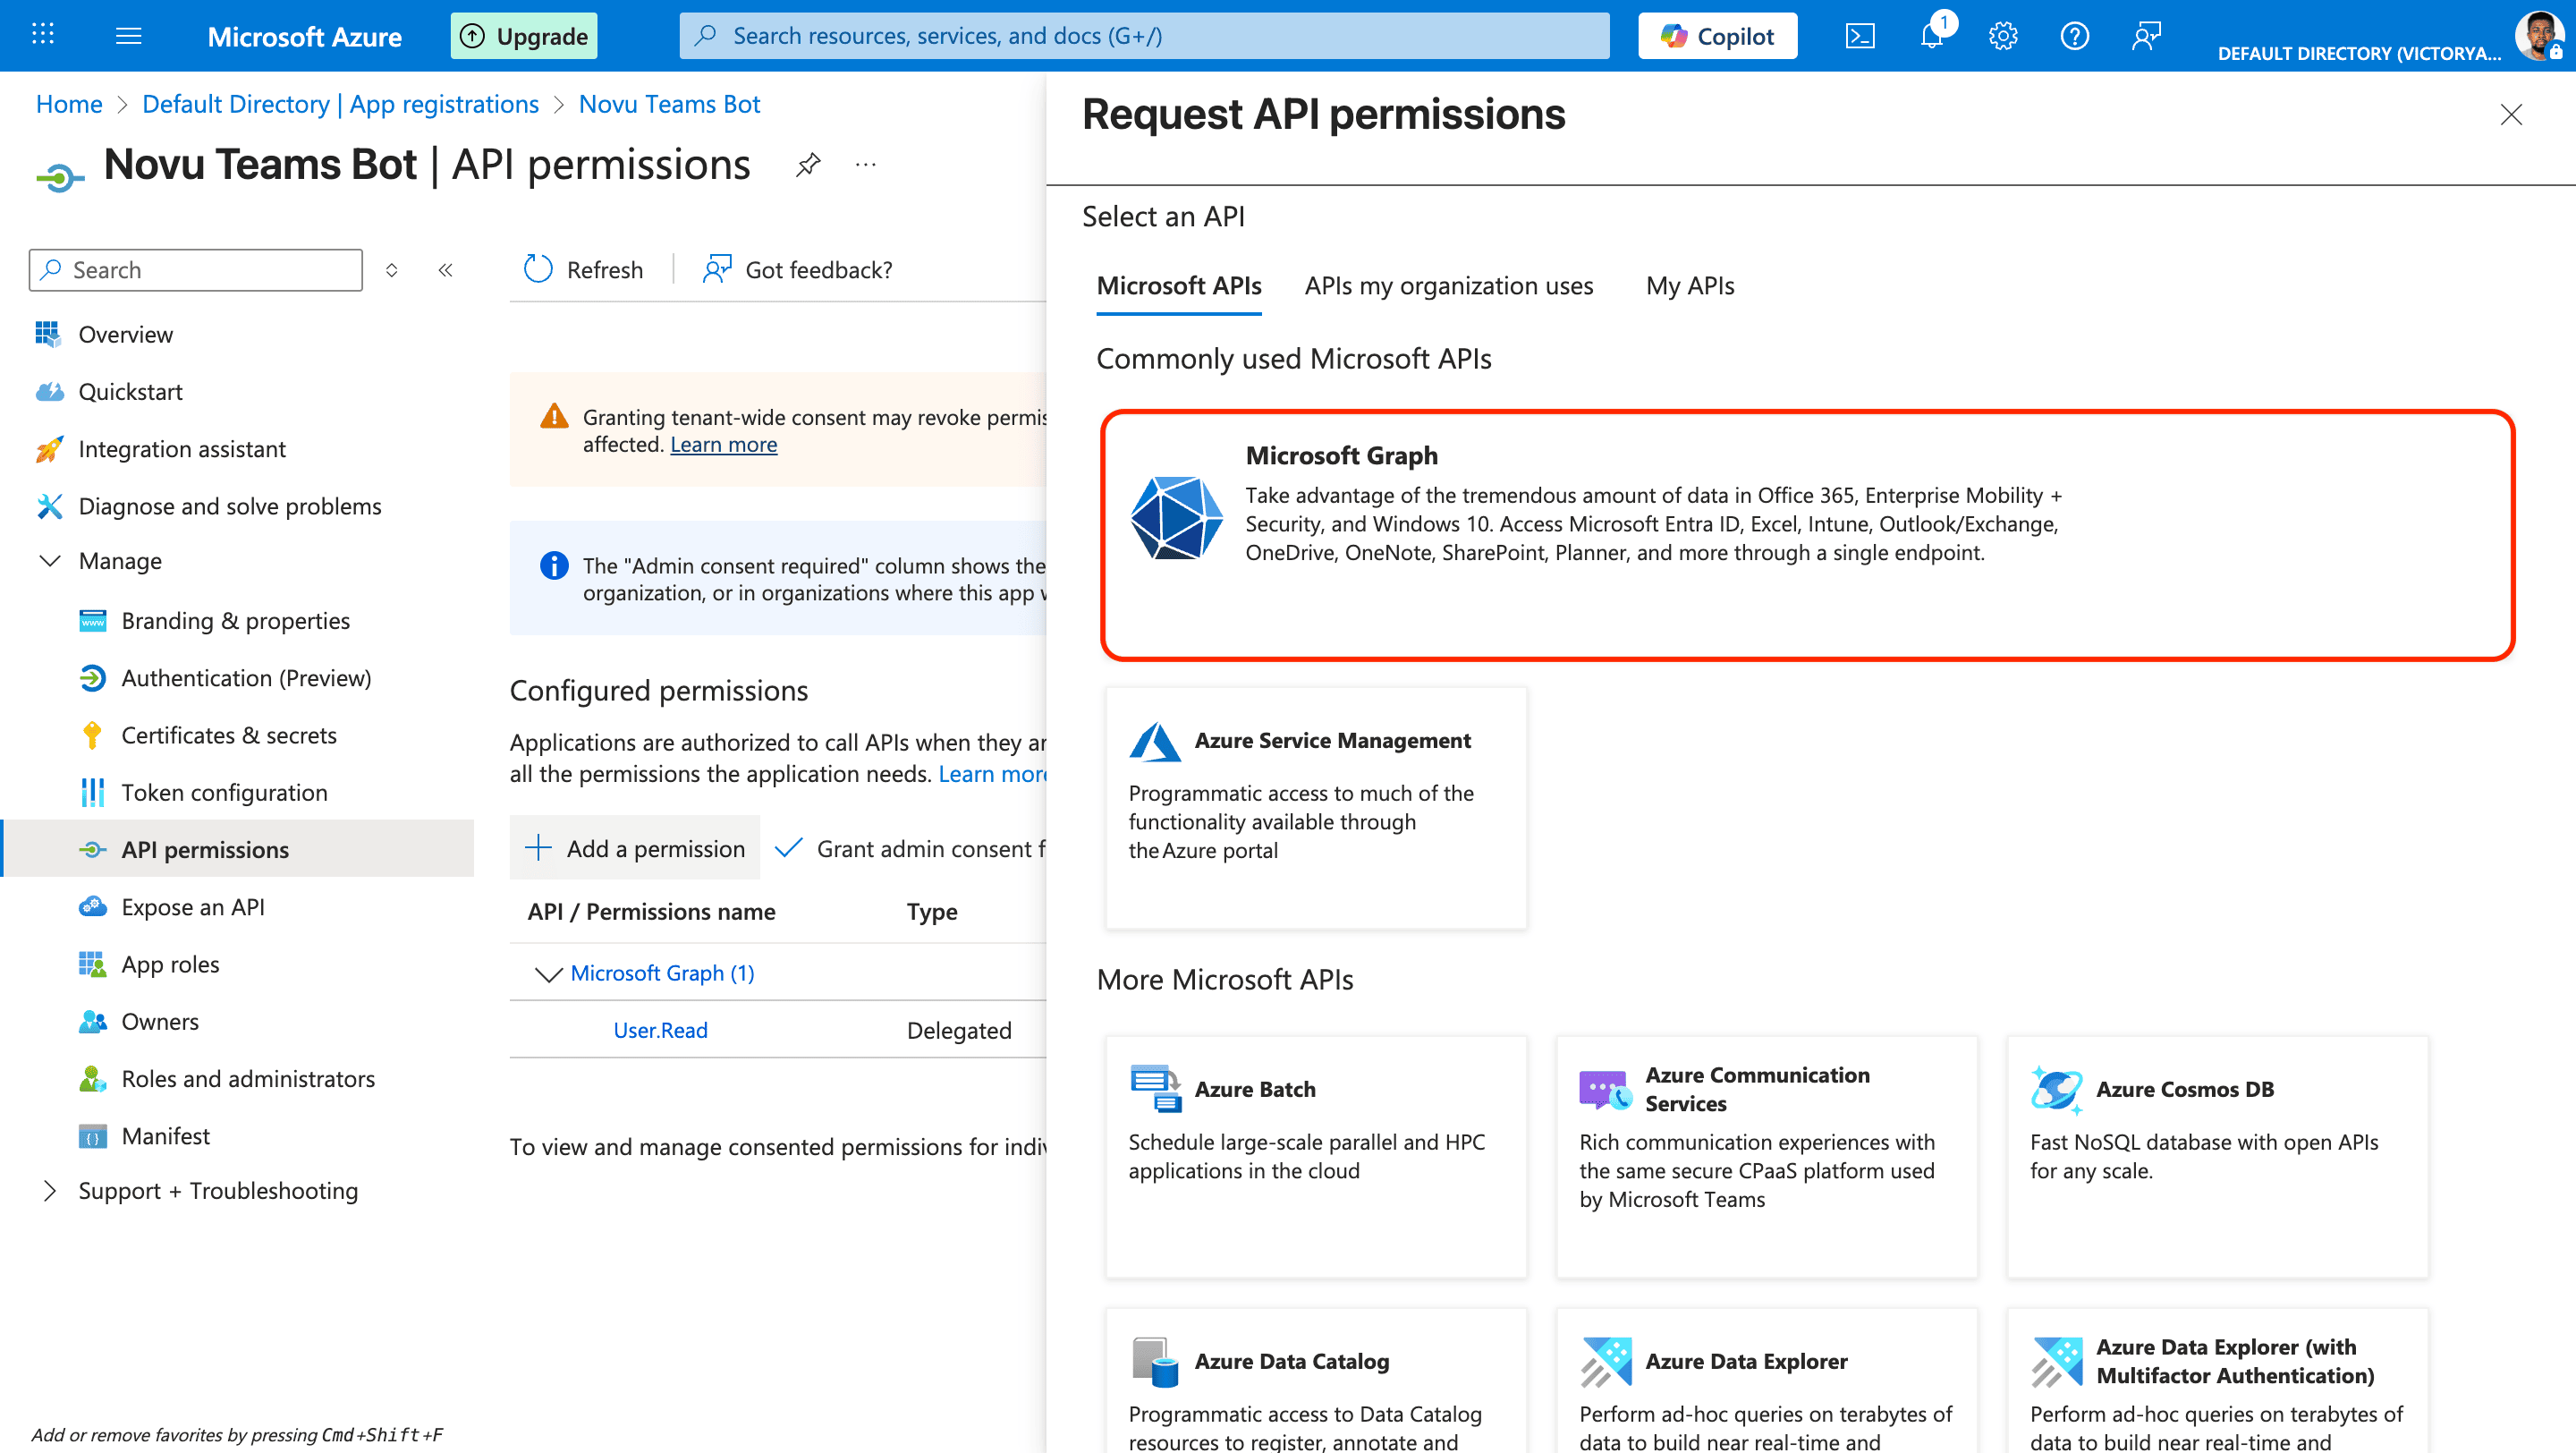 Switch from delegated to application permissions.
Search for and select the following **Application** permissions:
* `Team.ReadBasic.All` - list teams in a connected tenant
* `Channel.ReadBasic.All` - list channels in a team
* `AppCatalog.Read.All` - resolve your Teams app in the org catalog
* `TeamsAppInstallation.ReadWriteSelfForTeam.All` (optional) - programmatically install the app into a team
* `TeamsAppInstallation.ReadWriteSelfForUser.All` (required only for [OAuth DM linking](/platform/integrations/chat/ms-teams-connect#link-a-subscriber-for-direct-messages)) - install the app for a user during the link-user flow
Grant admin consent if your tenant requires it.
If you plan to link subscribers for direct messages via OAuth, also add this **Delegated** permission under **Microsoft Graph**:
* `User.Read`
Novu also requests `openid` and `profile` during the link-user OAuth flow; Azure includes these automatically for sign-in. Application permissions (above) cover tenant connect and channel messaging. Delegated `User.Read` is only needed for the separate link-user flow.
On the **API permissions** page, click **Grant admin consent for \[your tenant]** and confirm. This applies the application permissions in the tenant where you registered the app. Each organization that connects Teams later grants consent separately through the Novu OAuth flow.
### Create an Azure Bot resource
Now you register your bot with the Azure AI Bot Service and link it to the app registration that you just created.
In the Azure portal menu, click **Create a resource**.
Search for “Azure Bot”, and then click the Azure Bot resource.
Switch from delegated to application permissions.
Search for and select the following **Application** permissions:
* `Team.ReadBasic.All` - list teams in a connected tenant
* `Channel.ReadBasic.All` - list channels in a team
* `AppCatalog.Read.All` - resolve your Teams app in the org catalog
* `TeamsAppInstallation.ReadWriteSelfForTeam.All` (optional) - programmatically install the app into a team
* `TeamsAppInstallation.ReadWriteSelfForUser.All` (required only for [OAuth DM linking](/platform/integrations/chat/ms-teams-connect#link-a-subscriber-for-direct-messages)) - install the app for a user during the link-user flow
Grant admin consent if your tenant requires it.
If you plan to link subscribers for direct messages via OAuth, also add this **Delegated** permission under **Microsoft Graph**:
* `User.Read`
Novu also requests `openid` and `profile` during the link-user OAuth flow; Azure includes these automatically for sign-in. Application permissions (above) cover tenant connect and channel messaging. Delegated `User.Read` is only needed for the separate link-user flow.
On the **API permissions** page, click **Grant admin consent for \[your tenant]** and confirm. This applies the application permissions in the tenant where you registered the app. Each organization that connects Teams later grants consent separately through the Novu OAuth flow.
### Create an Azure Bot resource
Now you register your bot with the Azure AI Bot Service and link it to the app registration that you just created.
In the Azure portal menu, click **Create a resource**.
Search for “Azure Bot”, and then click the Azure Bot resource.
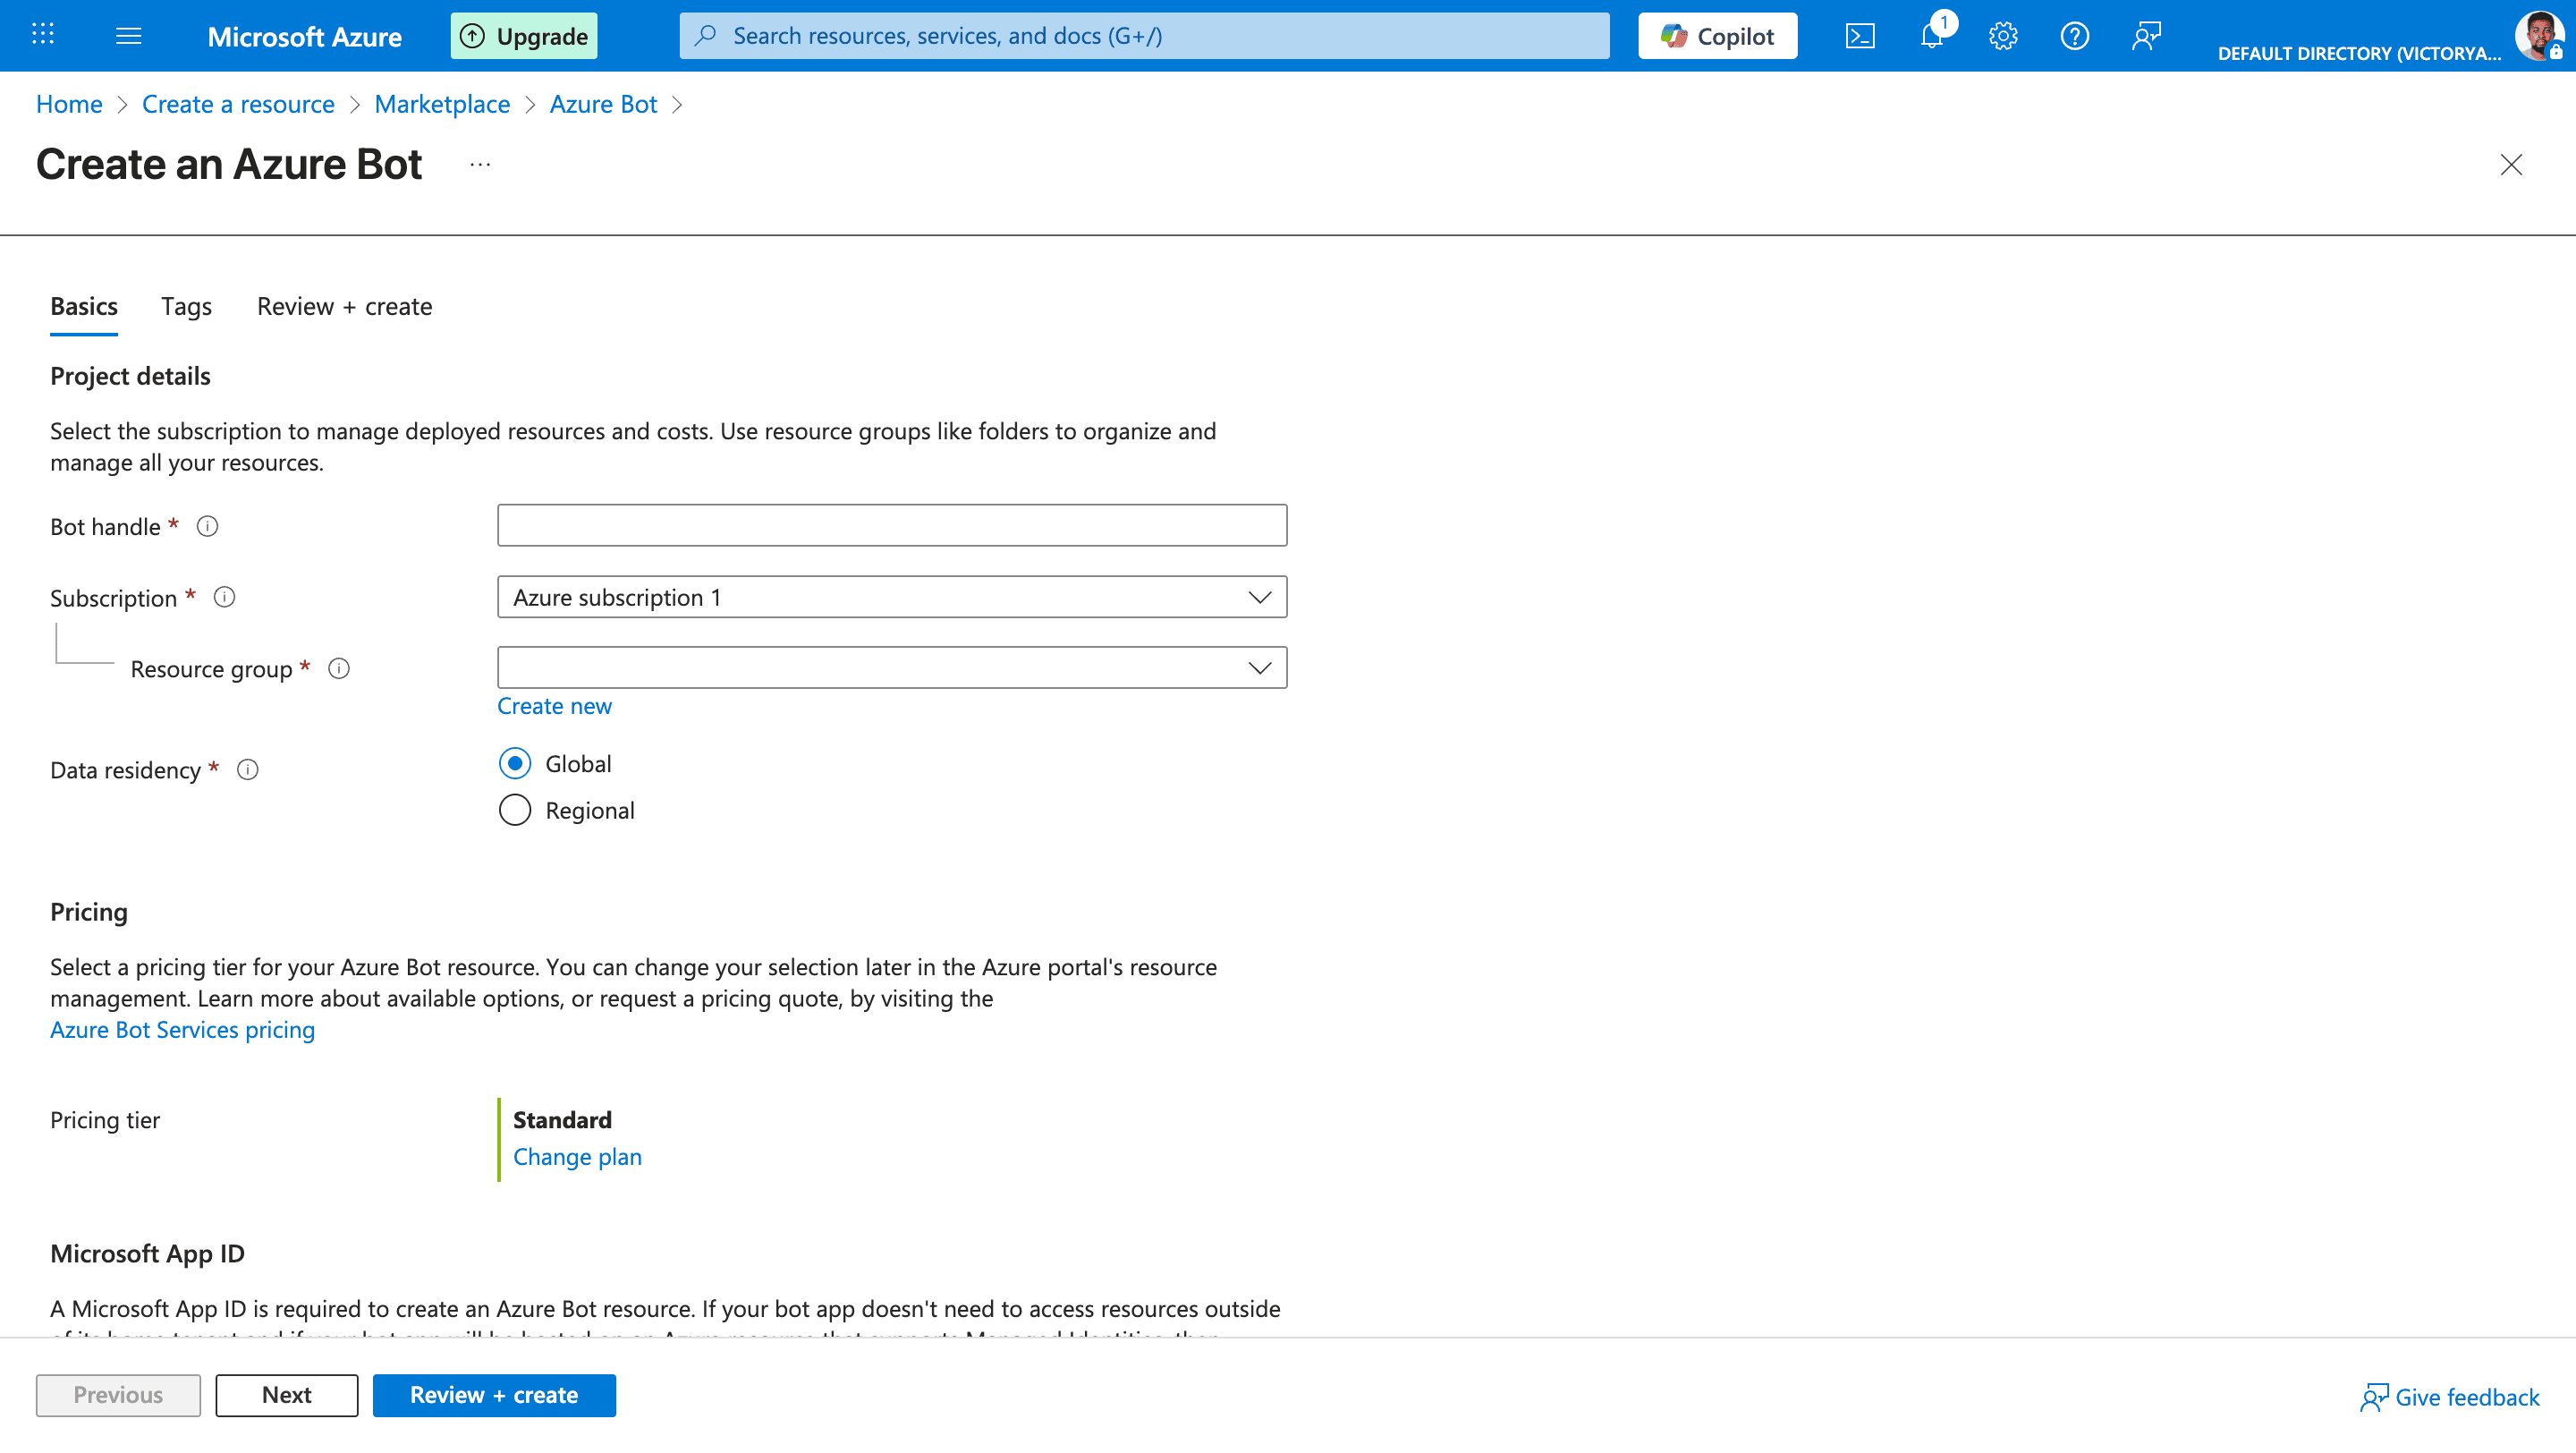
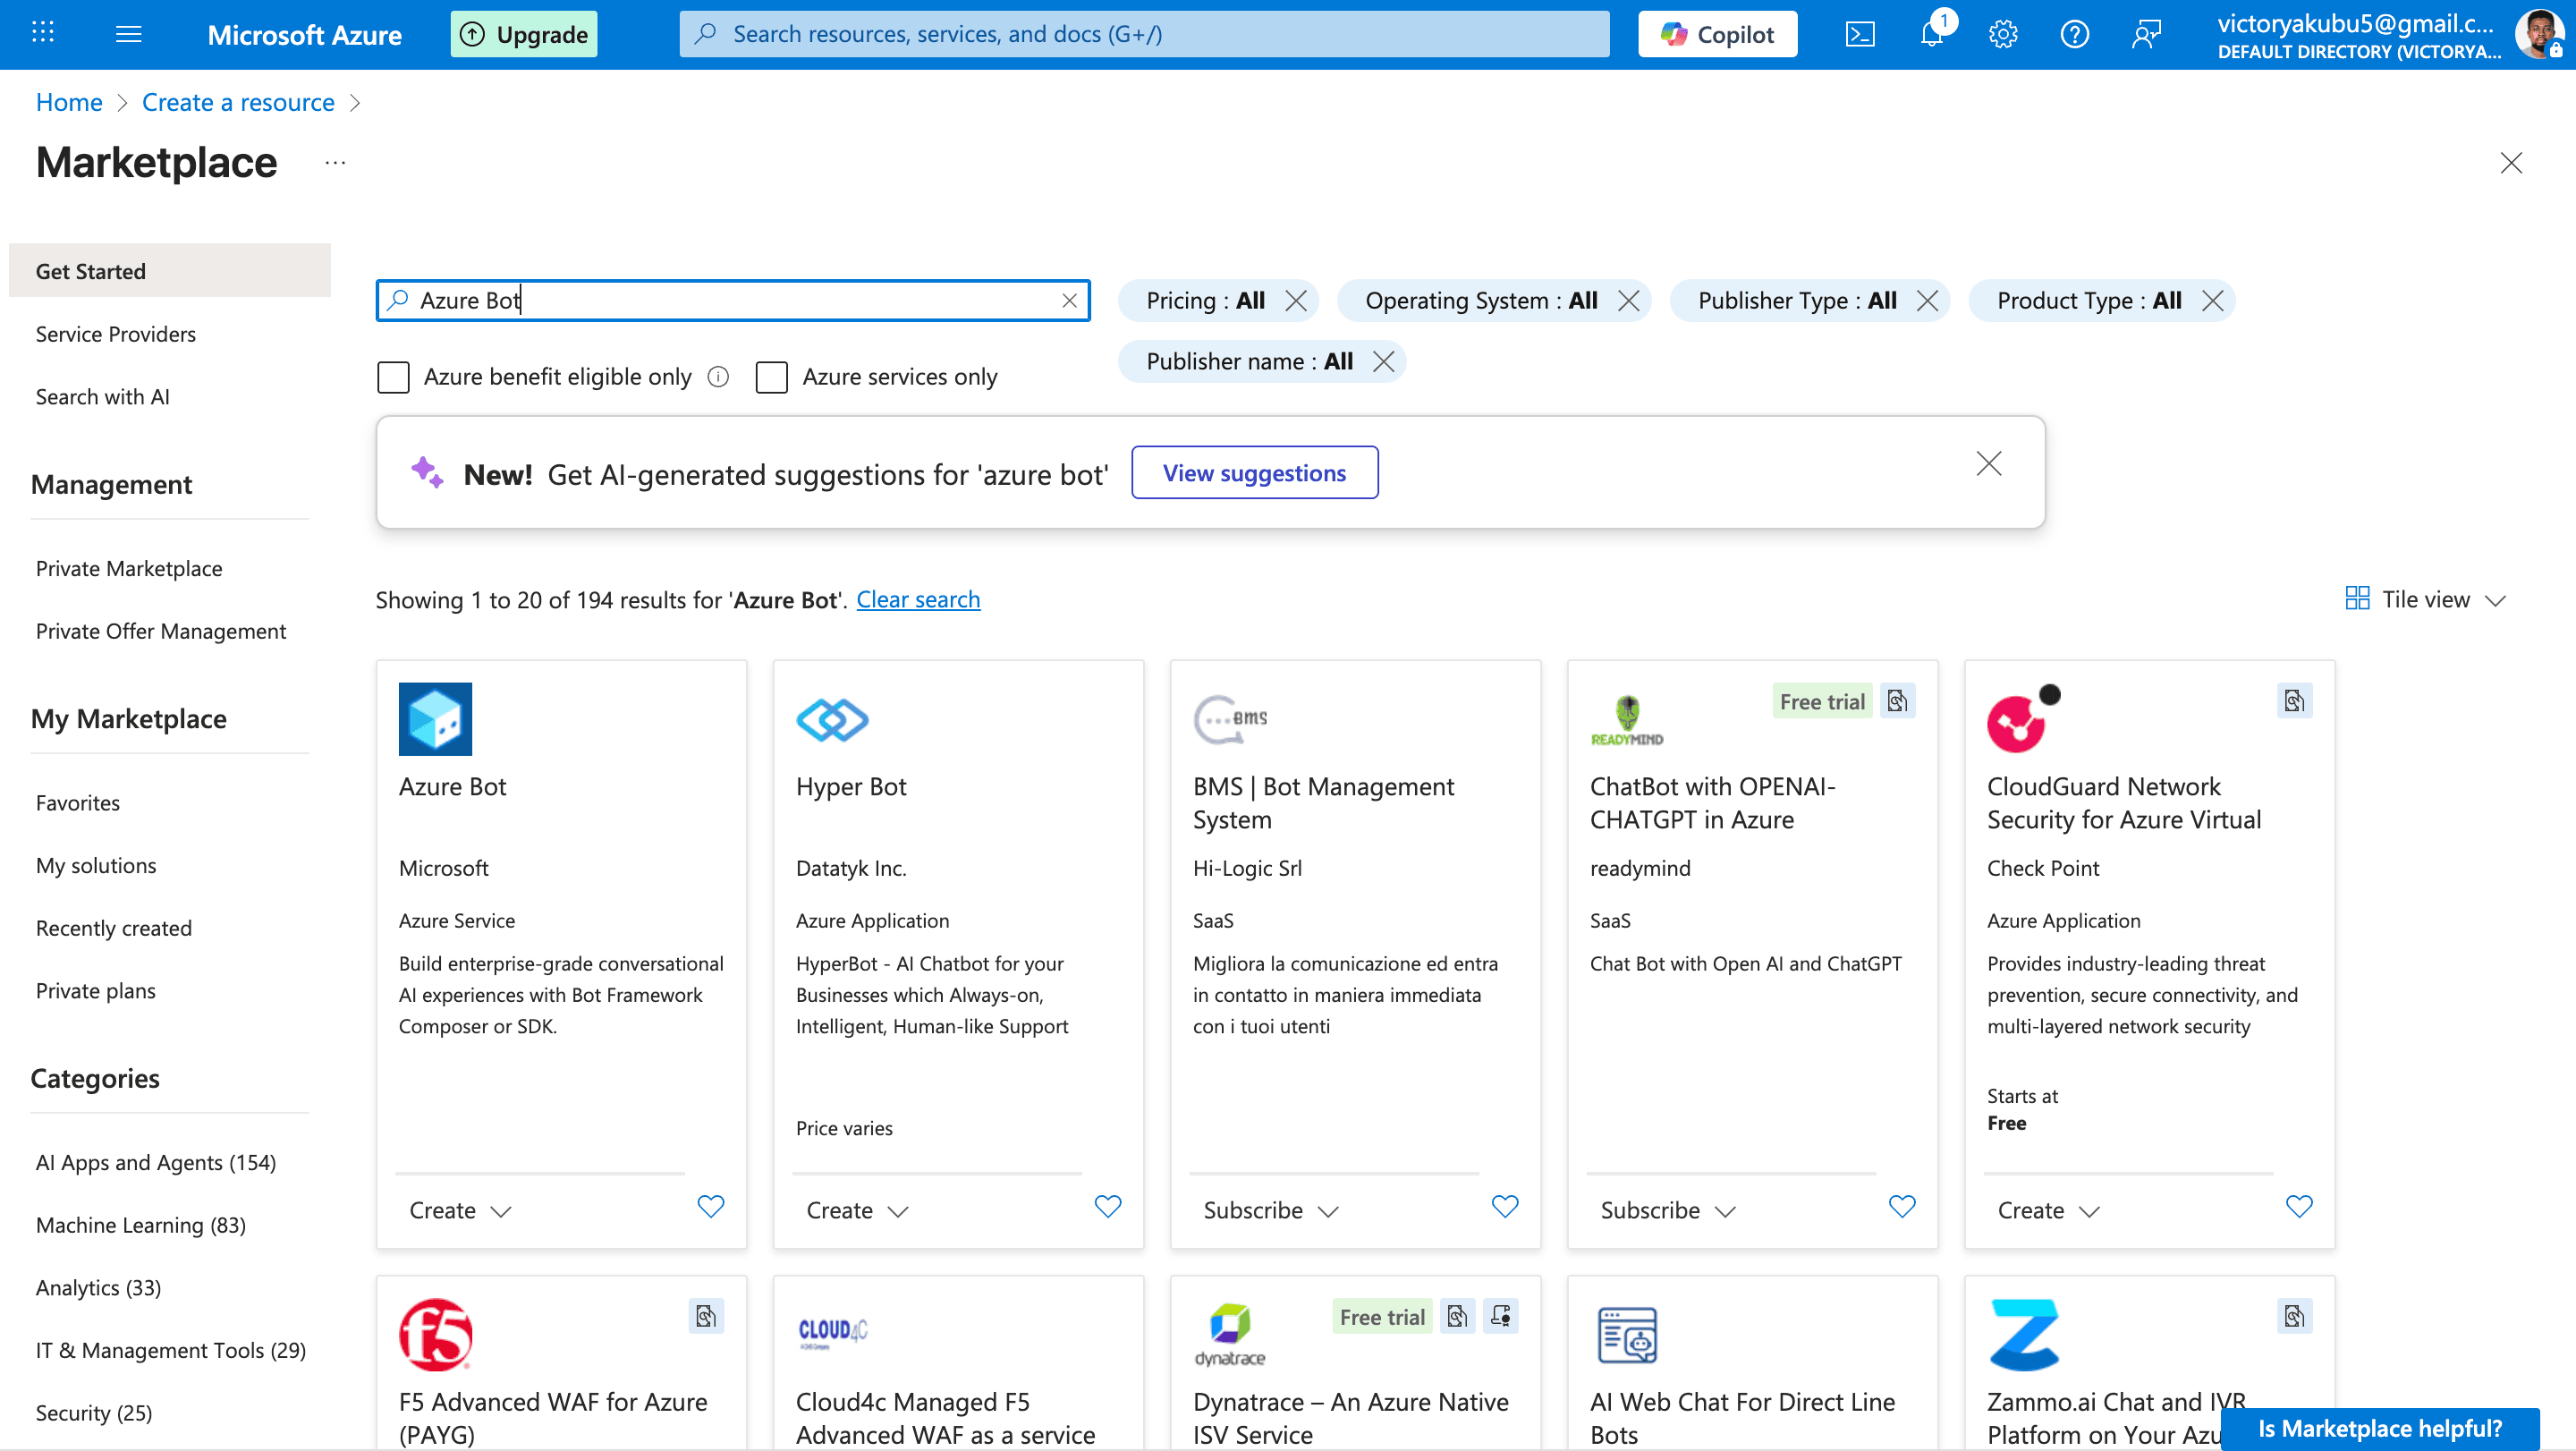 Click **Create**.
* **Bot handle**: The unique display name in Azure.
* **Subscription**: Select the Azure subscription.
* **Resource group**: A collection of resources that share the same lifecycle, permissions, and policies, you can either select or create one.
* **Data residency**: Specify an option for data residency, either global or regional.
* **Type of app**: Select Single-tenant app registration.
* **Creation type**: Choose “Use existing app registration” and use app IDs [you created earlier](/platform/integrations/chat/ms-teams-azure-setup#create-the-app-identity-azure-ad):
* **App ID**: Replace with the Application (client) ID.
* **App tenant ID**: Replace with the Directory (tenant) ID.
Click **Create**.
* **Bot handle**: The unique display name in Azure.
* **Subscription**: Select the Azure subscription.
* **Resource group**: A collection of resources that share the same lifecycle, permissions, and policies, you can either select or create one.
* **Data residency**: Specify an option for data residency, either global or regional.
* **Type of app**: Select Single-tenant app registration.
* **Creation type**: Choose “Use existing app registration” and use app IDs [you created earlier](/platform/integrations/chat/ms-teams-azure-setup#create-the-app-identity-azure-ad):
* **App ID**: Replace with the Application (client) ID.
* **App tenant ID**: Replace with the Directory (tenant) ID.
 Validate the configuration, then proceed to deployment.
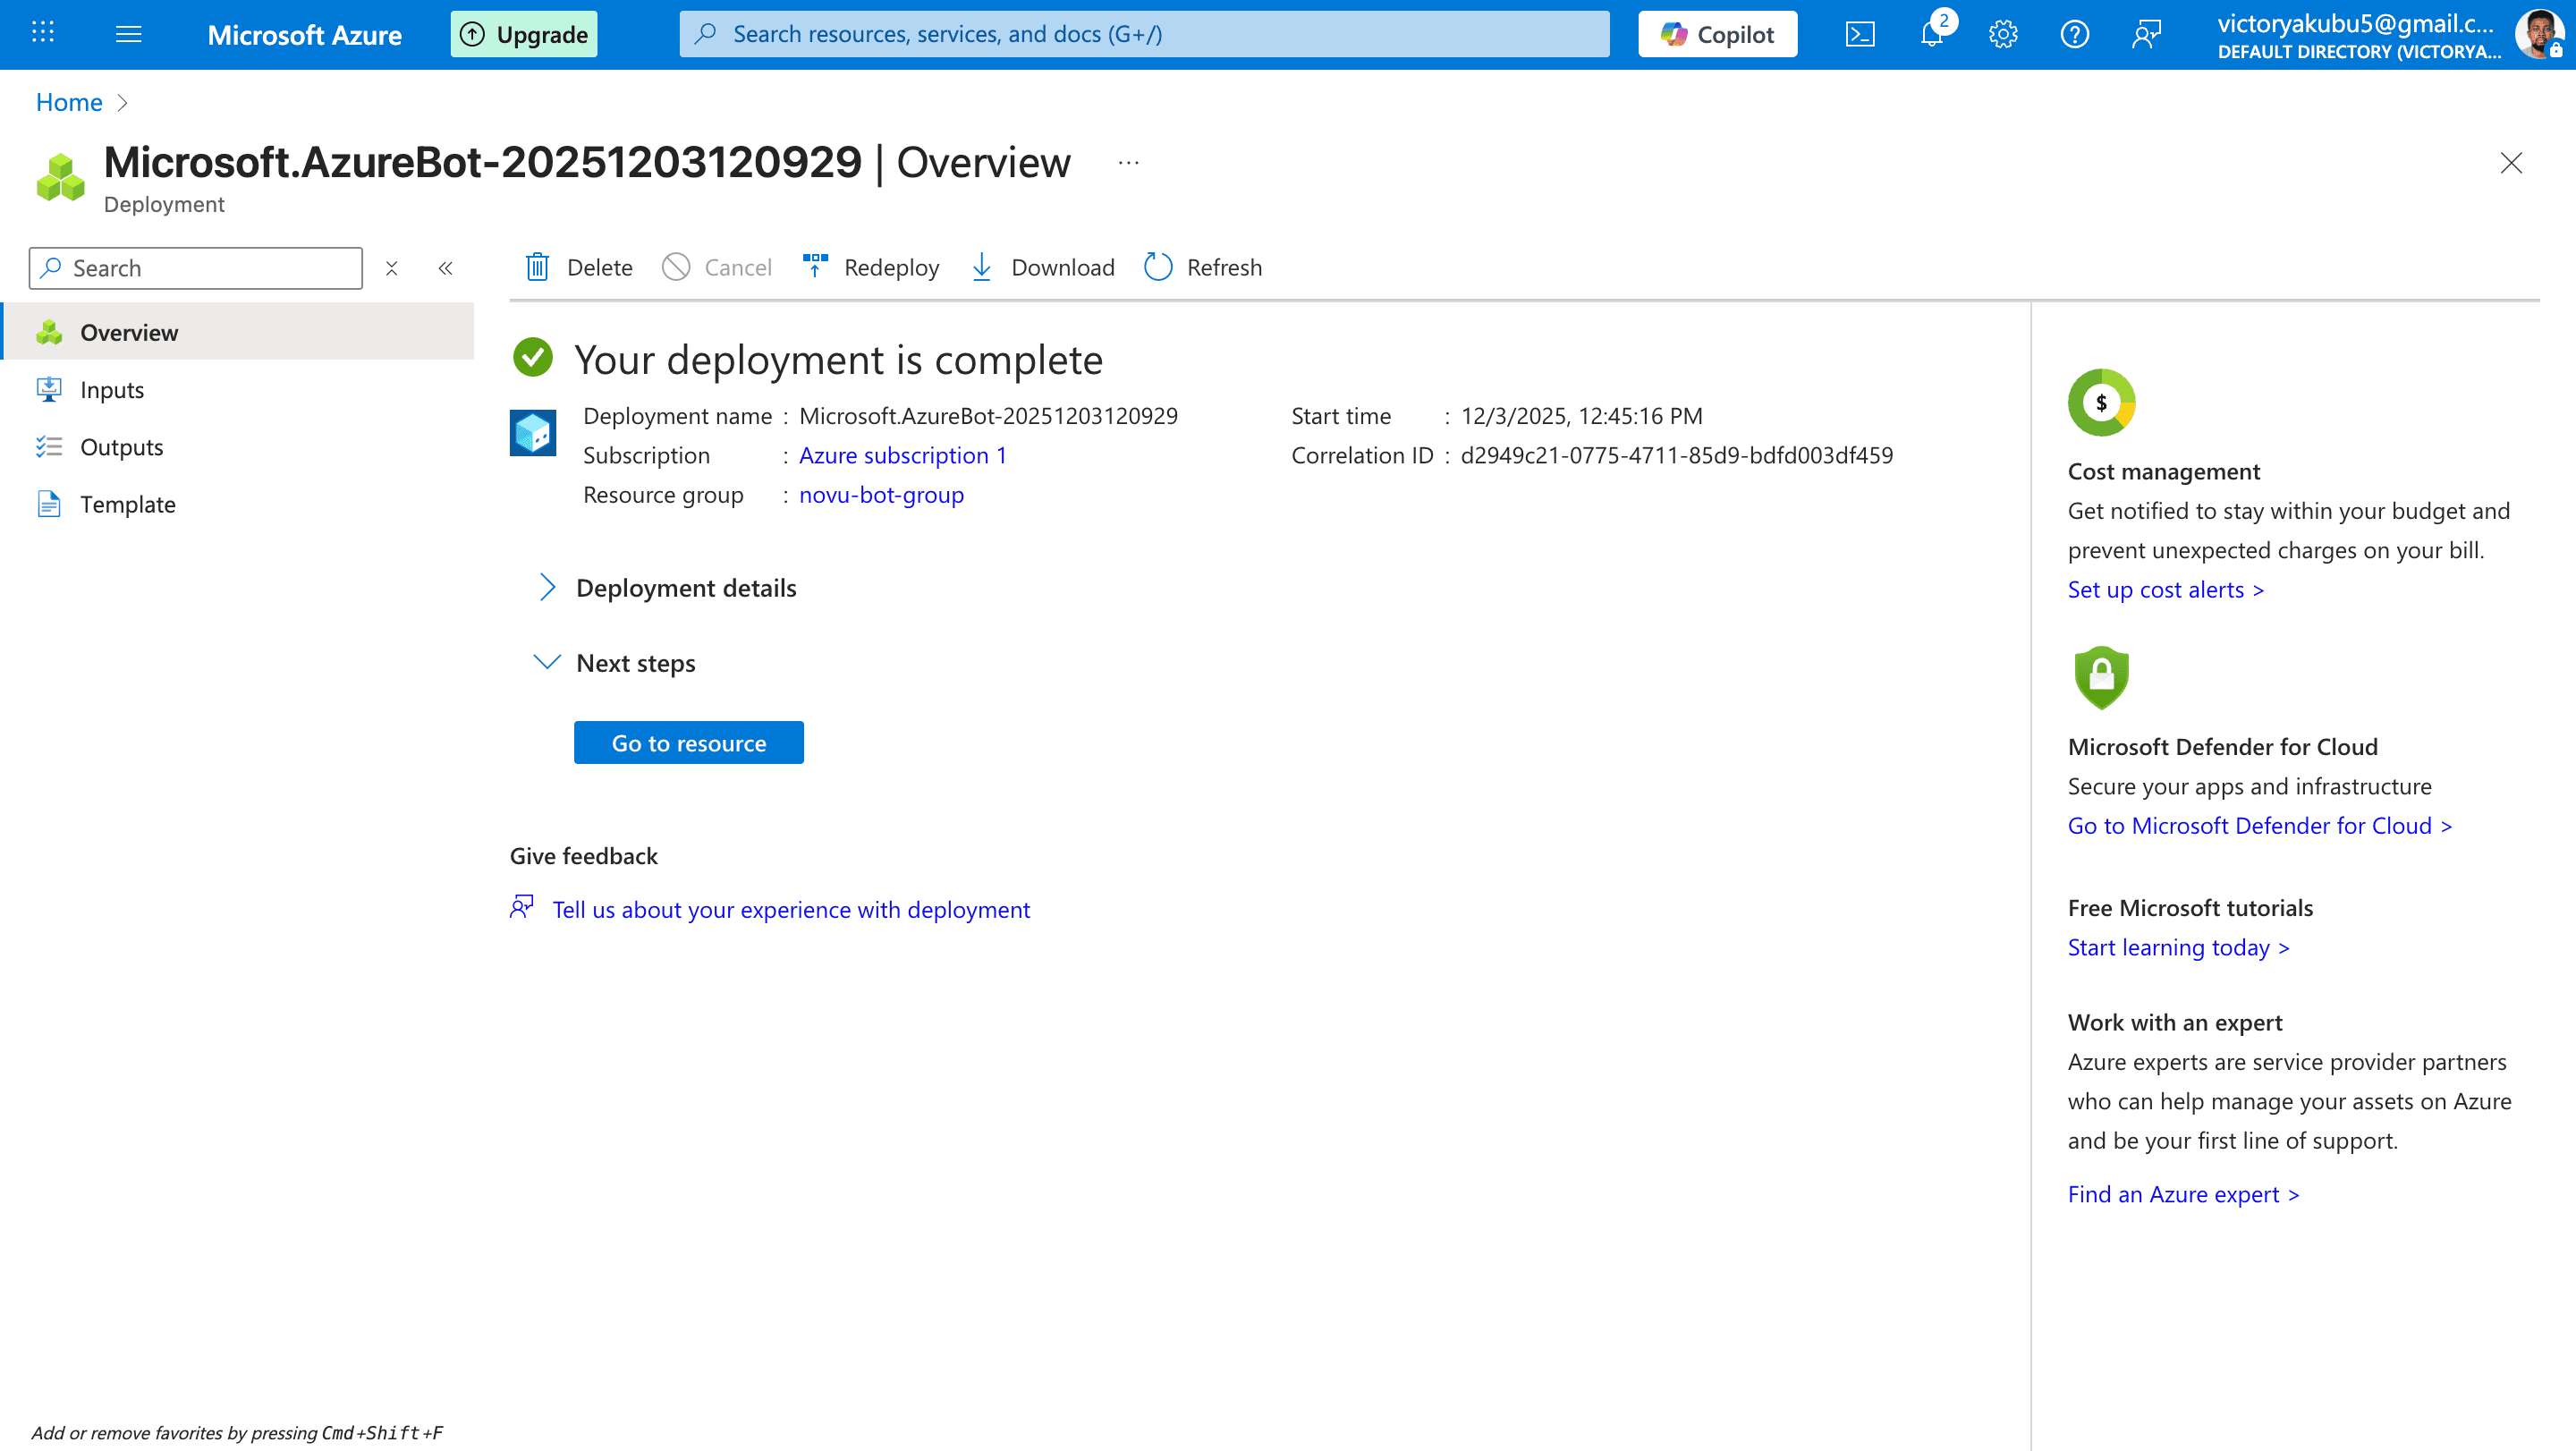
Wait for Azure to finish provisioning the bot resource.
### Enable the Microsoft Teams channel
This connects your bot resource to Teams and lets your Teams app install cleanly.
Once the deployment finishes, click **Go to resource**.
Validate the configuration, then proceed to deployment.
Wait for Azure to finish provisioning the bot resource.
### Enable the Microsoft Teams channel
This connects your bot resource to Teams and lets your Teams app install cleanly.
Once the deployment finishes, click **Go to resource**.
 In the Azure Bot resource, open **Settings**.
Under settings, open the **Channels** pane.
In the available channels section, click **Microsoft Teams**.
In the menu that appears, accept the terms of services.
In the **Messaging** section, choose the appropriate environment, typically **Microsoft Teams Commercial**.
Save the channel configuration before leaving the page.
### Create a Teams app
Now you create the Teams “wrapper” around your app registration and bot.
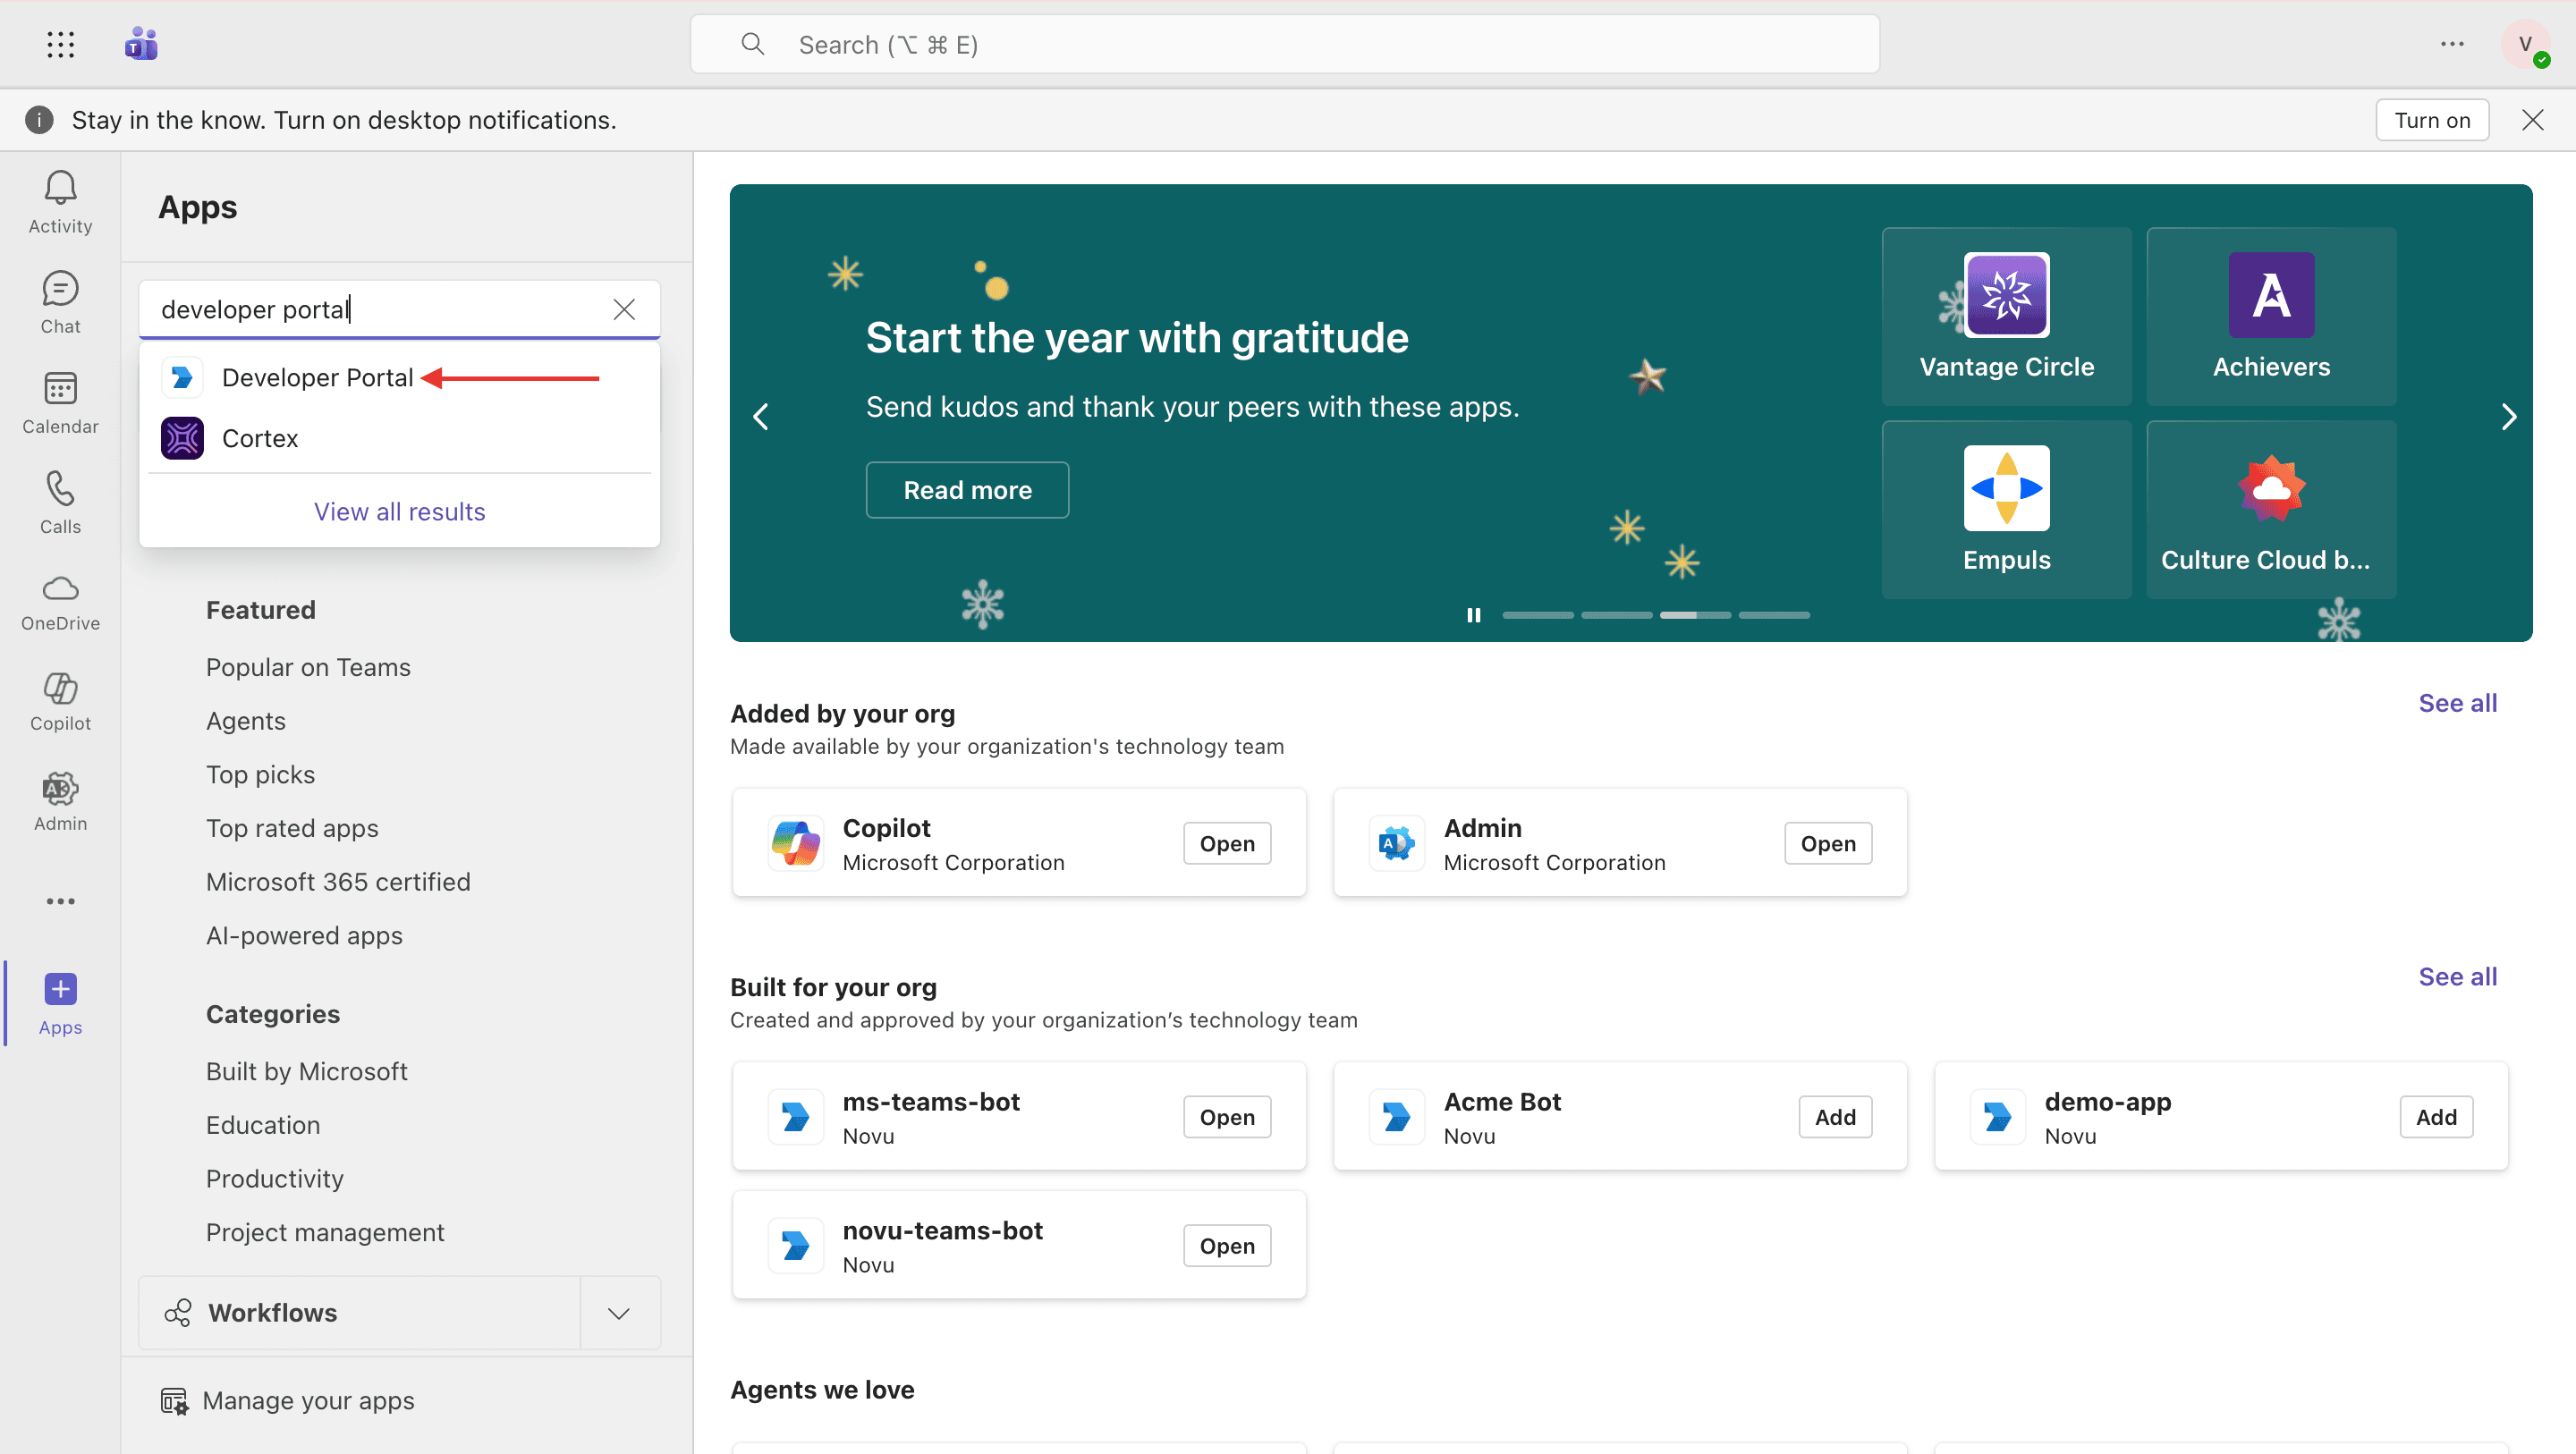
In the left sidebar, click **Apps**.
Search for **Developer Portal** and click **Add**, then open it.
In the Azure Bot resource, open **Settings**.
Under settings, open the **Channels** pane.
In the available channels section, click **Microsoft Teams**.
In the menu that appears, accept the terms of services.
In the **Messaging** section, choose the appropriate environment, typically **Microsoft Teams Commercial**.
Save the channel configuration before leaving the page.
### Create a Teams app
Now you create the Teams “wrapper” around your app registration and bot.
In the left sidebar, click **Apps**.
Search for **Developer Portal** and click **Add**, then open it.
 In the Developer Portal dashboard, click **Create a new app**.
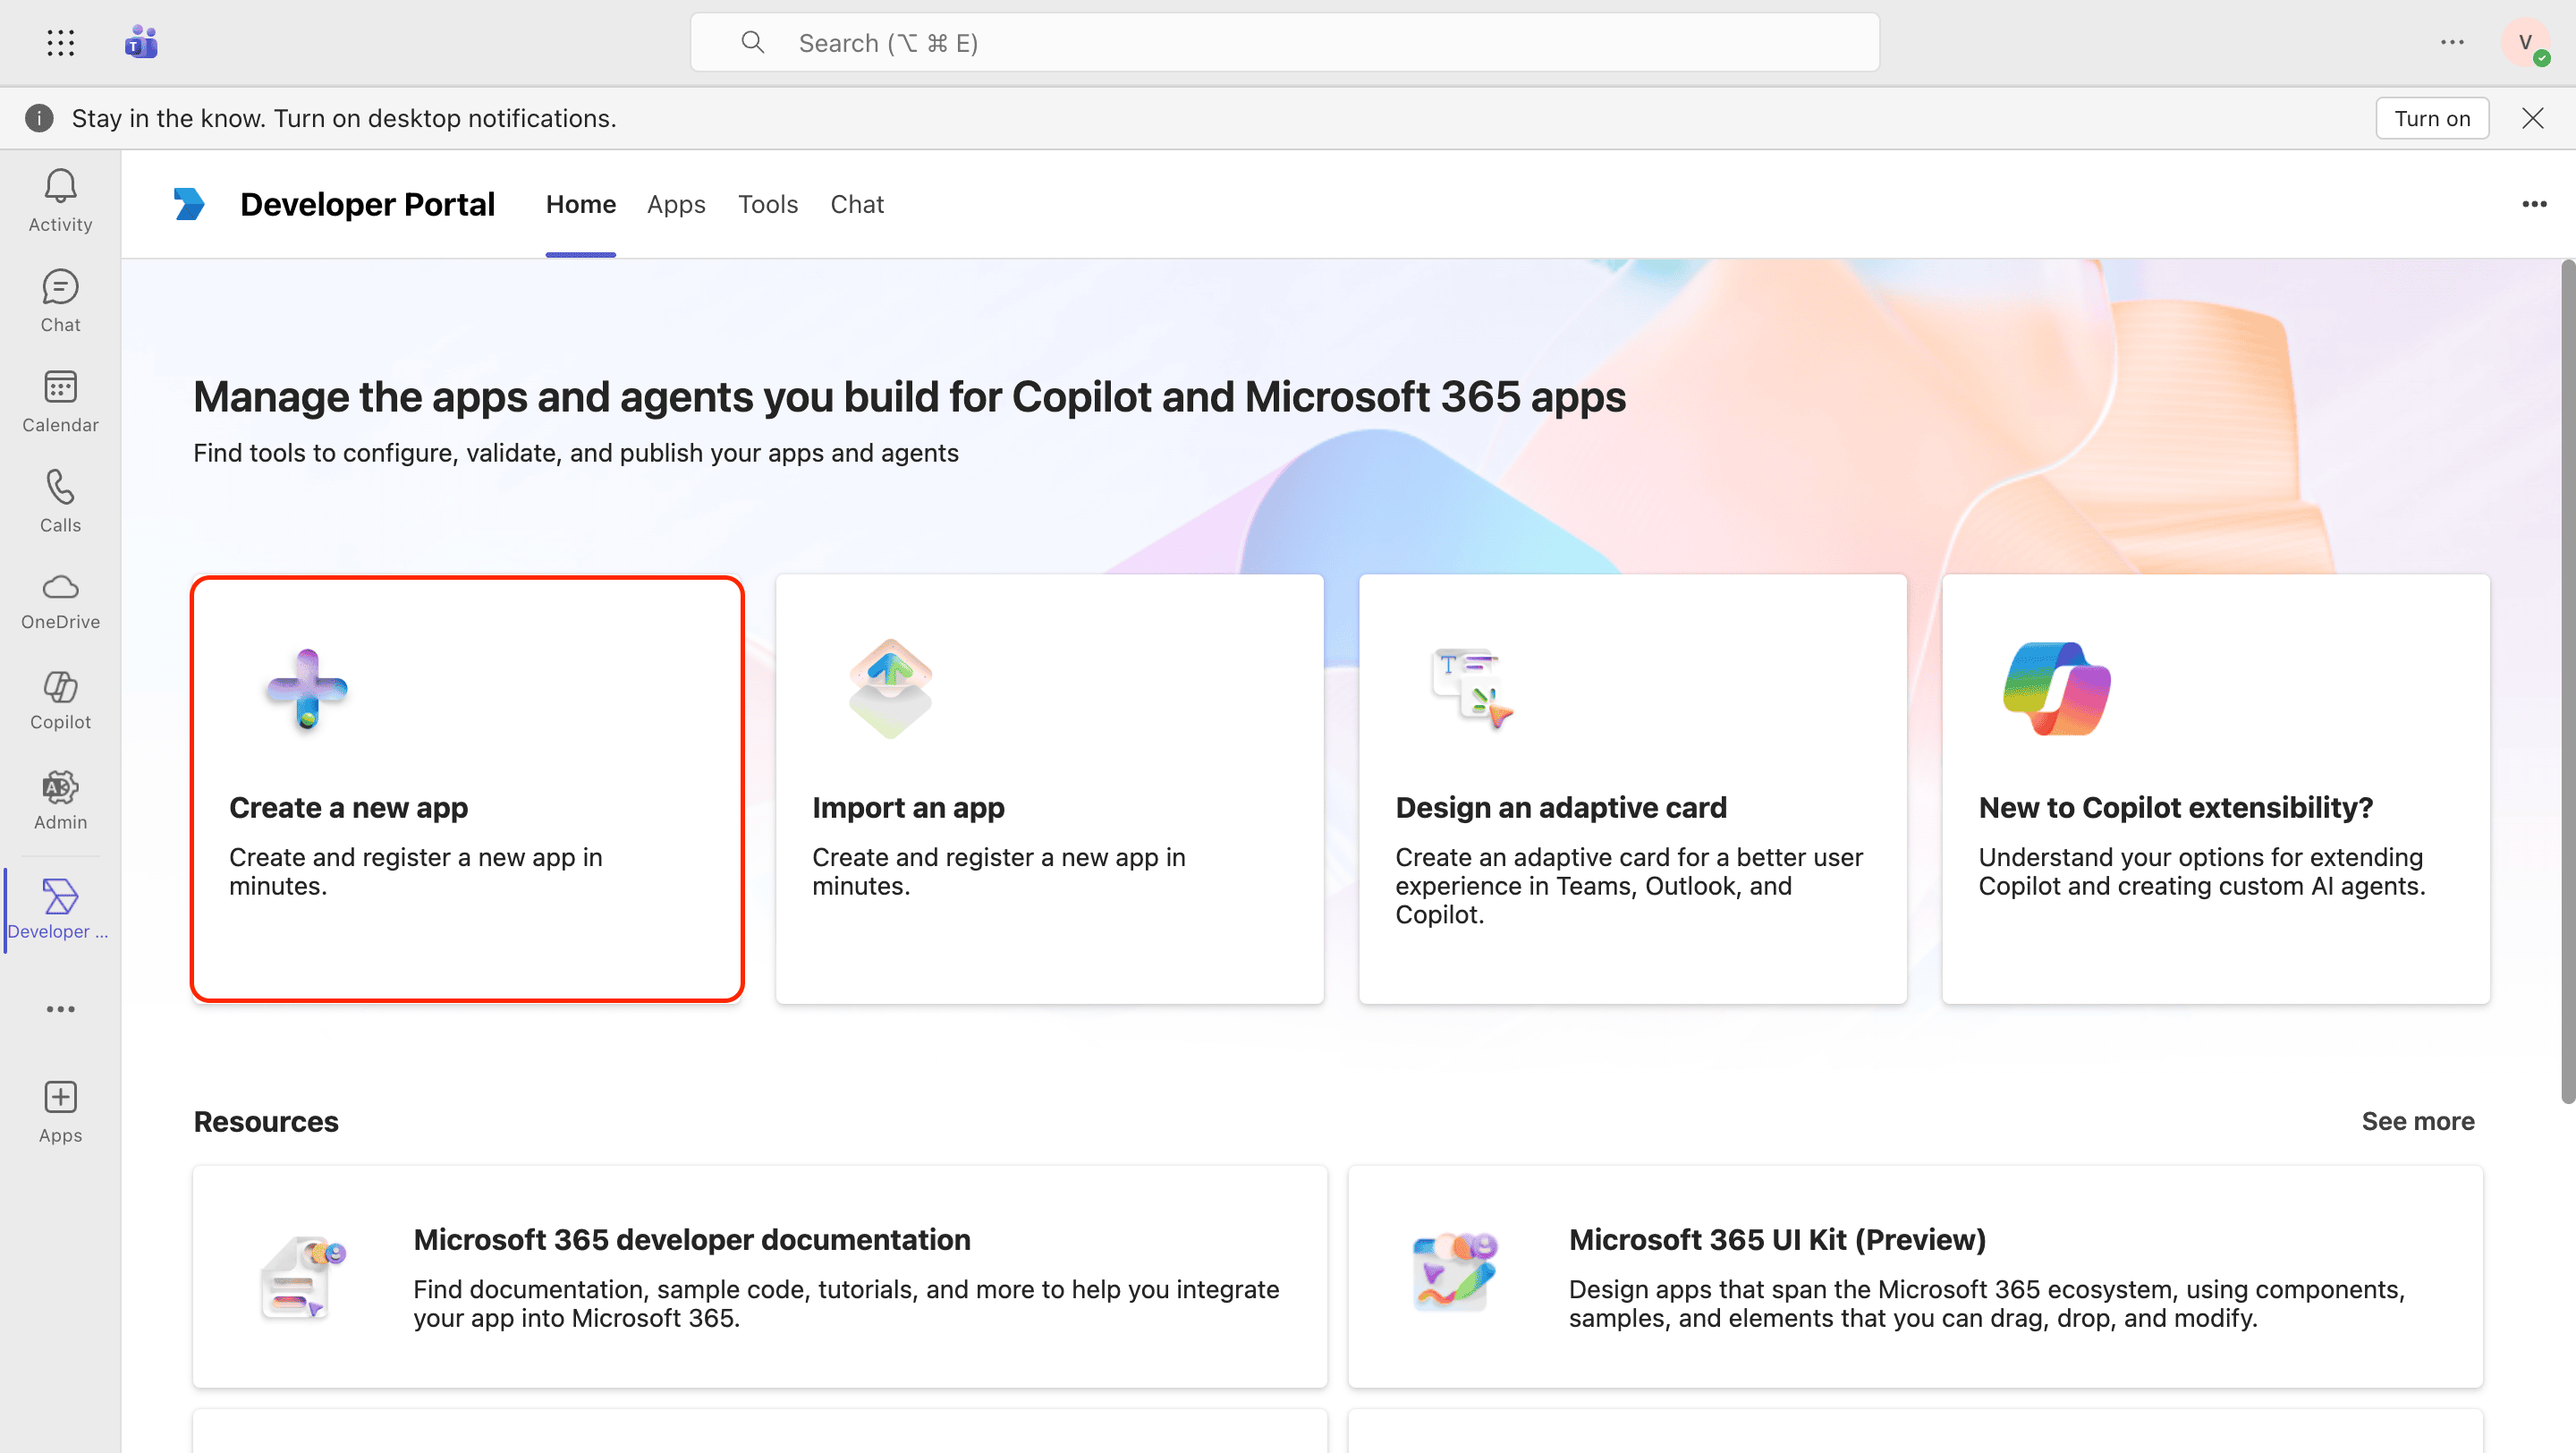 Enter a name of your choice and click **Create**.
In the left sidebar, click **Basic information**.
Fill in the required fields (names, descriptions, developer info, URLs) and then click **Save**.
In the sidebar, click **App features**.
Enter a name of your choice and click **Create**.
In the left sidebar, click **Basic information**.
Fill in the required fields (names, descriptions, developer info, URLs) and then click **Save**.
In the sidebar, click **App features**.
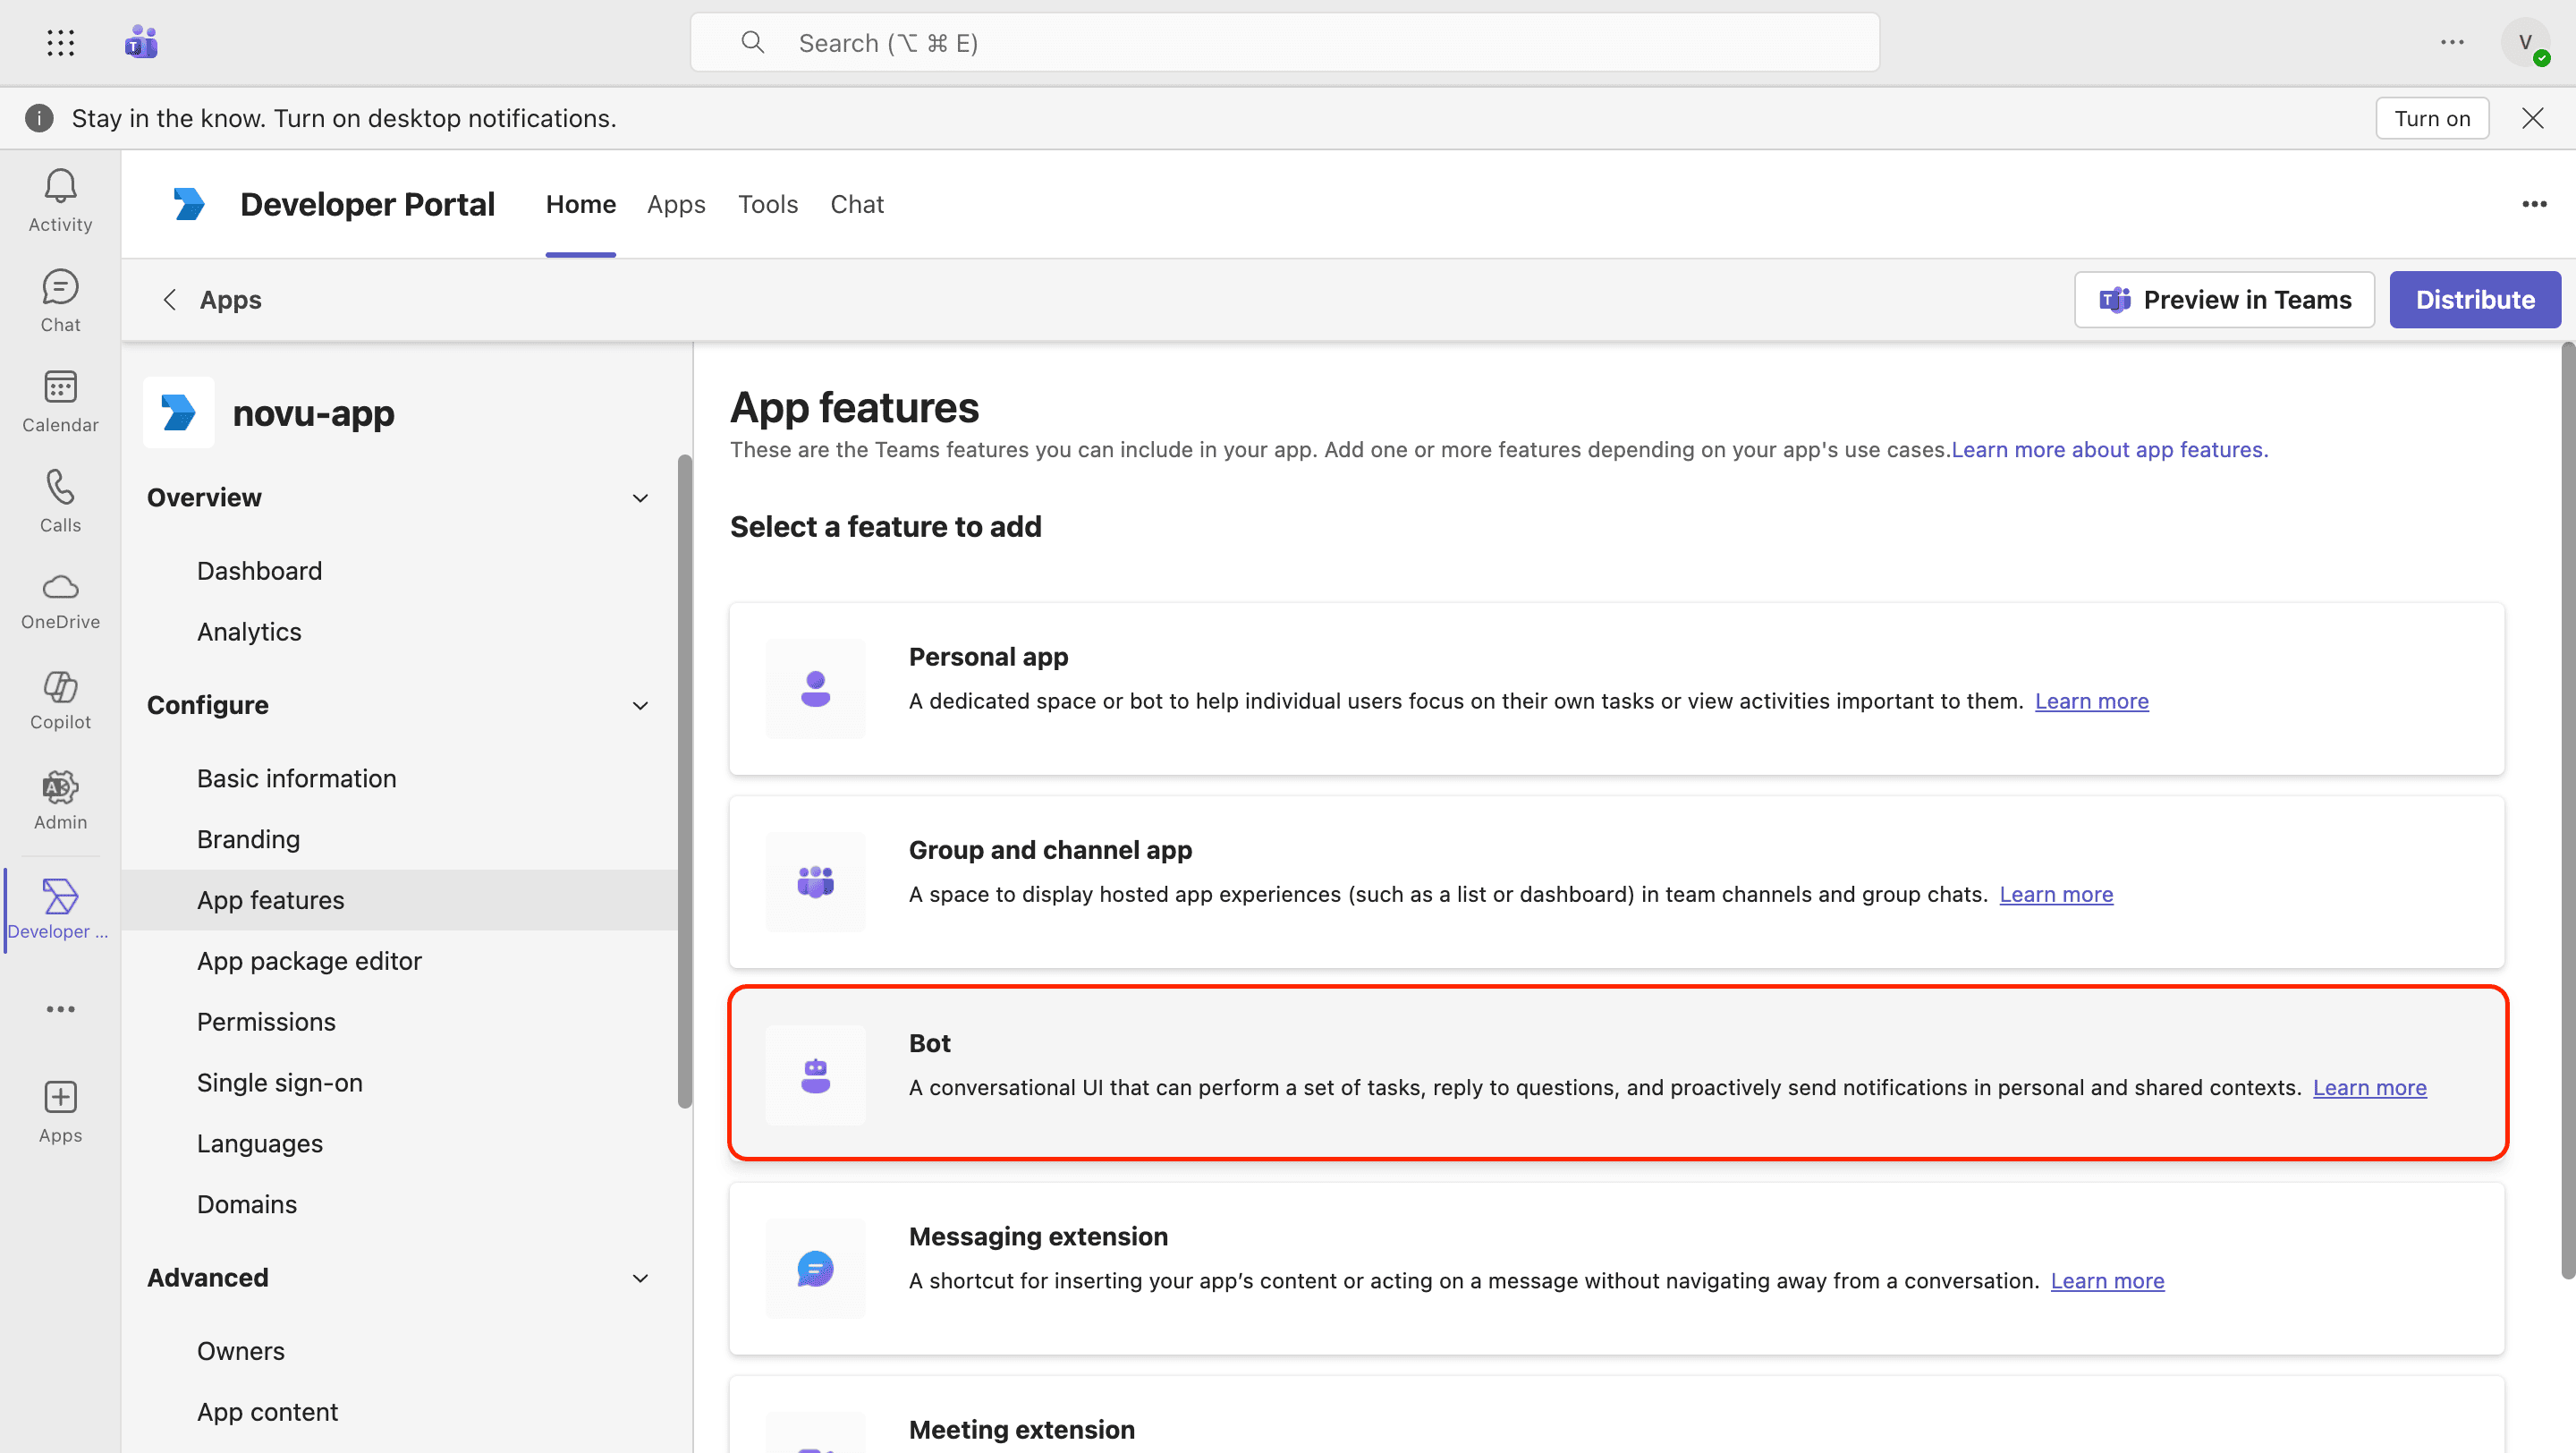 Under **Identify your bot**, select **Enter a bot ID** and then paste your Application (client) ID from Microsoft Azure.
In the **What can your bot do?** section, select "Only send notification" (at minimum).
Under **Select the scopes where people can use your bot**, enable the scopes based on your use case:
* **Team**
* **Personal**
* **Group chat**
If you enabled the **Team** scope, add the `supportsChannelFeatures` property to your app manifest. Without it, uploading or installing the app fails with:
> Applications with manifest version 1.25 or higher that support the 'team' scope must include the 'supportsChannelFeatures' property.
In the Developer Portal, go to **Configure** → **App package editor** → **manifest.json**, and add `"supportsChannelFeatures": "tier1"` at the root level of the manifest. `tier1` is the only supported value.
```json theme={null}
{
"$schema": "https://developer.microsoft.com/en-us/json-schemas/teams/v1.25/MicrosoftTeams.schema.json",
"manifestVersion": "1.25",
"bots": [
{
"botId": "YOUR_BOT_APP_ID",
"scopes": ["team", "groupChat", "personal"],
"isNotificationOnly": true,
"supportsCalling": false,
"supportsVideo": false,
"supportsFiles": false
}
],
"supportsChannelFeatures": "tier1"
}
```
Save your Teams app manifest changes in the Developer Portal.
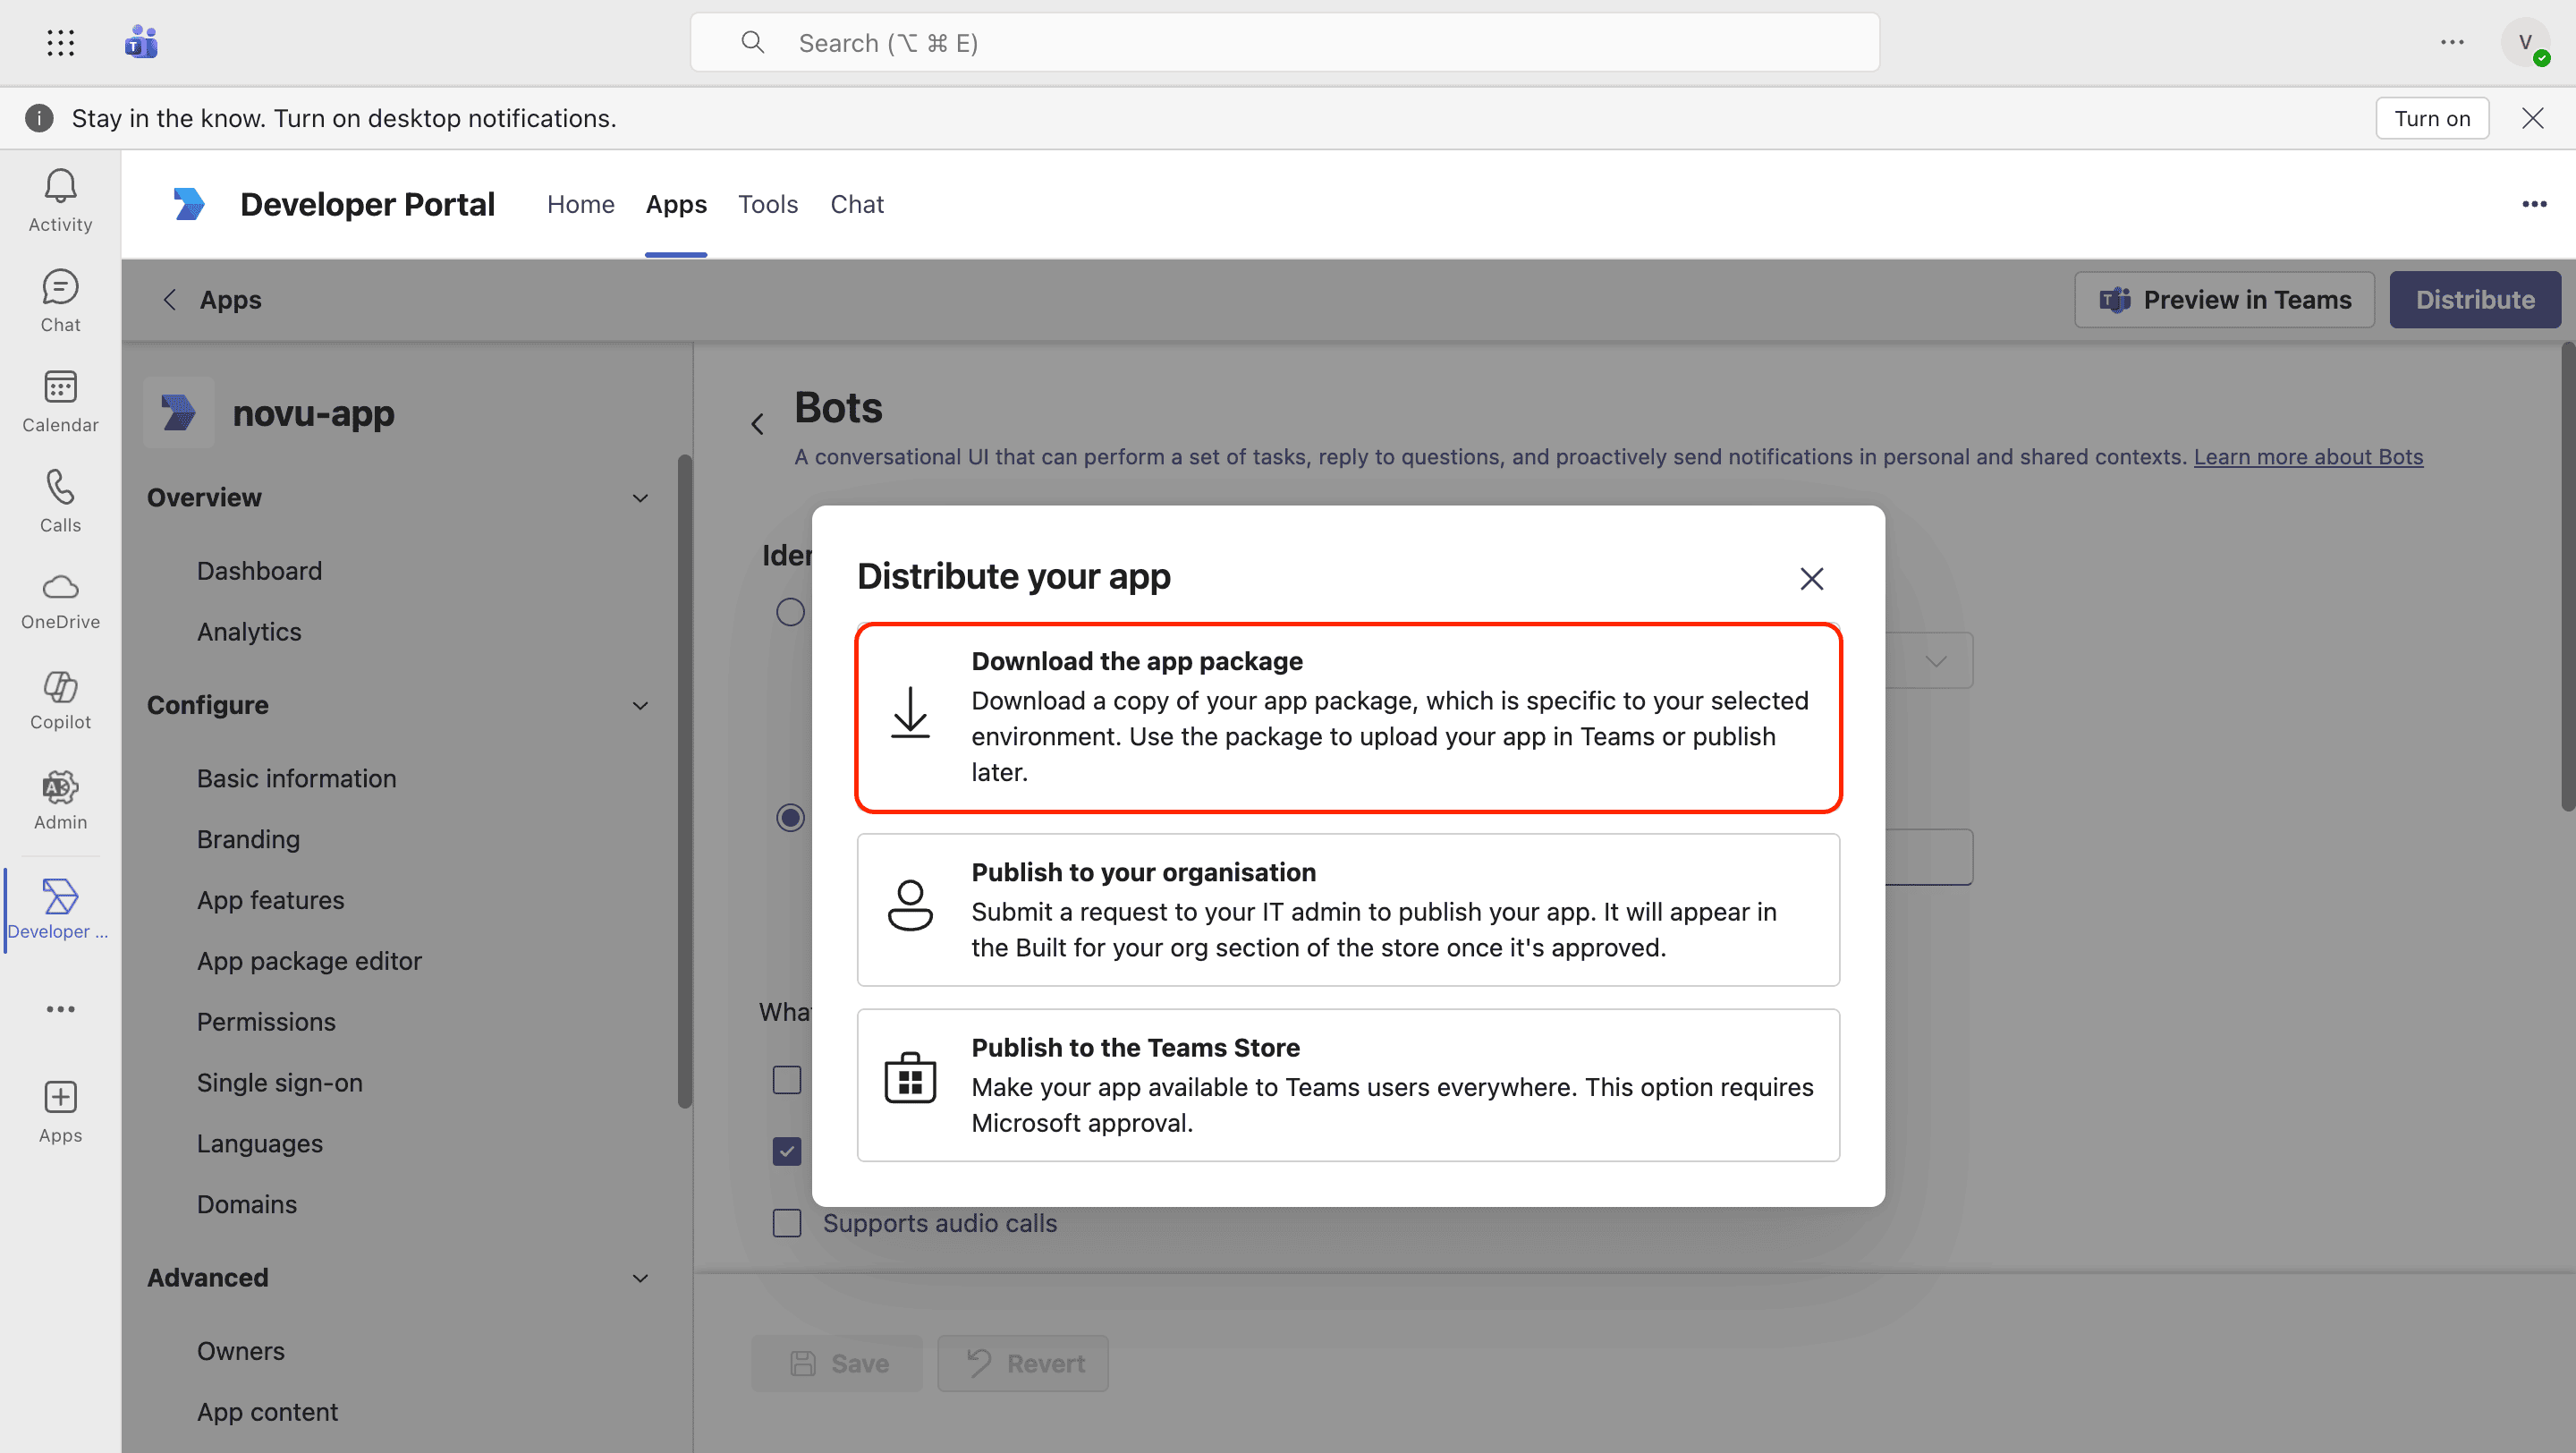
In the top right, click **Distribute** and then click **Download the app package**. This will save a copy of the app package to your computer in ZIP format.
Under **Identify your bot**, select **Enter a bot ID** and then paste your Application (client) ID from Microsoft Azure.
In the **What can your bot do?** section, select "Only send notification" (at minimum).
Under **Select the scopes where people can use your bot**, enable the scopes based on your use case:
* **Team**
* **Personal**
* **Group chat**
If you enabled the **Team** scope, add the `supportsChannelFeatures` property to your app manifest. Without it, uploading or installing the app fails with:
> Applications with manifest version 1.25 or higher that support the 'team' scope must include the 'supportsChannelFeatures' property.
In the Developer Portal, go to **Configure** → **App package editor** → **manifest.json**, and add `"supportsChannelFeatures": "tier1"` at the root level of the manifest. `tier1` is the only supported value.
```json theme={null}
{
"$schema": "https://developer.microsoft.com/en-us/json-schemas/teams/v1.25/MicrosoftTeams.schema.json",
"manifestVersion": "1.25",
"bots": [
{
"botId": "YOUR_BOT_APP_ID",
"scopes": ["team", "groupChat", "personal"],
"isNotificationOnly": true,
"supportsCalling": false,
"supportsVideo": false,
"supportsFiles": false
}
],
"supportsChannelFeatures": "tier1"
}
```
Save your Teams app manifest changes in the Developer Portal.
In the top right, click **Distribute** and then click **Download the app package**. This will save a copy of the app package to your computer in ZIP format.
 ### Upload your app
Next, you must install the app into a specific Team or for a specific User.
Follow the steps in the [Microsoft Teams documentation](https://learn.microsoft.com/en-us/microsoftteams/platform/concepts/deploy-and-publish/apps-upload#upload-your-app) to learn how to upload the just downloaded app package and also how to add the app to a specific location.
## Configure the Teams (Bot) integration in Novu
Now that you’ve configured your Azure Bot, provide Novu with the credentials to integrate it.
Open the [Novu Dashboard](https://dashboard.novu.co).
In the sidebar, click Integrations Store.
In the **Integration Store**, click **Connect provider** to begin setup.
Enter the credentials you saved from the Azure Portal:
* **Client ID**: Enter your `BOT_APP_ID`.
* **Client Secret**: Enter your `BOT_APP_SECRET`.
* **App Tenant ID**: Enter your `APP_TENANT_ID`. This value identifies the tenant where you registered the app.
* **Redirect URL** (Optional): Where the **tenant administrator** is sent in **your application** after Novu processes the OAuth callback. This is not the Azure redirect URI - see [Add Novu's redirect URI](#add-novus-redirect-uri).
### Upload your app
Next, you must install the app into a specific Team or for a specific User.
Follow the steps in the [Microsoft Teams documentation](https://learn.microsoft.com/en-us/microsoftteams/platform/concepts/deploy-and-publish/apps-upload#upload-your-app) to learn how to upload the just downloaded app package and also how to add the app to a specific location.
## Configure the Teams (Bot) integration in Novu
Now that you’ve configured your Azure Bot, provide Novu with the credentials to integrate it.
Open the [Novu Dashboard](https://dashboard.novu.co).
In the sidebar, click Integrations Store.
In the **Integration Store**, click **Connect provider** to begin setup.
Enter the credentials you saved from the Azure Portal:
* **Client ID**: Enter your `BOT_APP_ID`.
* **Client Secret**: Enter your `BOT_APP_SECRET`.
* **App Tenant ID**: Enter your `APP_TENANT_ID`. This value identifies the tenant where you registered the app.
* **Redirect URL** (Optional): Where the **tenant administrator** is sent in **your application** after Novu processes the OAuth callback. This is not the Azure redirect URI - see [Add Novu's redirect URI](#add-novus-redirect-uri).
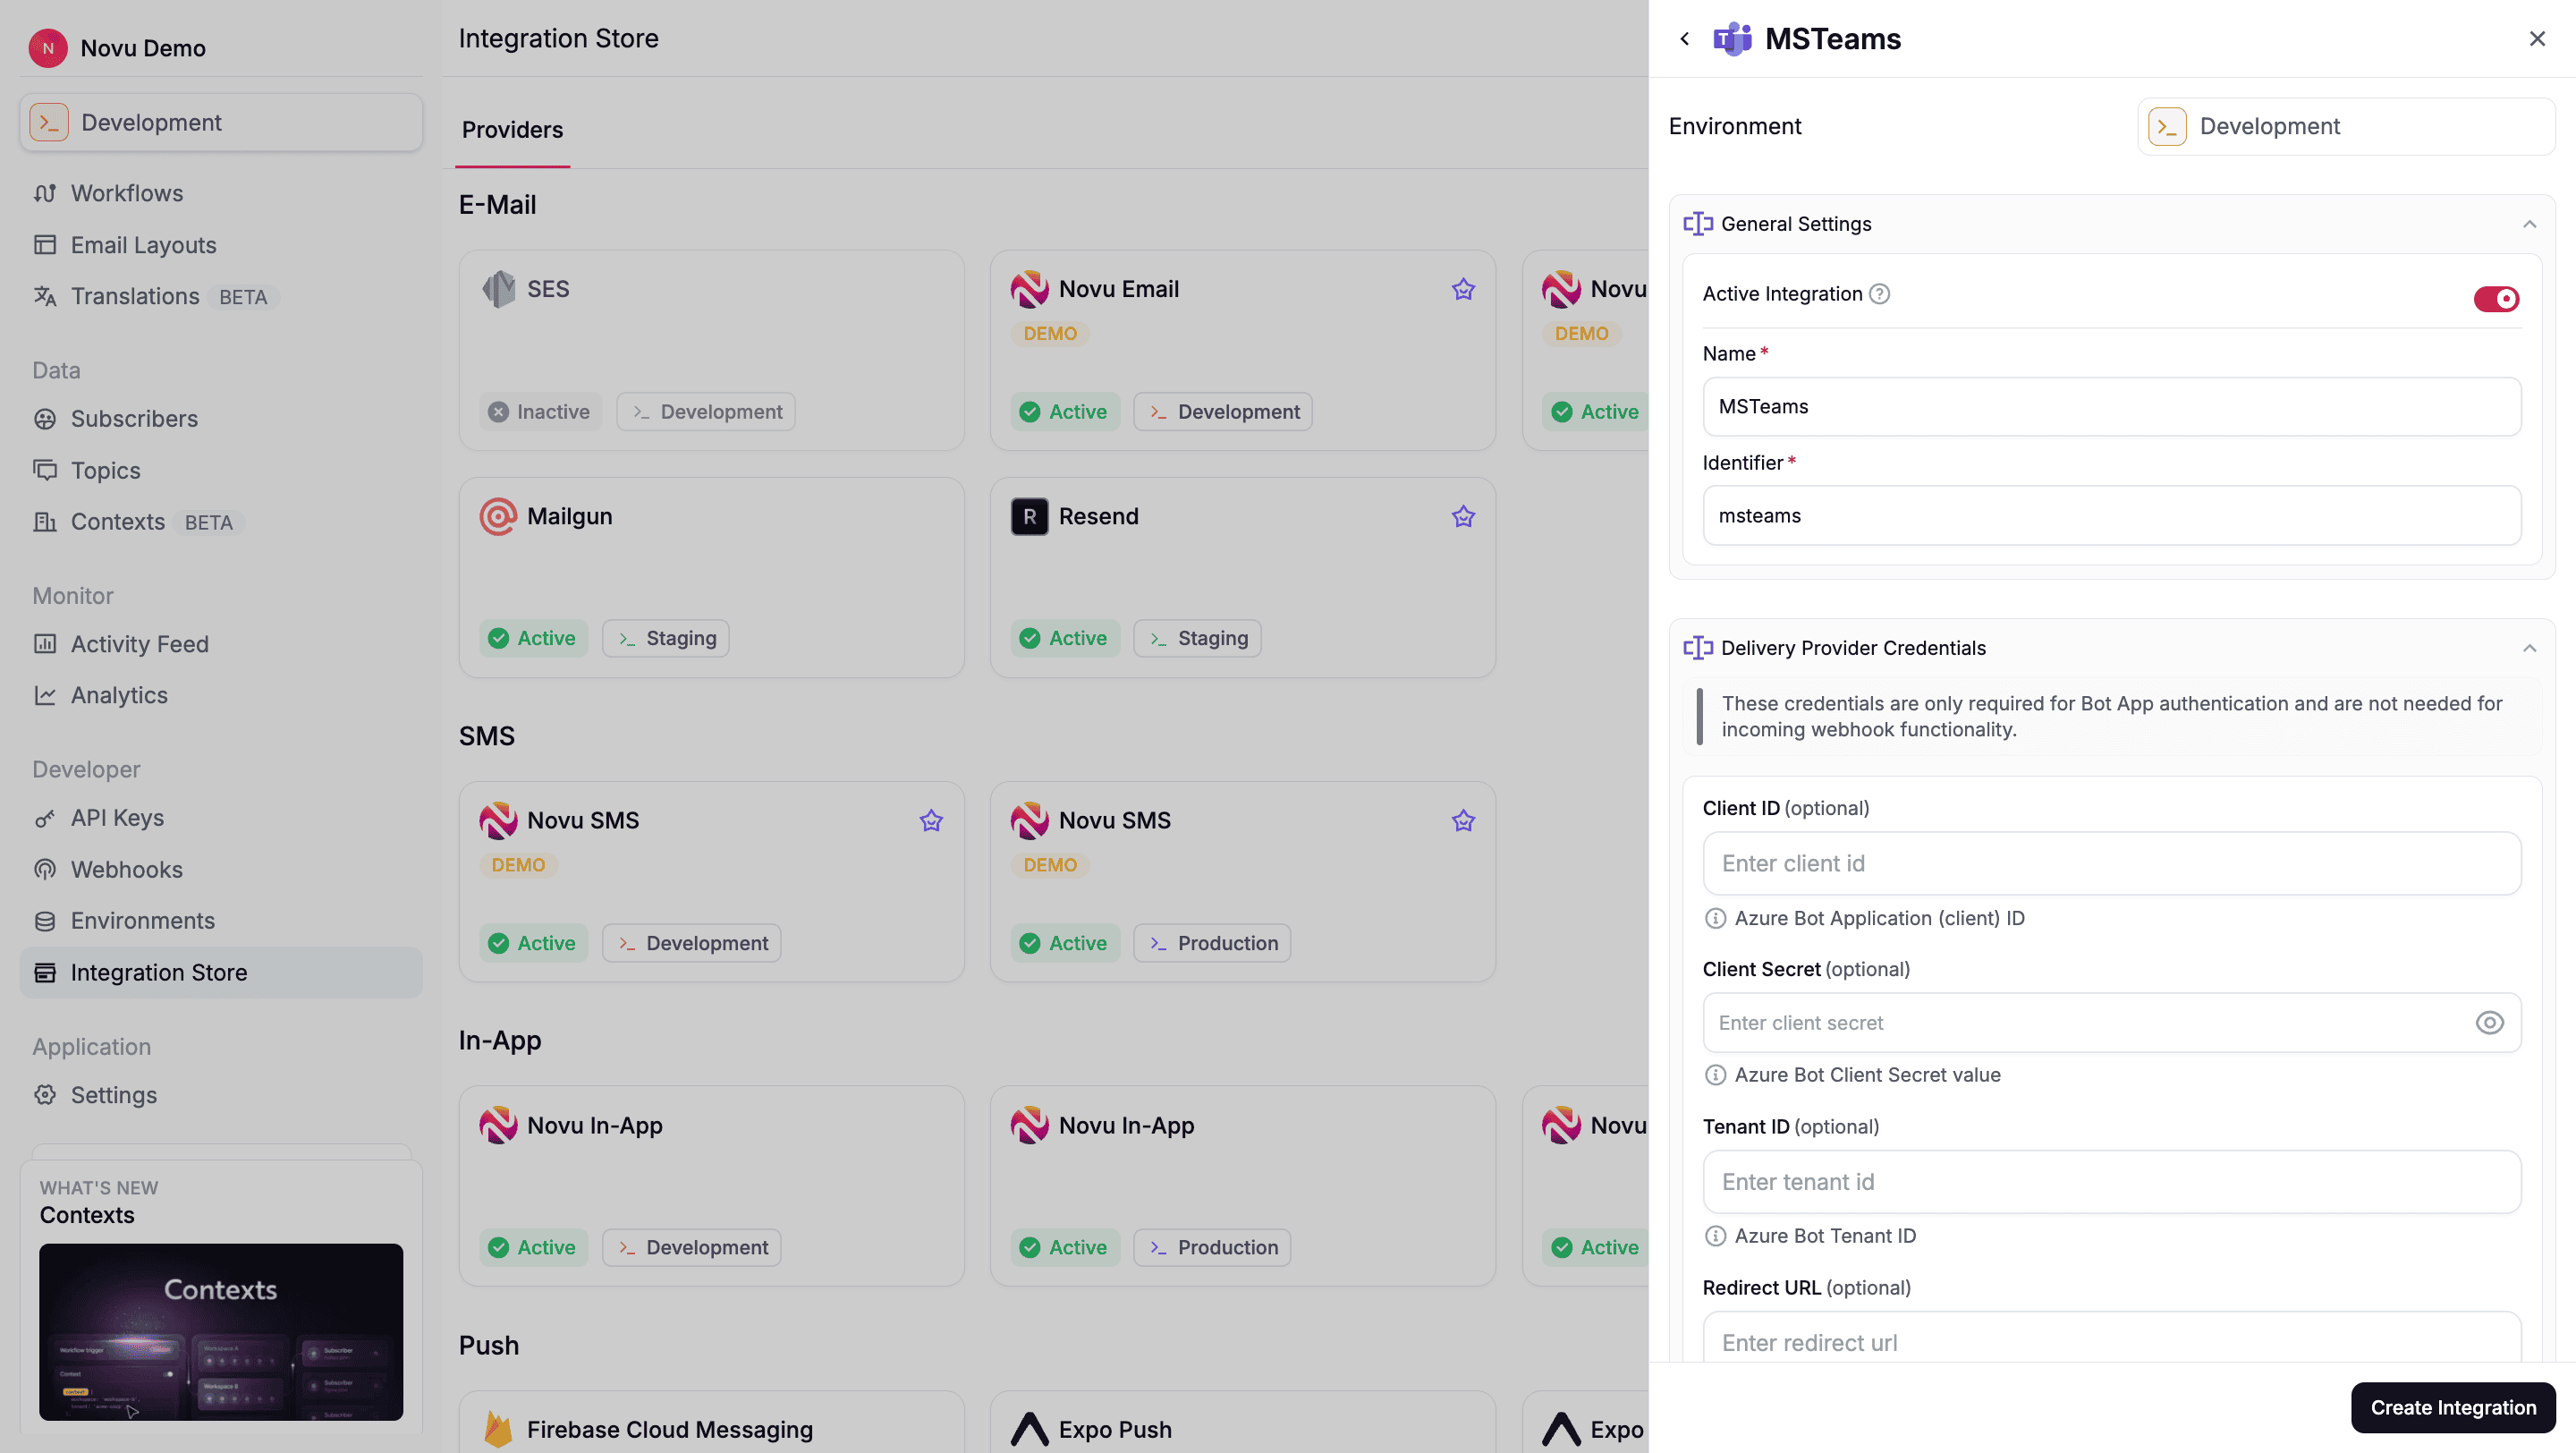 Review your credentials, then click **Create Integration** to save.
From now on, Novu can send messages as your bot once an organization's tenant is connected and the app is installed in Teams.
**Try the Microsoft Teams integration with a demo app**
If you’ve completed the previous steps, you can test your bot configuration end to end with this [demo app](https://github.com/novuhq/ms-teams-example).
## Next
Generate admin consent, install the app, and register channel or DM destinations.
Review your credentials, then click **Create Integration** to save.
From now on, Novu can send messages as your bot once an organization's tenant is connected and the app is installed in Teams.
**Try the Microsoft Teams integration with a demo app**
If you’ve completed the previous steps, you can test your bot configuration end to end with this [demo app](https://github.com/novuhq/ms-teams-example).
## Next
Generate admin consent, install the app, and register channel or DM destinations.