Use Clerks webhooks events to trigger authentication related notifications workflows.
Use Stripe webhooks events to trigger payment related notifications workflows.
Use Segment's Destination Functions to forward user events and traits to trigger notification workflows.
Use Inngest's event-driven workflows to trigger notifications at specific steps in your automation pipeline.
Leverage Trigger.dev's developer-friendly workflow engine to send notifications based on scheduled or event-driven triggers.
`encrypt-credentials` *(Secure Credentials)*
`expire-at` *(Database TTL)*
`fcm-credentials` *(Secure Credentials)*
`in-app-integration` *(In-App Integration)*
`normalize-users-email` *(Organization Invite Fix)*
`secure-to-boolean` *(Secure Flag Fix)*
`seen-read-support` *(Seen/Read Support)* | | [`v0.21.0`](https://github.com/novuhq/novu/releases/tag/v0.19.0) | 2023-09-01 | `integration-scheme-update` *(Multi-Provider)*
`layout-identifier-update` *(Add layout identifier)* | | [`v0.23.0`](https://github.com/novuhq/novu/releases/tag/v0.23.0) | 2024-02-02 | `encrypt-api-keys` *(API keys encryption)* | | [`v0.24.0`](https://github.com/novuhq/novu/releases/tag/v0.24.0) | 2024-03-06 | `normalize-message-template-cta-action` *(Normalize CTA action)*
`topic-subscriber-normalize` *(Normalize topic-subscriber links)* | | [`v2.0.0`](https://github.com/novuhq/novu/releases/tag/v2.0.0) | 2024-10-07 | `subscribers` *(Subscriber record adjustments)* | | [`v2.0.1`](https://github.com/novuhq/novu/releases/tag/v2.0.1) | 2024-11-11 | `preference-centralization` *(Preference model centralization)* — **ensure this is done before v2.1 as repository access has been removed** | | *(future release)* | *sometime 2025* | `deleteLogs` *(Cleanup deleted logs)* | ### Historical releases | Version | Feature | Migration Path(s) | | ------------------------------------------------------------ | ----------------------- | ------------------------------------------------------------------------------------------------------------------------------------------ | | [v0.23](https://github.com/novuhq/novu/releases/tag/v0.23.0) | API keys encryption | `./encrypt-api-keys/encrypt-api-keys-migration.ts` | | [v0.18](https://github.com/novuhq/novu/releases/tag/v0.18.0) | Multi-Provider | `./integration-scheme-update/add-primary-priority-migration.ts`
`./integration-scheme-update/add-integration-identifier-migration.ts` | | | Integration Store | `./novu-integrations/novu-integrations.migration.ts` | | [v0.16](https://github.com/novuhq/novu/releases/tag/v0.16.0) | In-App Integration | `./in-app-integration/in-app-integration.migration.ts` | | | Secure Flag Fix | `./secure-to-boolean/secure-to-boolean-migration.ts` | | [v0.15](https://github.com/novuhq/novu/releases/tag/v0.15.0) | Database TTL | `./expire-at/expire-at.migration.ts` | | [v0.12](https://github.com/novuhq/novu/releases/tag/v0.12.0) | Organization Invite Fix | `./normalize-users-email/normalize-users-email.migration.ts` | | [v0.9](https://github.com/novuhq/novu/releases/tag/v0.9.0) | Seen/Read Support | `./seen-read-support/seen-read-support.migration.ts` | | [v0.8](https://github.com/novuhq/novu/releases/tag/v0.8.0) | Secure Credentials | `./fcm-credentials/fcm-credentials-migration.ts`
`./encrypt-credentials/encrypt-credentials-migration.ts` | | [v0.4](https://github.com/novuhq/novu/releases/tag/v0.4.0) | Change Promotion | `./changes-migration.ts` | ## Step-by-Step Instructions ### Runtime prerequisites * `node` * `npm` * `pnpm` * `npx` * MacOS (or linux) * tunnel (optional `ssh`) Some migration scripts (like `in-app-integration`) require access to Redis during execution. If Redis is not running, you will encounter `ECONNREFUSED 127.0.0.1:6379`. The problem here is that remote environments have their own Redis and currently the assumption is that migrations should only affect the MongoDB collection. To fix this start Redis locally ( or launch a Docker container: `docker run -p 6379:6379 redis`) ### 1. Clone the Novu Repository Ensure you’re using the same version as the one you’re deploying: ```bash git clone https://github.com/novuhq/novu.git cd novu git checkout
Welcome, {name}!
Thanks for trying Svelte Email. We're thrilled to have you on board.
Welcome, {{ name }}!
Thanks for trying Vue Email. We're thrilled to have you on board.
The Novu framework allows you to build and manage advanced notification workflows with code, and expose no-code controls for non-technical users to modify.
The Novu framework allows you to build and manage advanced notification workflows with code, and expose no-code controls for non-technical users to modify.
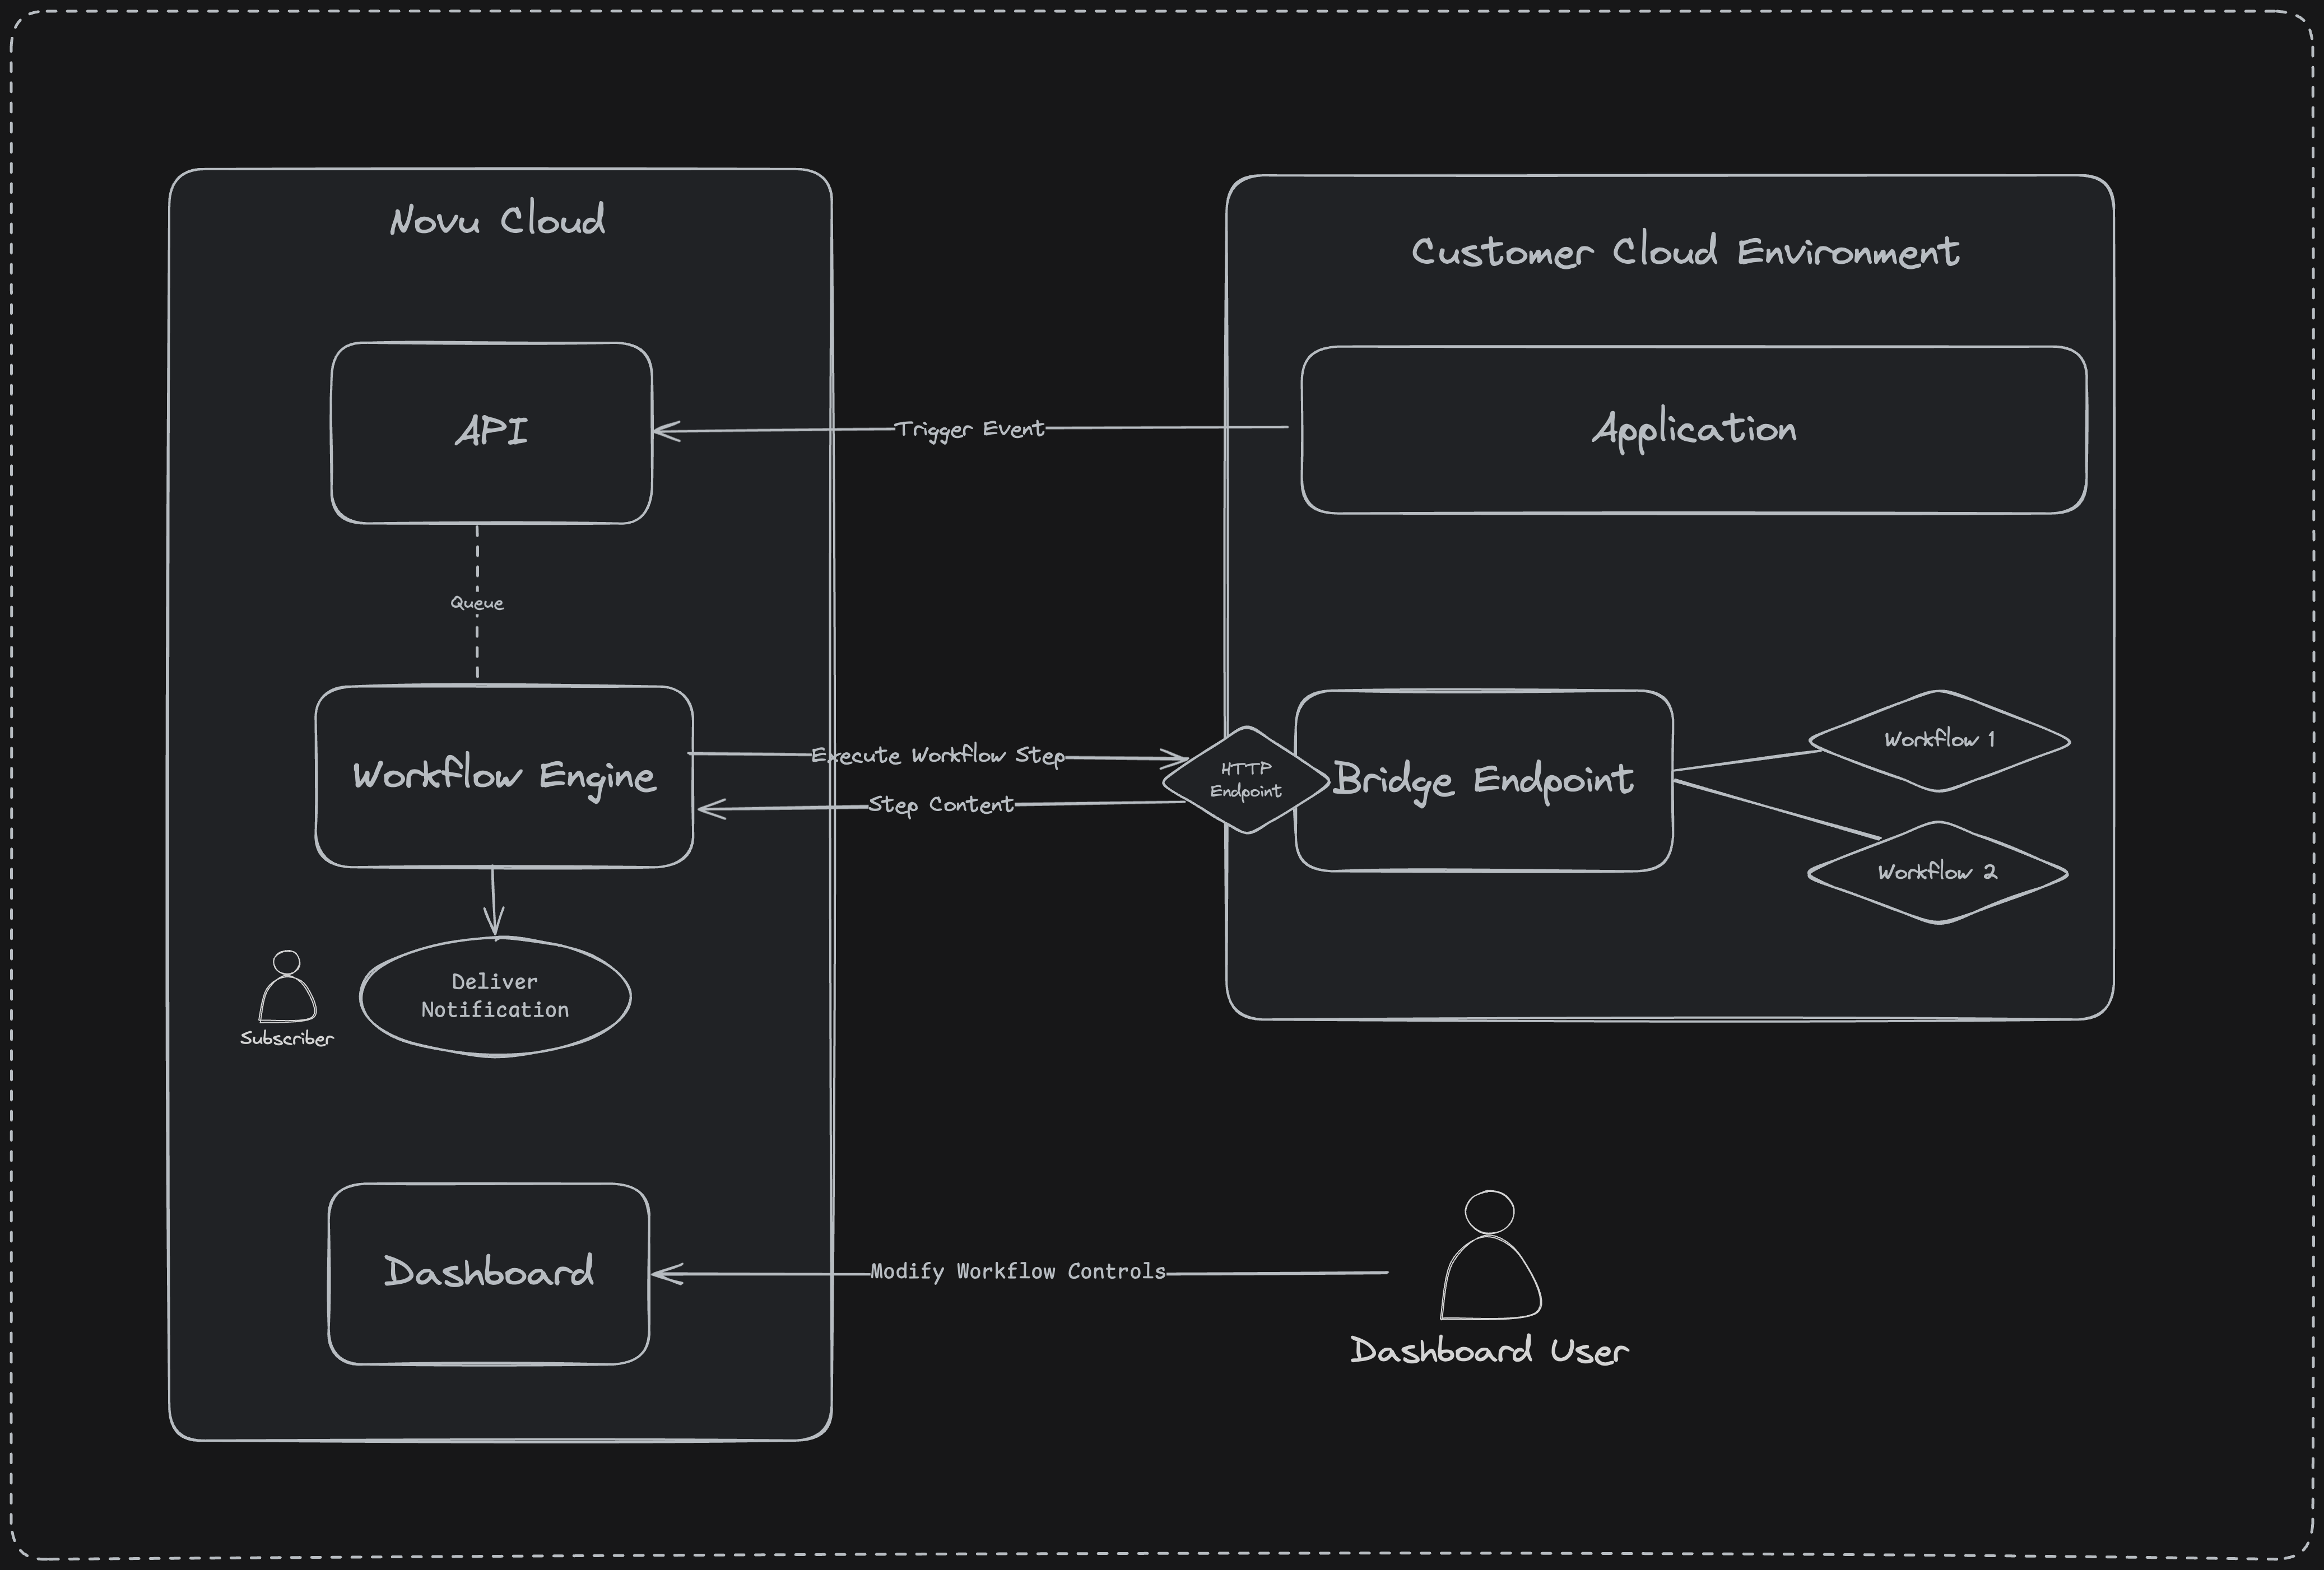 ### Build phase
When [building new workflows](/platform/workflow/overview), you will be using the [Novu Framework SDK](/framework/typescript/overview) to define the workflows and their steps directly in your IDE. The local workflows can be previewed and tested using our [Local Studio](/framework/studio) companion app.
### Sync phase
A sync is needed once a notification workflow code is created or updated. We offer multiple sync methods including CI/CD integrations and a custom CLI tool.
During a sync, the workflows defined using the Novu Framework SDK will be pushed to our cloud service and will be persisted in our database.
Once synced, you will be able to view the workflows in the workflows Page on the Dashboard. All the controls created using JSON Schema or Zod will be transformed into UI elements that can be modified without changing the source code. Read more about controls [here](/framework/controls).
### Execution phase
Once a workflow is synced, the workflow engine will make API requests to the bridge endpoint to execute individual workflow steps.
After the fan-out is complete, the bridge endpoint will be triggered with the relevant execution context and will respond with the compiled content and metadata needed to deliver the notification.
## Get Started
To get started with the framework endpoint, visit the Getting Started page relevant to your tech-stack:
### Build phase
When [building new workflows](/platform/workflow/overview), you will be using the [Novu Framework SDK](/framework/typescript/overview) to define the workflows and their steps directly in your IDE. The local workflows can be previewed and tested using our [Local Studio](/framework/studio) companion app.
### Sync phase
A sync is needed once a notification workflow code is created or updated. We offer multiple sync methods including CI/CD integrations and a custom CLI tool.
During a sync, the workflows defined using the Novu Framework SDK will be pushed to our cloud service and will be persisted in our database.
Once synced, you will be able to view the workflows in the workflows Page on the Dashboard. All the controls created using JSON Schema or Zod will be transformed into UI elements that can be modified without changing the source code. Read more about controls [here](/framework/controls).
### Execution phase
Once a workflow is synced, the workflow engine will make API requests to the bridge endpoint to execute individual workflow steps.
After the fan-out is complete, the bridge endpoint will be triggered with the relevant execution context and will respond with the compiled content and metadata needed to deliver the notification.
## Get Started
To get started with the framework endpoint, visit the Getting Started page relevant to your tech-stack:
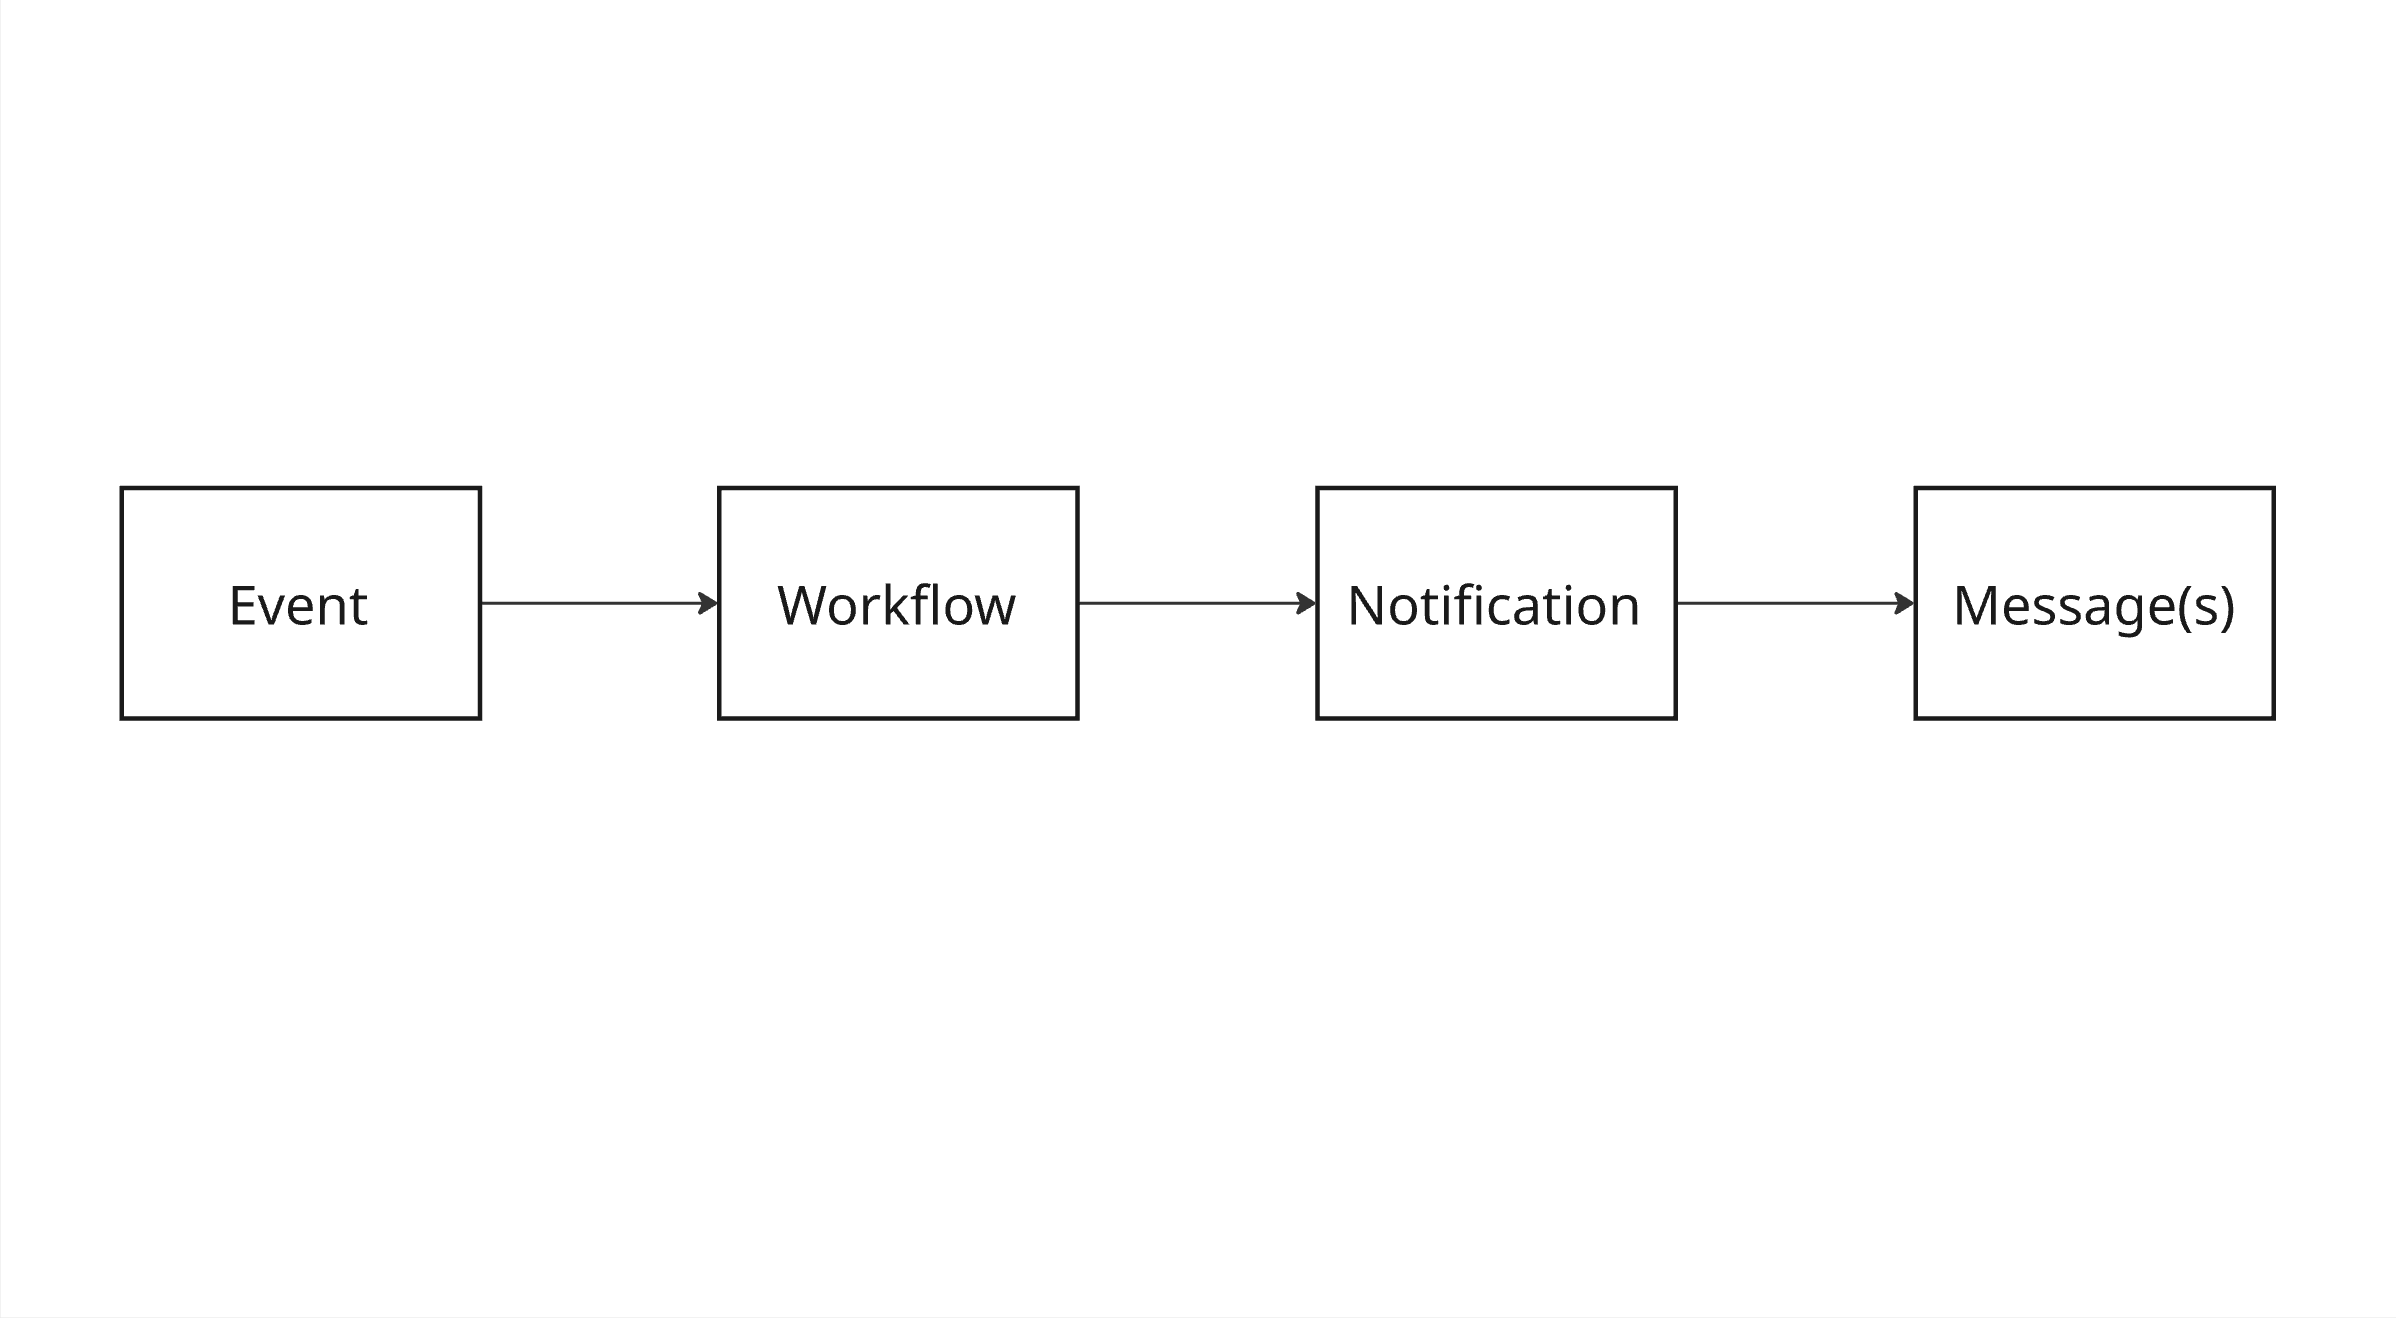 ### Event
Something meaningful happens in your application, such as a user signing up, a password reset being requested, or a comment being posted. You emit this event to Novu using the [Event Trigger API](/api-reference/events/trigger-event).
Each event contains:
* A name that maps to a specific workflow (user\_signed\_up)
* A payload with dynamic data
* One or more subscribers
* Optional overrides or metadata
This is how your application tells Novu, “It’s time to send something.”
### Workflow
Novu matches the incoming event to a predefined workflow. This workflow is your logic for determining:
* What channels to use (email, in-app, SMS, etc.)
* What message templates to render
* When and how messages should be sent
The workflow is where message personalization, conditional logic, and multi-channel orchestration happens.
### Event
Something meaningful happens in your application, such as a user signing up, a password reset being requested, or a comment being posted. You emit this event to Novu using the [Event Trigger API](/api-reference/events/trigger-event).
Each event contains:
* A name that maps to a specific workflow (user\_signed\_up)
* A payload with dynamic data
* One or more subscribers
* Optional overrides or metadata
This is how your application tells Novu, “It’s time to send something.”
### Workflow
Novu matches the incoming event to a predefined workflow. This workflow is your logic for determining:
* What channels to use (email, in-app, SMS, etc.)
* What message templates to render
* When and how messages should be sent
The workflow is where message personalization, conditional logic, and multi-channel orchestration happens.
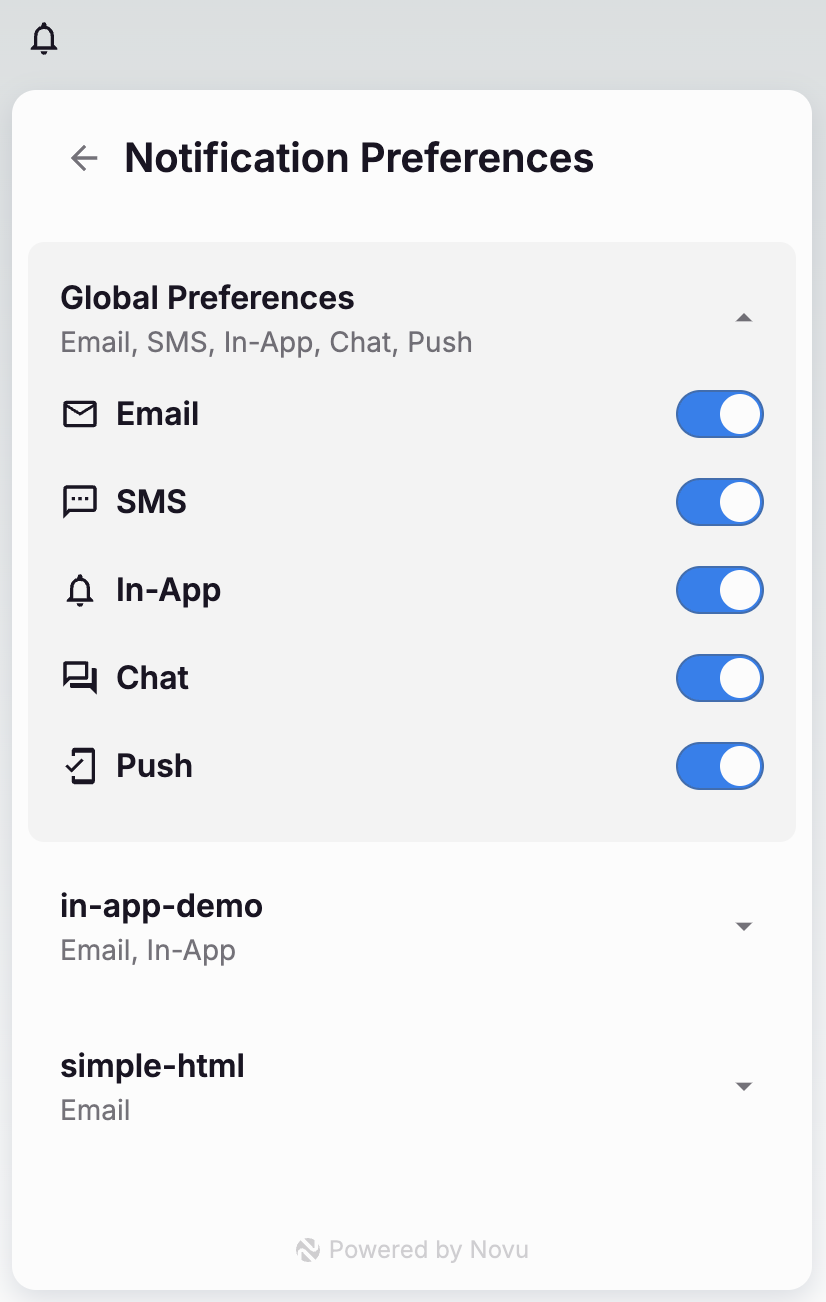
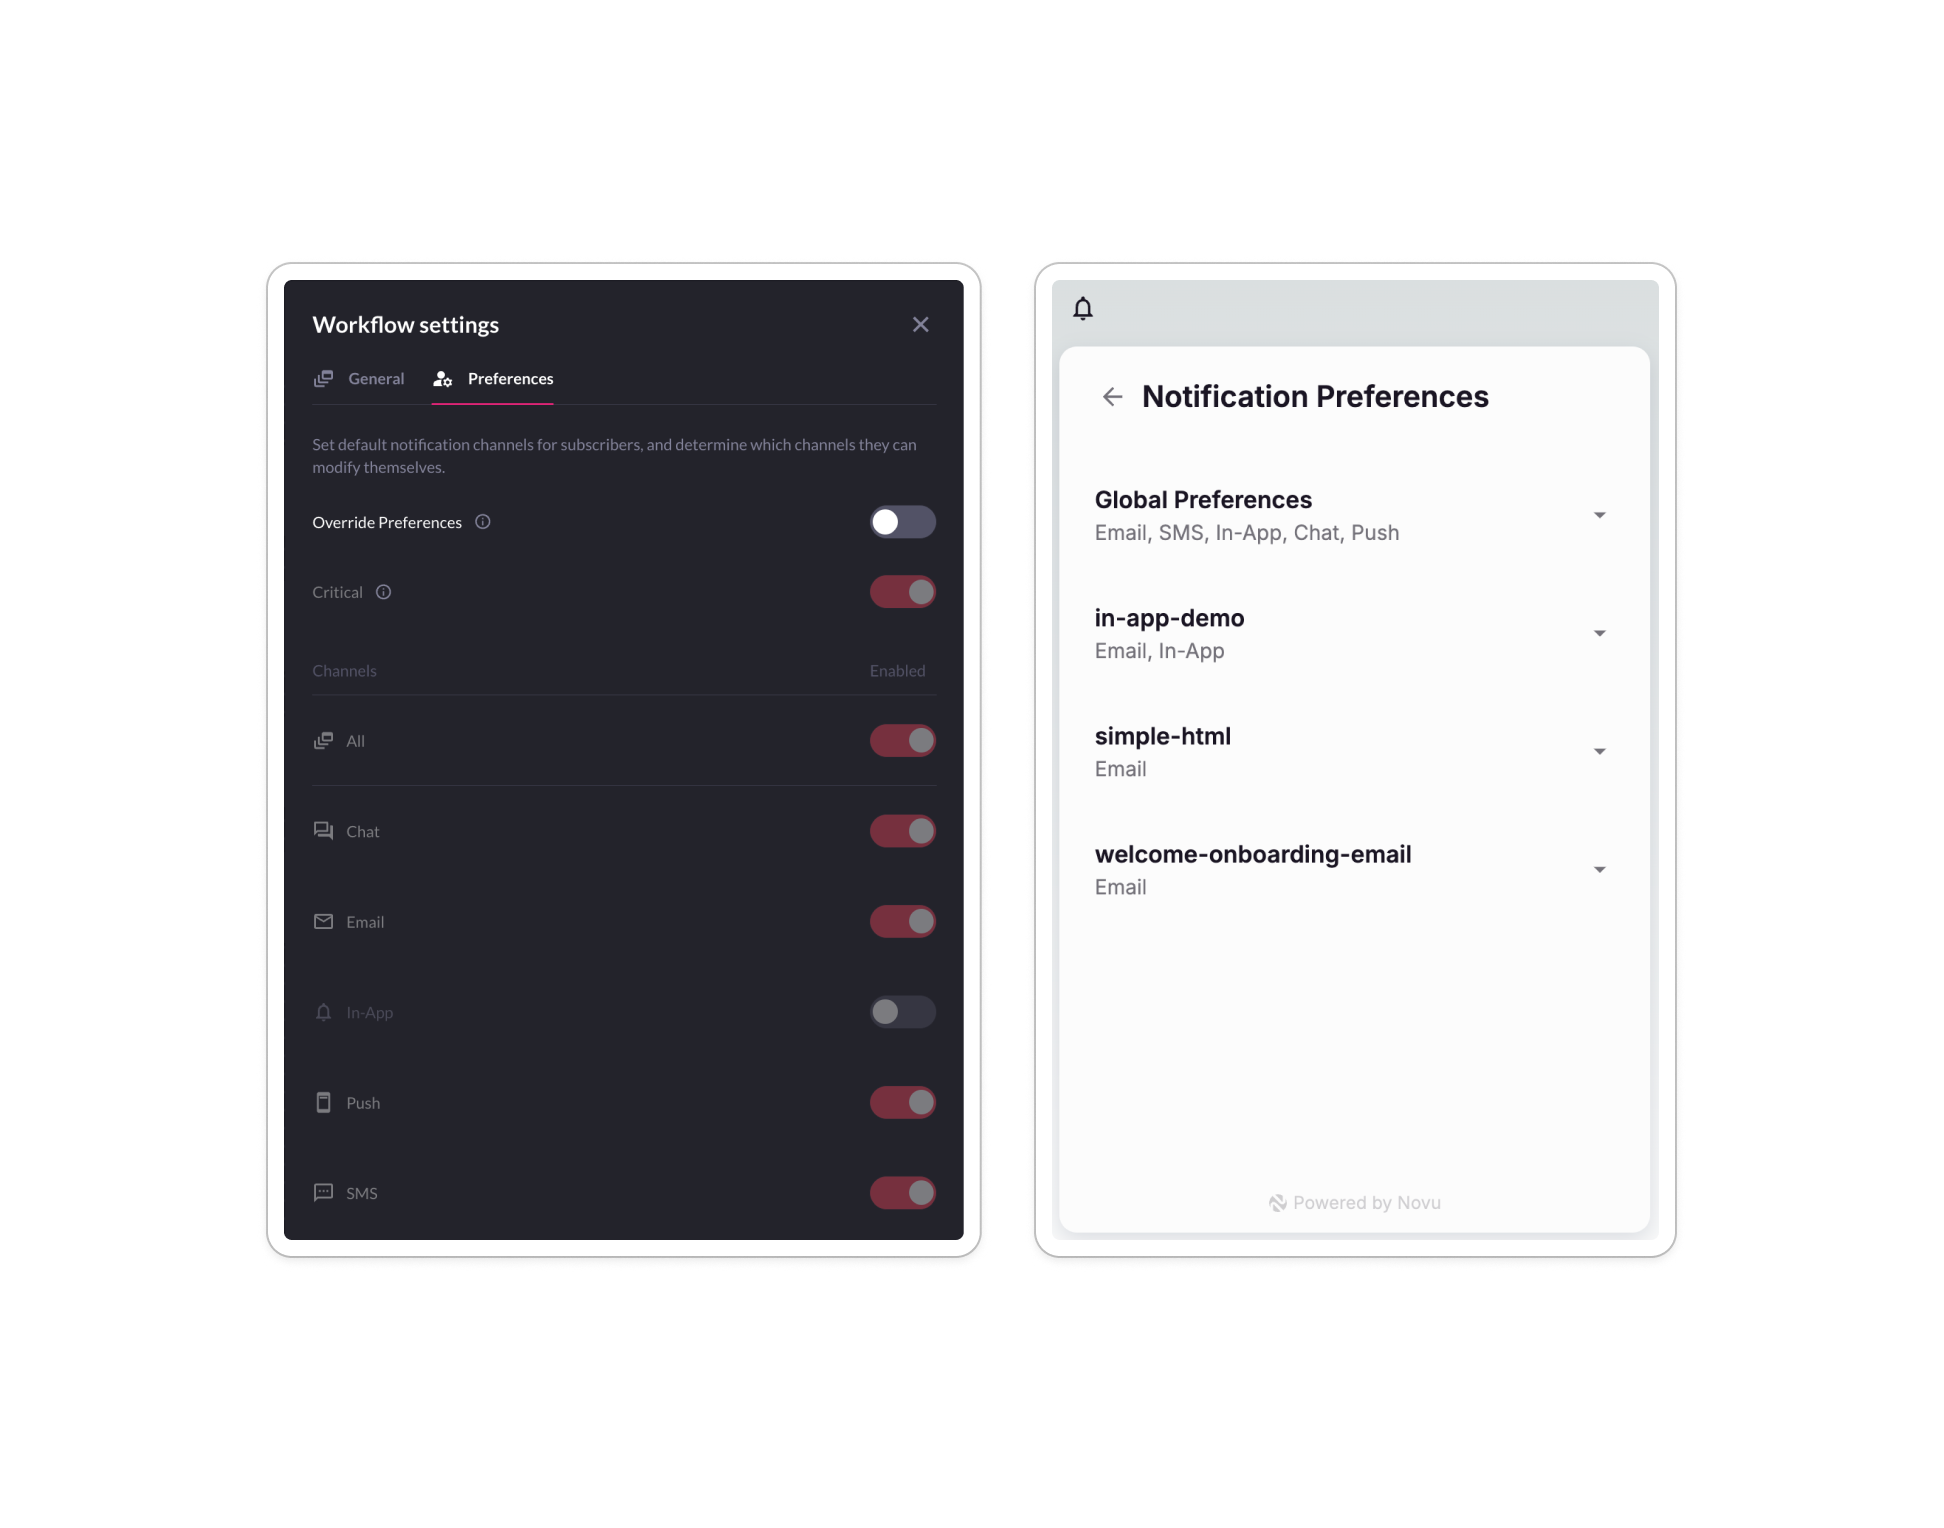 ## Subscriber channel preferences per workflow
`
## Subscriber channel preferences per workflow
`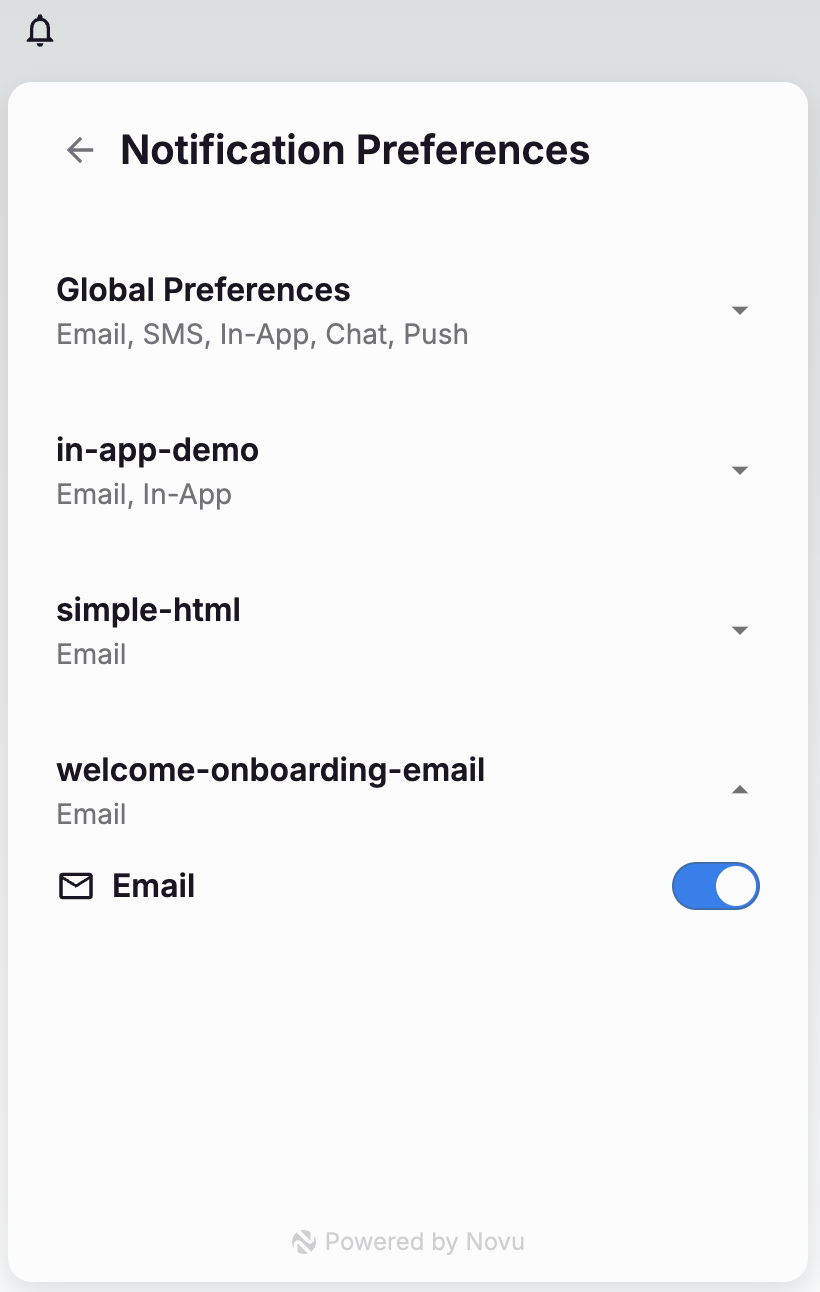
 ## Critical workflows
In some cases, you don't want the subscriber to be able to unsubscribe from mandatory notifications such as Account Verification, Password Reset, etc...
In those cases you can mark a workflow as `critical` in the Dashboard. Critical workflow are not displayed in the subscriber preferences page.
file: ./content/docs/platform/concepts/subscribers.mdx
# Subscribers
Learn what a subscriber is in Novu, how they’re identified, and how they fit into the notification system.
import { Tab, Tabs } from 'fumadocs-ui/components/tabs';
In Novu, a subscriber represents a user or system entity that is intended to receive notifications. Subscribers are central to Novu’s delivery model: workflows are triggered with one or more targeted subscribers, and all delivery logic, such as channel routing, preferences, and personalization is applied at the subscriber level.
## How Novu identifies a subscriber
Each subscriber is uniquely identified in Novu by a `subscriberId`. This ID is defined by your application and serves as the reference point for all subscriber-related operations whether sending messages, retrieving preferences, or managing user data.
Unlike email addresses or phone numbers, which may change or be shared across users, the `subscriberId` must remain stable and unique within your system. It acts as the anchor that connects a subscriber’s profile, activity history, and delivery settings across all channels and workflows.
## Critical workflows
In some cases, you don't want the subscriber to be able to unsubscribe from mandatory notifications such as Account Verification, Password Reset, etc...
In those cases you can mark a workflow as `critical` in the Dashboard. Critical workflow are not displayed in the subscriber preferences page.
file: ./content/docs/platform/concepts/subscribers.mdx
# Subscribers
Learn what a subscriber is in Novu, how they’re identified, and how they fit into the notification system.
import { Tab, Tabs } from 'fumadocs-ui/components/tabs';
In Novu, a subscriber represents a user or system entity that is intended to receive notifications. Subscribers are central to Novu’s delivery model: workflows are triggered with one or more targeted subscribers, and all delivery logic, such as channel routing, preferences, and personalization is applied at the subscriber level.
## How Novu identifies a subscriber
Each subscriber is uniquely identified in Novu by a `subscriberId`. This ID is defined by your application and serves as the reference point for all subscriber-related operations whether sending messages, retrieving preferences, or managing user data.
Unlike email addresses or phone numbers, which may change or be shared across users, the `subscriberId` must remain stable and unique within your system. It acts as the anchor that connects a subscriber’s profile, activity history, and delivery settings across all channels and workflows.
 ## Getting Started
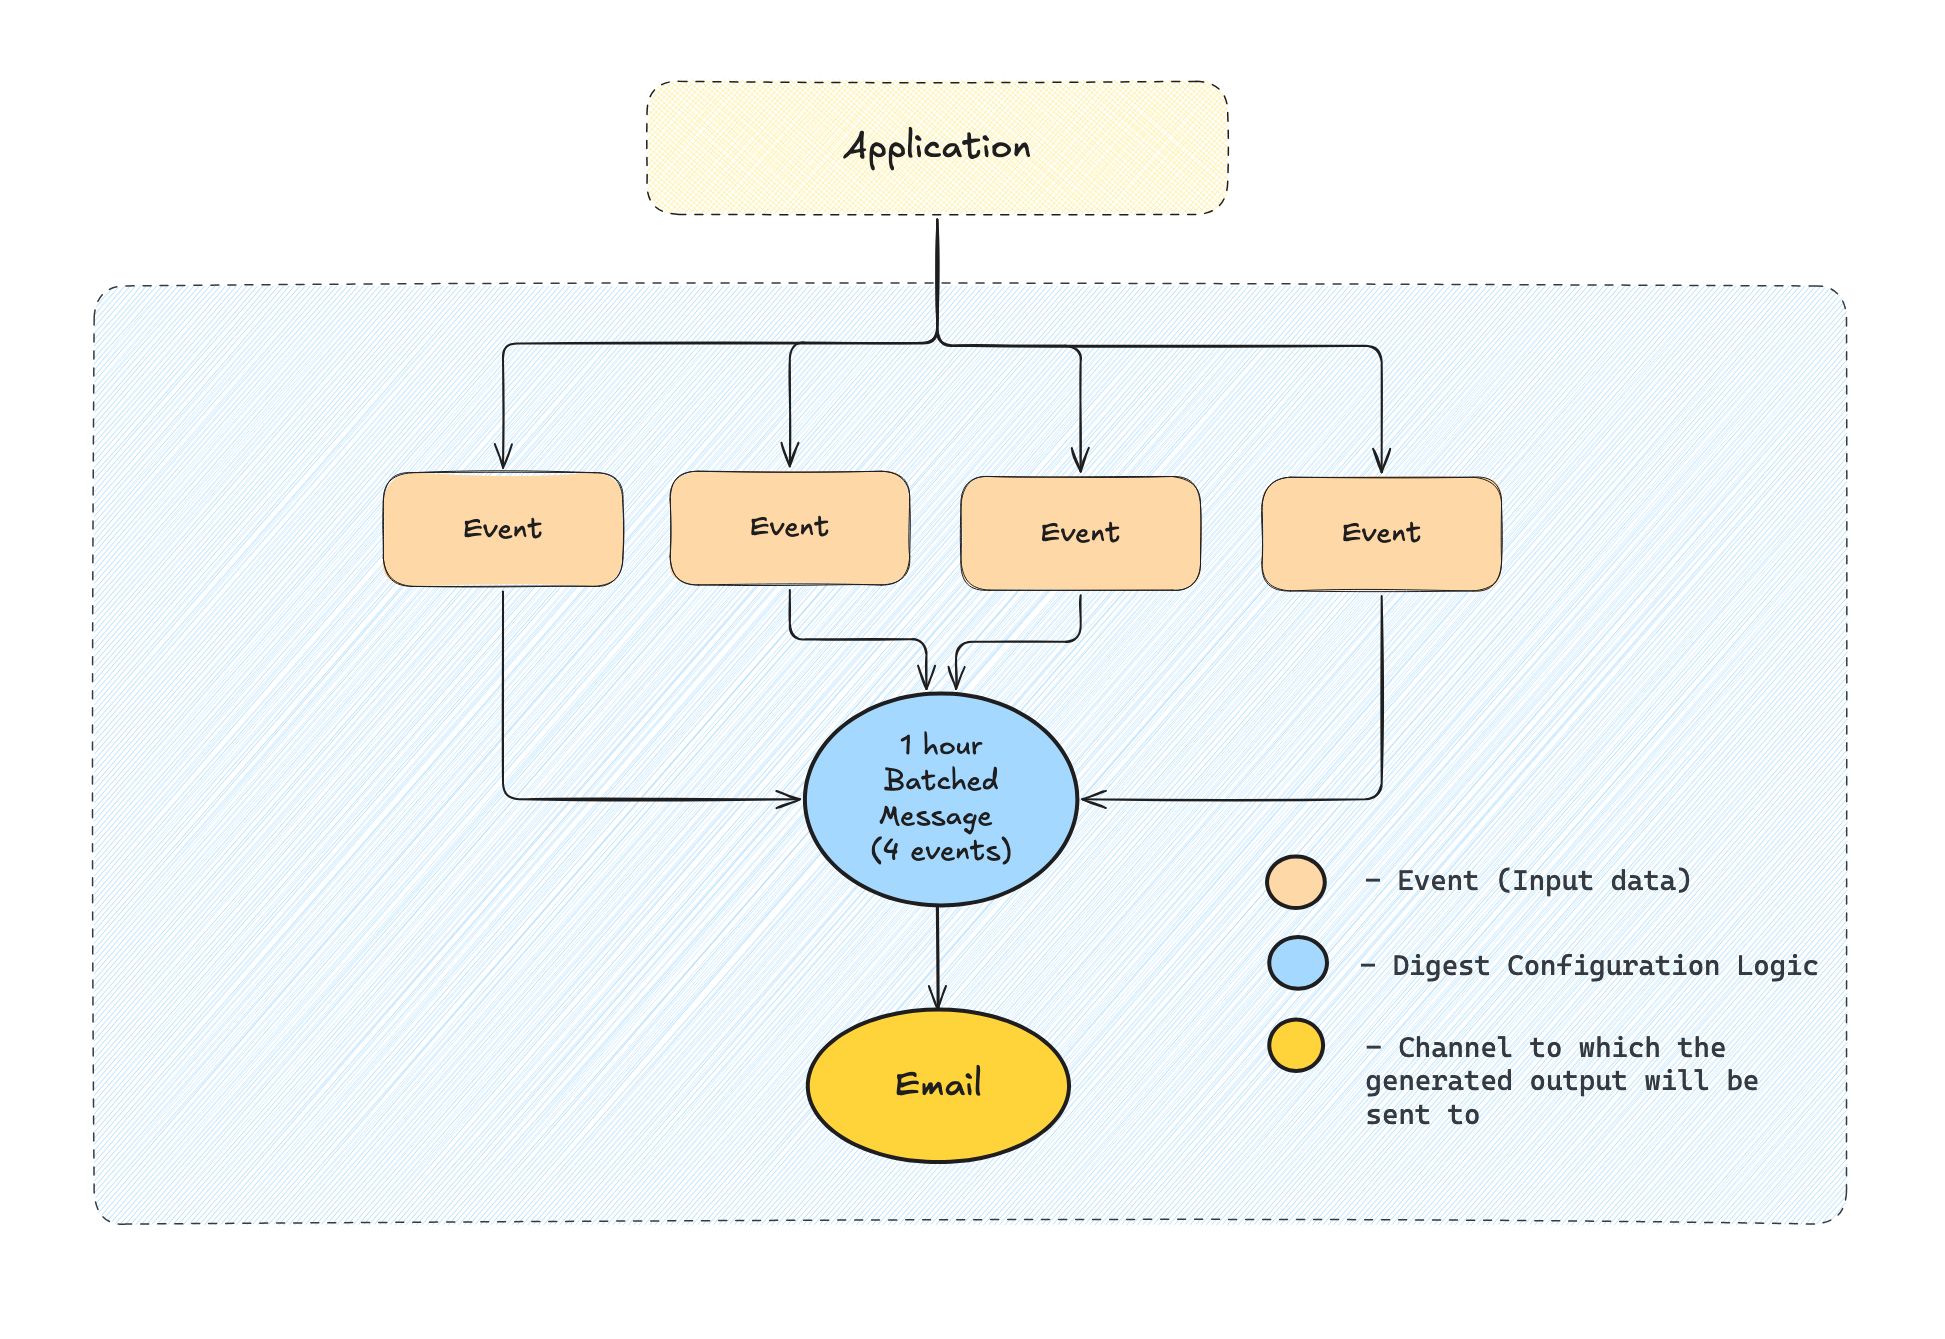 ## Digest configuration
### Digest key
If specified, the digest engine will group the events based on the `digestKey` and `subscriberId`, otherwise the digest engine will group the events based only on the subscriberId.
The digest key might come useful when you want a particular subscriber to get events grouped on a custom field. For example when an actor likes the user's post, you might want to digest based on the `post_id` key.
### Time interval
The time interval determines how long the digest engine will wait before sending the message once created. You can specify the amount and the unit that best suits your needs.
In the image below, `5` is the interval amount, and `mins` is the interval unit. Interval units can be `sec(s)`, `min(s)`, `hour(s)`, or `day(s)`.
## Digest strategy types
The strategy which Novu should use to handle the digest step. More details on available strategies below.
Novu allows you to define different digest strategies depending on the actual use-case you are trying to achieve. At this point we allow you to select from 2 strategies:
* Regular
* Look-back
* Scheduled
Let's explore them in detail:
### Regular strategy
In regular strategy, a digest will always be created for the specified window time. Which means that from the first event trigger, if no active digest exists for this subscriber, one will be created and the user will receive the message only when the digest window time is reached.
### Look-back strategy
In the Look-Back strategy, before creating a digest, Novu will check if a message was sent to the user in the Look-back period. If a message was sent, a digest will be created. Otherwise, a message will be sent directly to the user and the digest creation will be skipped.
Look-back digest has two intervals, `digest interval` and `look-back window`. First, it checks if any event is triggered within the past look-back window, only then a digest is created for the digest interval. If not, the event is considered non-digest and workflow execution continues to the next step.
#### Example
Let's set the digest interval as 20 minutes and the look-back interval as 15 minutes.
If we trigger the first event. Since it is the first event and there was no event triggered in the past 15 minutes (look-back interval), this event will send a message immediately (without digest).
Now, if we trigger a second event within 15 minutes range, then a new digest will be created with this second event. From now on, for the next 20 minutes (digest interval), all triggers will be digested, and after 20 minutes, the workflow will carry forward to the next step with digested events as a payload.
### Scheduled digest
## Digest configuration
### Digest key
If specified, the digest engine will group the events based on the `digestKey` and `subscriberId`, otherwise the digest engine will group the events based only on the subscriberId.
The digest key might come useful when you want a particular subscriber to get events grouped on a custom field. For example when an actor likes the user's post, you might want to digest based on the `post_id` key.
### Time interval
The time interval determines how long the digest engine will wait before sending the message once created. You can specify the amount and the unit that best suits your needs.
In the image below, `5` is the interval amount, and `mins` is the interval unit. Interval units can be `sec(s)`, `min(s)`, `hour(s)`, or `day(s)`.
## Digest strategy types
The strategy which Novu should use to handle the digest step. More details on available strategies below.
Novu allows you to define different digest strategies depending on the actual use-case you are trying to achieve. At this point we allow you to select from 2 strategies:
* Regular
* Look-back
* Scheduled
Let's explore them in detail:
### Regular strategy
In regular strategy, a digest will always be created for the specified window time. Which means that from the first event trigger, if no active digest exists for this subscriber, one will be created and the user will receive the message only when the digest window time is reached.
### Look-back strategy
In the Look-Back strategy, before creating a digest, Novu will check if a message was sent to the user in the Look-back period. If a message was sent, a digest will be created. Otherwise, a message will be sent directly to the user and the digest creation will be skipped.
Look-back digest has two intervals, `digest interval` and `look-back window`. First, it checks if any event is triggered within the past look-back window, only then a digest is created for the digest interval. If not, the event is considered non-digest and workflow execution continues to the next step.
#### Example
Let's set the digest interval as 20 minutes and the look-back interval as 15 minutes.
If we trigger the first event. Since it is the first event and there was no event triggered in the past 15 minutes (look-back interval), this event will send a message immediately (without digest).
Now, if we trigger a second event within 15 minutes range, then a new digest will be created with this second event. From now on, for the next 20 minutes (digest interval), all triggers will be digested, and after 20 minutes, the workflow will carry forward to the next step with digested events as a payload.
### Scheduled digest
 In this case, the step will execute only if `payload.foo` is equal to `payload.bar` at runtime.
You can also use subscriber variables in the same way:
```json
{
"operator": "AND",
"conditions": [
{
"field": "subscriber.firstName",
"operator": "=",
"value": "{{payload.firstName}}"
}
]
}
```
In this case, the step will execute only if `payload.foo` is equal to `payload.bar` at runtime.
You can also use subscriber variables in the same way:
```json
{
"operator": "AND",
"conditions": [
{
"field": "subscriber.firstName",
"operator": "=",
"value": "{{payload.firstName}}"
}
]
}
```
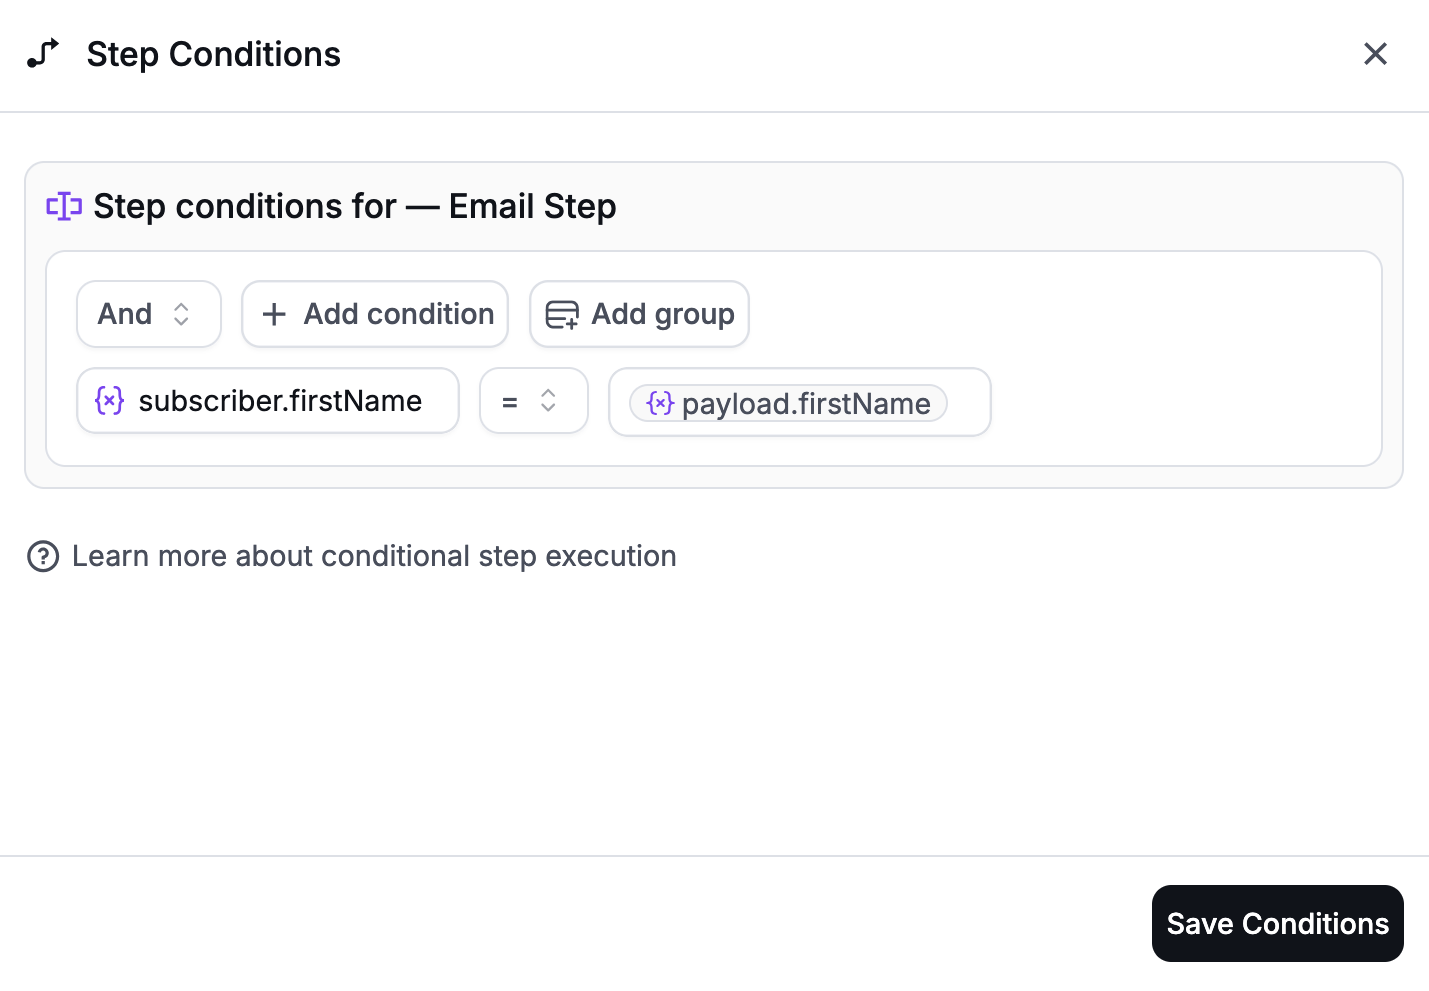 This enables flexible condition logic based on real-time data comparisons.
## Building Condition Groups
Novu allows you to group multiple conditions using **AND** and **OR** operators to create complex logic. For instance:
* **AND Group**: All conditions in the group must be true for the step to execute.
* **OR Group**: At least one condition in the group must be true.
Condition groups can also be nested for advanced use cases.
Novu's Step Condition feature empowers you to build intelligent and dynamic workflows tailored to your specific use cases. By leveraging subscriber data, payload information, and step outcomes, you can ensure that each notification reaches the right audience at the right time with the appropriate content.
file: ./content/docs/platform/workflow/tags.mdx
# Tags
Learn how to organize and manage notification tags using Novu's visual workflow editor for better user experience and notification management.
**Tags** act like labels or categories that help you organize and manage notifications in your app. By grouping notifications under specific tags, you can better control how they're filtered, displayed, or managed by both your app and your users.
For example, you might want to group all security-related notifications together, separate from updates about account activity or promotional offers.
## Why Use Tags?
* **Filtering Notifications**: Tags make it easy to filter and display notifications based on categories.
For instance, you can create a UI that allows users to view only security or promotional notifications. Learn more about using tags to filter notifications in the [Inbox](/platform/inbox/react/multiple-tabs) section.
Think of it as organizing emails into folders—tags help keep things tidy and manageable for both you and your users.
## How to Add Tags to Notifications
This enables flexible condition logic based on real-time data comparisons.
## Building Condition Groups
Novu allows you to group multiple conditions using **AND** and **OR** operators to create complex logic. For instance:
* **AND Group**: All conditions in the group must be true for the step to execute.
* **OR Group**: At least one condition in the group must be true.
Condition groups can also be nested for advanced use cases.
Novu's Step Condition feature empowers you to build intelligent and dynamic workflows tailored to your specific use cases. By leveraging subscriber data, payload information, and step outcomes, you can ensure that each notification reaches the right audience at the right time with the appropriate content.
file: ./content/docs/platform/workflow/tags.mdx
# Tags
Learn how to organize and manage notification tags using Novu's visual workflow editor for better user experience and notification management.
**Tags** act like labels or categories that help you organize and manage notifications in your app. By grouping notifications under specific tags, you can better control how they're filtered, displayed, or managed by both your app and your users.
For example, you might want to group all security-related notifications together, separate from updates about account activity or promotional offers.
## Why Use Tags?
* **Filtering Notifications**: Tags make it easy to filter and display notifications based on categories.
For instance, you can create a UI that allows users to view only security or promotional notifications. Learn more about using tags to filter notifications in the [Inbox](/platform/inbox/react/multiple-tabs) section.
Think of it as organizing emails into folders—tags help keep things tidy and manageable for both you and your users.
## How to Add Tags to Notifications
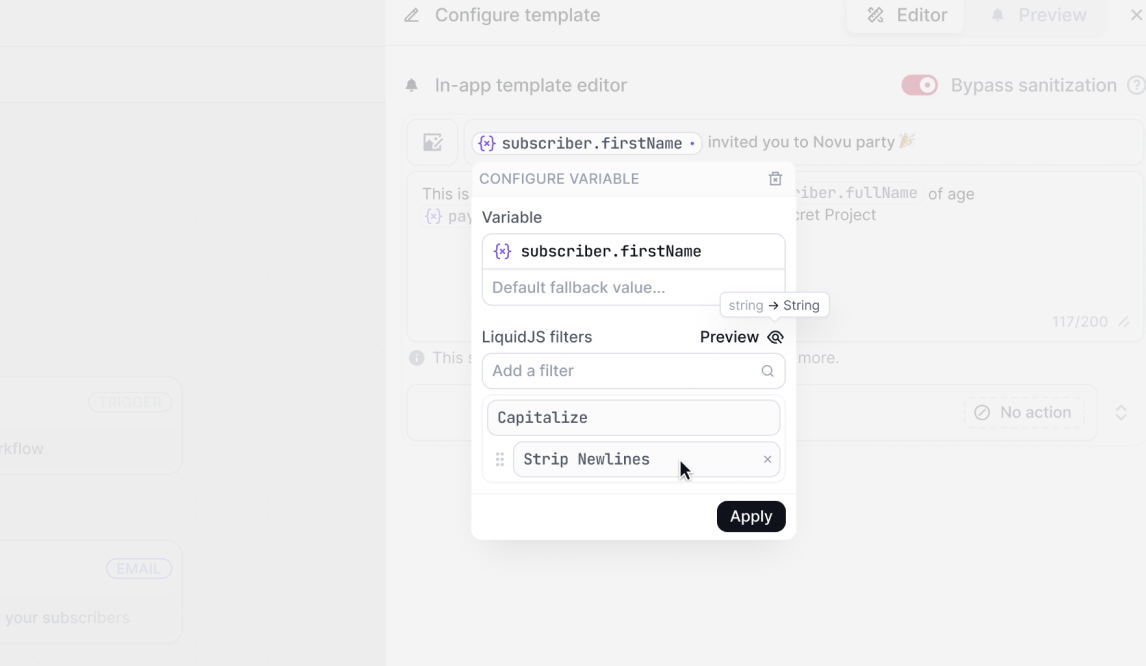 ### Applying Liquid Filters
The variable popover will display a list of suggested Liquid Filters based on the variable type, you can apply one or more filters to the variable and re-order using drag and drop.
Re-ordering filters is useful as the filters are applied in the order they are listed, and the output of each filter is passed to the next one.
### Previewing filters output
With more advanced filter logic, you can preview the output of the filters by clicking on the **Preview** button and pass the variable value to see how the filters will be applied.
### Raw Liquid.js syntax
You can also apply raw Liquid.js syntax to the variable by clicking on the **Raw** button which will reveal the raw Liquid.js content that will be applied to the variable.
## Adding logic with Liquid Filters
Novu supports Liquid filters to add dynamic and conditional content to your notifications. Below are examples of how to use the top 10 Liquid filters in real-world notification templates.
Learn more about the Liquid Templating Language.
### `capitalize`
Use `capitalize` to ensure proper formatting for user names.
```liquid
Hello {{ subscriber.firstName | capitalize }},
Welcome to Novu! We're excited to have you on board.
```
**Output**:\
`Hello John,
Welcome to Novu! We're excited to have you on board.`
### `upcase`
Use `upcase` for emphasizing specific information like workspace names.
```liquid
Your workspace {{ payload.workspaceName | upcase }} has been successfully created.
```
**Output**:\
`Your workspace TEAM ALPHA has been successfully created.`
### `downcase`
Use `downcase` for consistent email formatting or usernames.
```liquid
Hi {{ subscriber.email | downcase }},
We've sent a confirmation to your inbox.
```
**Output**:\
`Hi john.doe@example.com,
We've sent a confirmation to your inbox.`
### `date`
Use `date` to format subscription or event dates.
```liquid
Your subscription will renew on {{ payload.renewalDate | date: "%B %d, %Y" }}.
```
**Output**:\
`Your subscription will renew on December 31, 2024.`
### `truncate`
Use `truncate` to shorten long content like notification messages.
```liquid
New comment on your post: {{ payload.commentText | truncate: 20 }}
Click here to read more.
```
**Output**:\
`New comment on your post: Great work on your...
Click here to read more.`
### `truncatewords`
Use `truncatewords` to limit the number of words in a preview.
```liquid
{{ subscriber.firstName }}, here's a preview of the article:
{{ payload.articleExcerpt | truncatewords: 5 }}
```
**Output**:\
`John, here's a preview of the article:
Novu is a flexible and...`
### `replace`
Use `replace` to dynamically update template content.
```liquid
Hi {{ subscriber.firstName }},
Your {{ payload.subscriptionType | replace: "basic", "premium" }} subscription is active.
```
**Output**:\
`Hi John,
Your premium subscription is active.`
### `split`
Use `split` to parse tags or interests.
```liquid
You have new updates in {{ payload.tags | split: "," | join: ", " }}.
```
**Input**:\
`"announcements,updates,offers"`
**Output**:\
`You have new updates in announcements, updates, offers.`
### `join`
Use `join` to list multiple items in a human-readable way.
```liquid
Hello {{ subscriber.firstName }},
You have the following items pending: {{ payload.tasks | join: ", " }}.
```
**Input**:\
`["Upload documents", "Confirm email", "Schedule meeting"]`
**Output**:\
`Hello John,
You have the following items pending: Upload documents, Confirm email, Schedule meeting.`
### `default`
Use `default` to provide fallback values.
```liquid
Hi {{ subscriber.nickname | default: subscriber.firstName }},
Your account settings are updated.
```
**Output (when nickname is null)**:\
`Hi John,
Your account settings are updated.`
### Applying Liquid Filters
The variable popover will display a list of suggested Liquid Filters based on the variable type, you can apply one or more filters to the variable and re-order using drag and drop.
Re-ordering filters is useful as the filters are applied in the order they are listed, and the output of each filter is passed to the next one.
### Previewing filters output
With more advanced filter logic, you can preview the output of the filters by clicking on the **Preview** button and pass the variable value to see how the filters will be applied.
### Raw Liquid.js syntax
You can also apply raw Liquid.js syntax to the variable by clicking on the **Raw** button which will reveal the raw Liquid.js content that will be applied to the variable.
## Adding logic with Liquid Filters
Novu supports Liquid filters to add dynamic and conditional content to your notifications. Below are examples of how to use the top 10 Liquid filters in real-world notification templates.
Learn more about the Liquid Templating Language.
### `capitalize`
Use `capitalize` to ensure proper formatting for user names.
```liquid
Hello {{ subscriber.firstName | capitalize }},
Welcome to Novu! We're excited to have you on board.
```
**Output**:\
`Hello John,
Welcome to Novu! We're excited to have you on board.`
### `upcase`
Use `upcase` for emphasizing specific information like workspace names.
```liquid
Your workspace {{ payload.workspaceName | upcase }} has been successfully created.
```
**Output**:\
`Your workspace TEAM ALPHA has been successfully created.`
### `downcase`
Use `downcase` for consistent email formatting or usernames.
```liquid
Hi {{ subscriber.email | downcase }},
We've sent a confirmation to your inbox.
```
**Output**:\
`Hi john.doe@example.com,
We've sent a confirmation to your inbox.`
### `date`
Use `date` to format subscription or event dates.
```liquid
Your subscription will renew on {{ payload.renewalDate | date: "%B %d, %Y" }}.
```
**Output**:\
`Your subscription will renew on December 31, 2024.`
### `truncate`
Use `truncate` to shorten long content like notification messages.
```liquid
New comment on your post: {{ payload.commentText | truncate: 20 }}
Click here to read more.
```
**Output**:\
`New comment on your post: Great work on your...
Click here to read more.`
### `truncatewords`
Use `truncatewords` to limit the number of words in a preview.
```liquid
{{ subscriber.firstName }}, here's a preview of the article:
{{ payload.articleExcerpt | truncatewords: 5 }}
```
**Output**:\
`John, here's a preview of the article:
Novu is a flexible and...`
### `replace`
Use `replace` to dynamically update template content.
```liquid
Hi {{ subscriber.firstName }},
Your {{ payload.subscriptionType | replace: "basic", "premium" }} subscription is active.
```
**Output**:\
`Hi John,
Your premium subscription is active.`
### `split`
Use `split` to parse tags or interests.
```liquid
You have new updates in {{ payload.tags | split: "," | join: ", " }}.
```
**Input**:\
`"announcements,updates,offers"`
**Output**:\
`You have new updates in announcements, updates, offers.`
### `join`
Use `join` to list multiple items in a human-readable way.
```liquid
Hello {{ subscriber.firstName }},
You have the following items pending: {{ payload.tasks | join: ", " }}.
```
**Input**:\
`["Upload documents", "Confirm email", "Schedule meeting"]`
**Output**:\
`Hello John,
You have the following items pending: Upload documents, Confirm email, Schedule meeting.`
### `default`
Use `default` to provide fallback values.
```liquid
Hi {{ subscriber.nickname | default: subscriber.firstName }},
Your account settings are updated.
```
**Output (when nickname is null)**:\
`Hi John,
Your account settings are updated.`
{notification.subject}
{notification.body}
{notification.subject}
{notification.body}
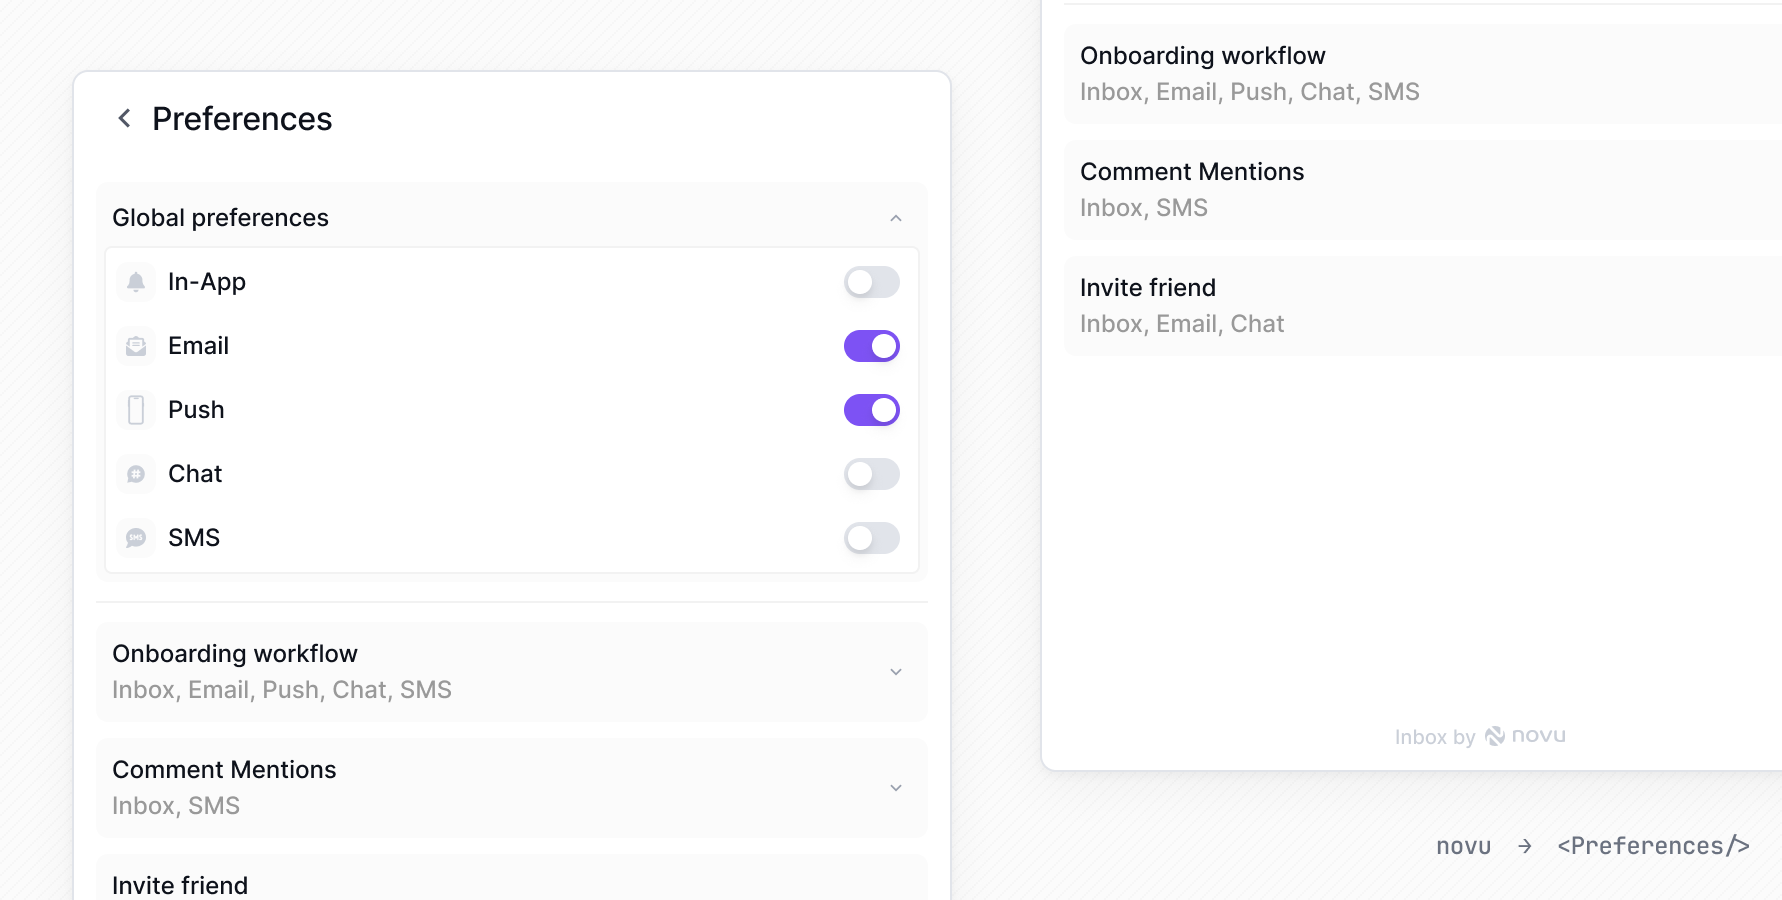 ### Hide global preferences
Global preferences can be hidden by using following css style in root css file.
```css
.nv-workflowContainer:first-child {
display: none;
}
```
file: ./content/docs/platform/inbox/react/production.mdx
# Going to production
Learn how to prepare your React notification inbox for production deployment including HMAC encryption and security best practices.
## HMAC Encryption
When Novu's user adds the Inbox to their application they are required to pass a `subscriberId` which identifies the user's end-customer, and the application Identifier which is acted as a public key to communicate with the notification feed API.
A malicious actor can access the user feed by accessing the API and passing another `subscriberId` using the public application identifier.
HMAC encryption will make sure that a `subscriberId` is encrypted using the secret API key, and those will prevent malicious actors from impersonating users.
### Enabling HMAC Encryption
In order to enable Hash-Based Message Authentication Codes, you need to visit the admin panel In-App settings page and enable HMAC encryption for your environment.
1. Next step would be to generate an HMAC encrypted subscriberId on your backend:
```tsx
import { createHmac } from 'crypto';
const hmacHash = createHmac('sha256', process.env.NOVU_SECRET_KEY)
.update(subscriberId)
.digest('hex');
```
2. Then pass the created HMAC to your client side application forward it to the component:
```tsx
import { Inbox } from '@novu/react';
### Hide global preferences
Global preferences can be hidden by using following css style in root css file.
```css
.nv-workflowContainer:first-child {
display: none;
}
```
file: ./content/docs/platform/inbox/react/production.mdx
# Going to production
Learn how to prepare your React notification inbox for production deployment including HMAC encryption and security best practices.
## HMAC Encryption
When Novu's user adds the Inbox to their application they are required to pass a `subscriberId` which identifies the user's end-customer, and the application Identifier which is acted as a public key to communicate with the notification feed API.
A malicious actor can access the user feed by accessing the API and passing another `subscriberId` using the public application identifier.
HMAC encryption will make sure that a `subscriberId` is encrypted using the secret API key, and those will prevent malicious actors from impersonating users.
### Enabling HMAC Encryption
In order to enable Hash-Based Message Authentication Codes, you need to visit the admin panel In-App settings page and enable HMAC encryption for your environment.
1. Next step would be to generate an HMAC encrypted subscriberId on your backend:
```tsx
import { createHmac } from 'crypto';
const hmacHash = createHmac('sha256', process.env.NOVU_SECRET_KEY)
.update(subscriberId)
.digest('hex');
```
2. Then pass the created HMAC to your client side application forward it to the component:
```tsx
import { Inbox } from '@novu/react';
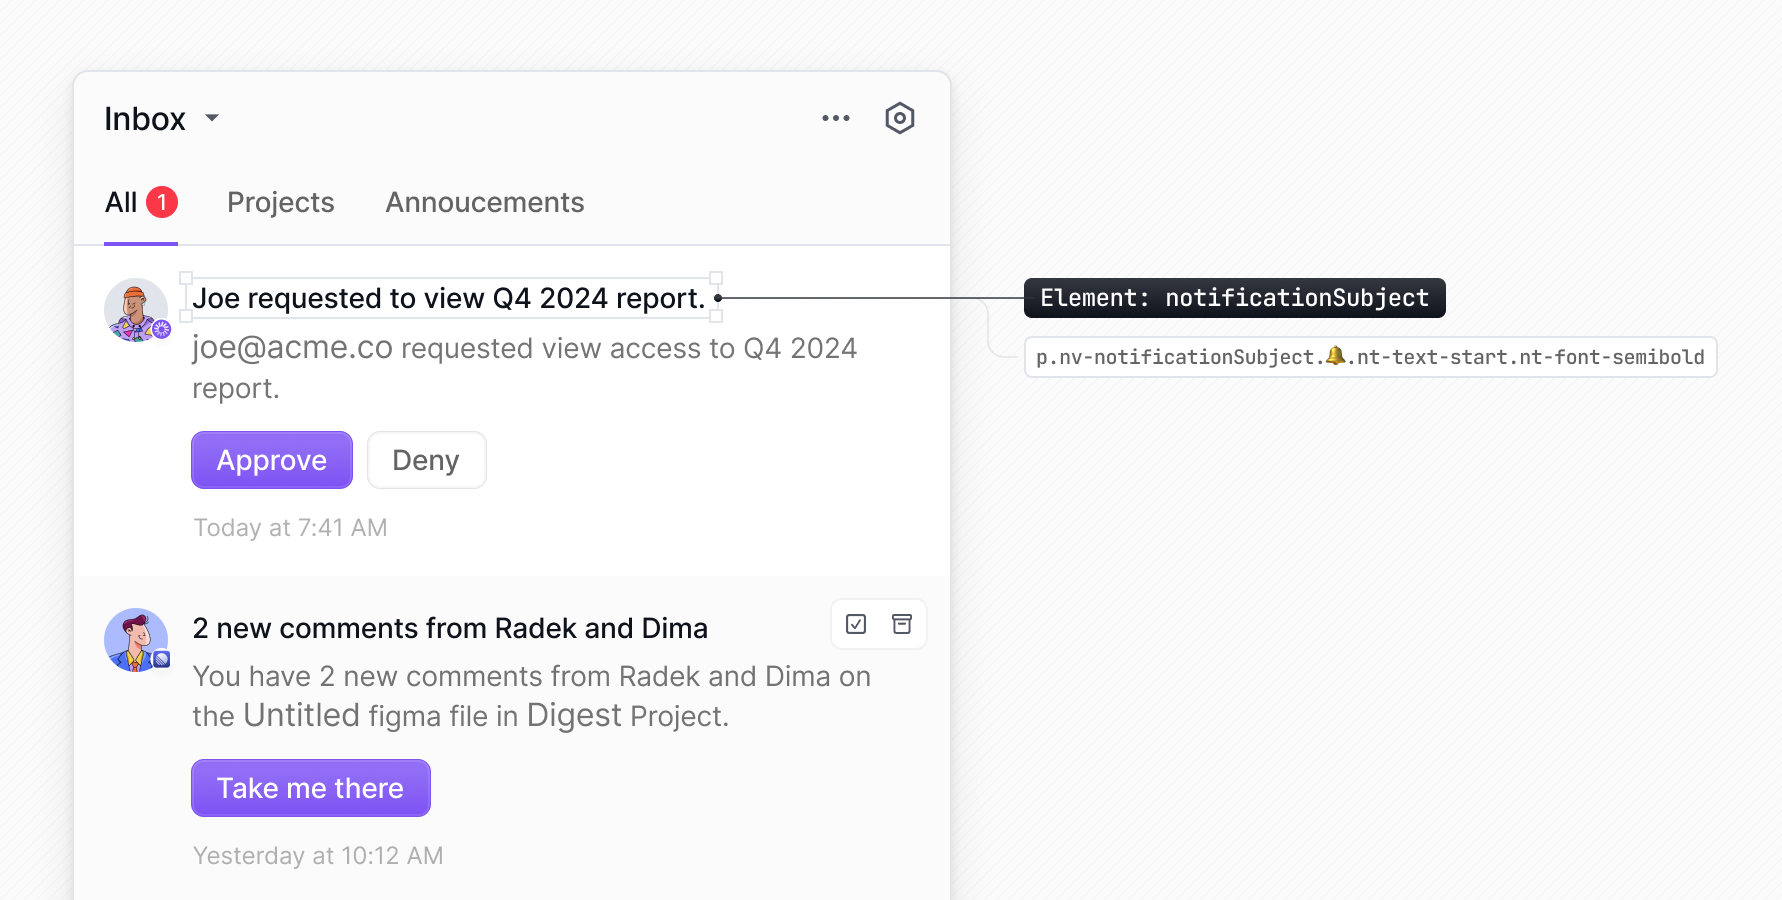
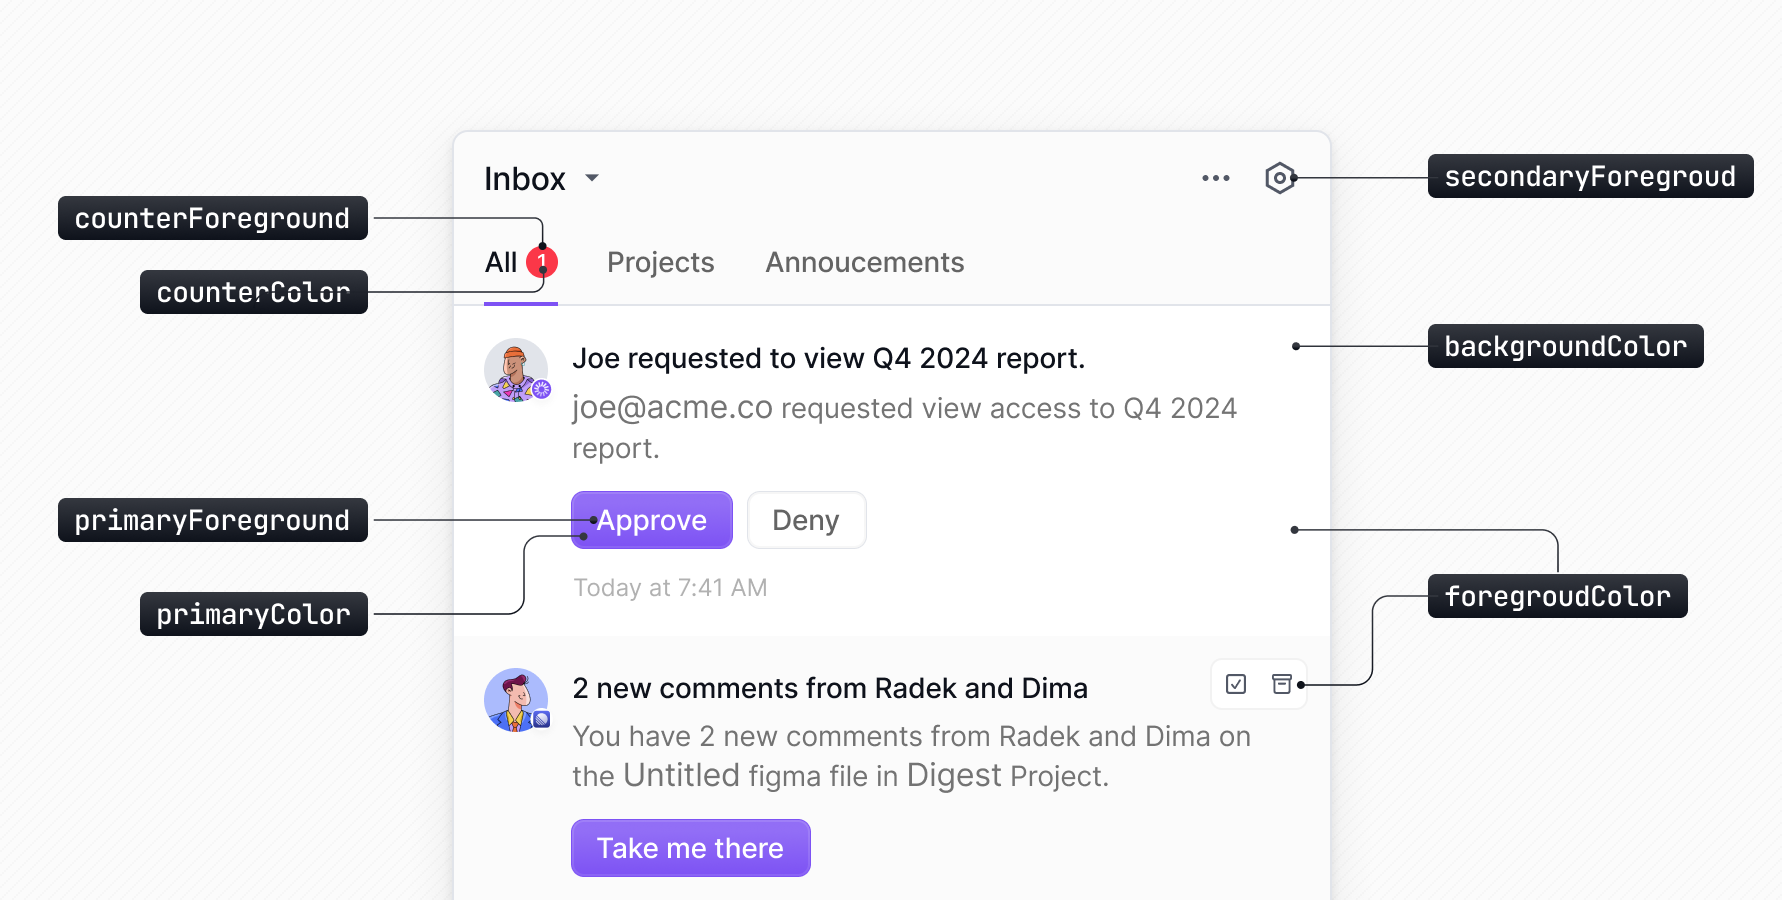 #### Styling Variables
You can override the default elements by passing your own styles or CSS classes to the `elements` object.
```tsx
import { Inbox } from '@novu/react';
const appearance = {
variables: {
colorBackground: 'yellow',
},
};
#### Styling Variables
You can override the default elements by passing your own styles or CSS classes to the `elements` object.
```tsx
import { Inbox } from '@novu/react';
const appearance = {
variables: {
colorBackground: 'yellow',
},
};
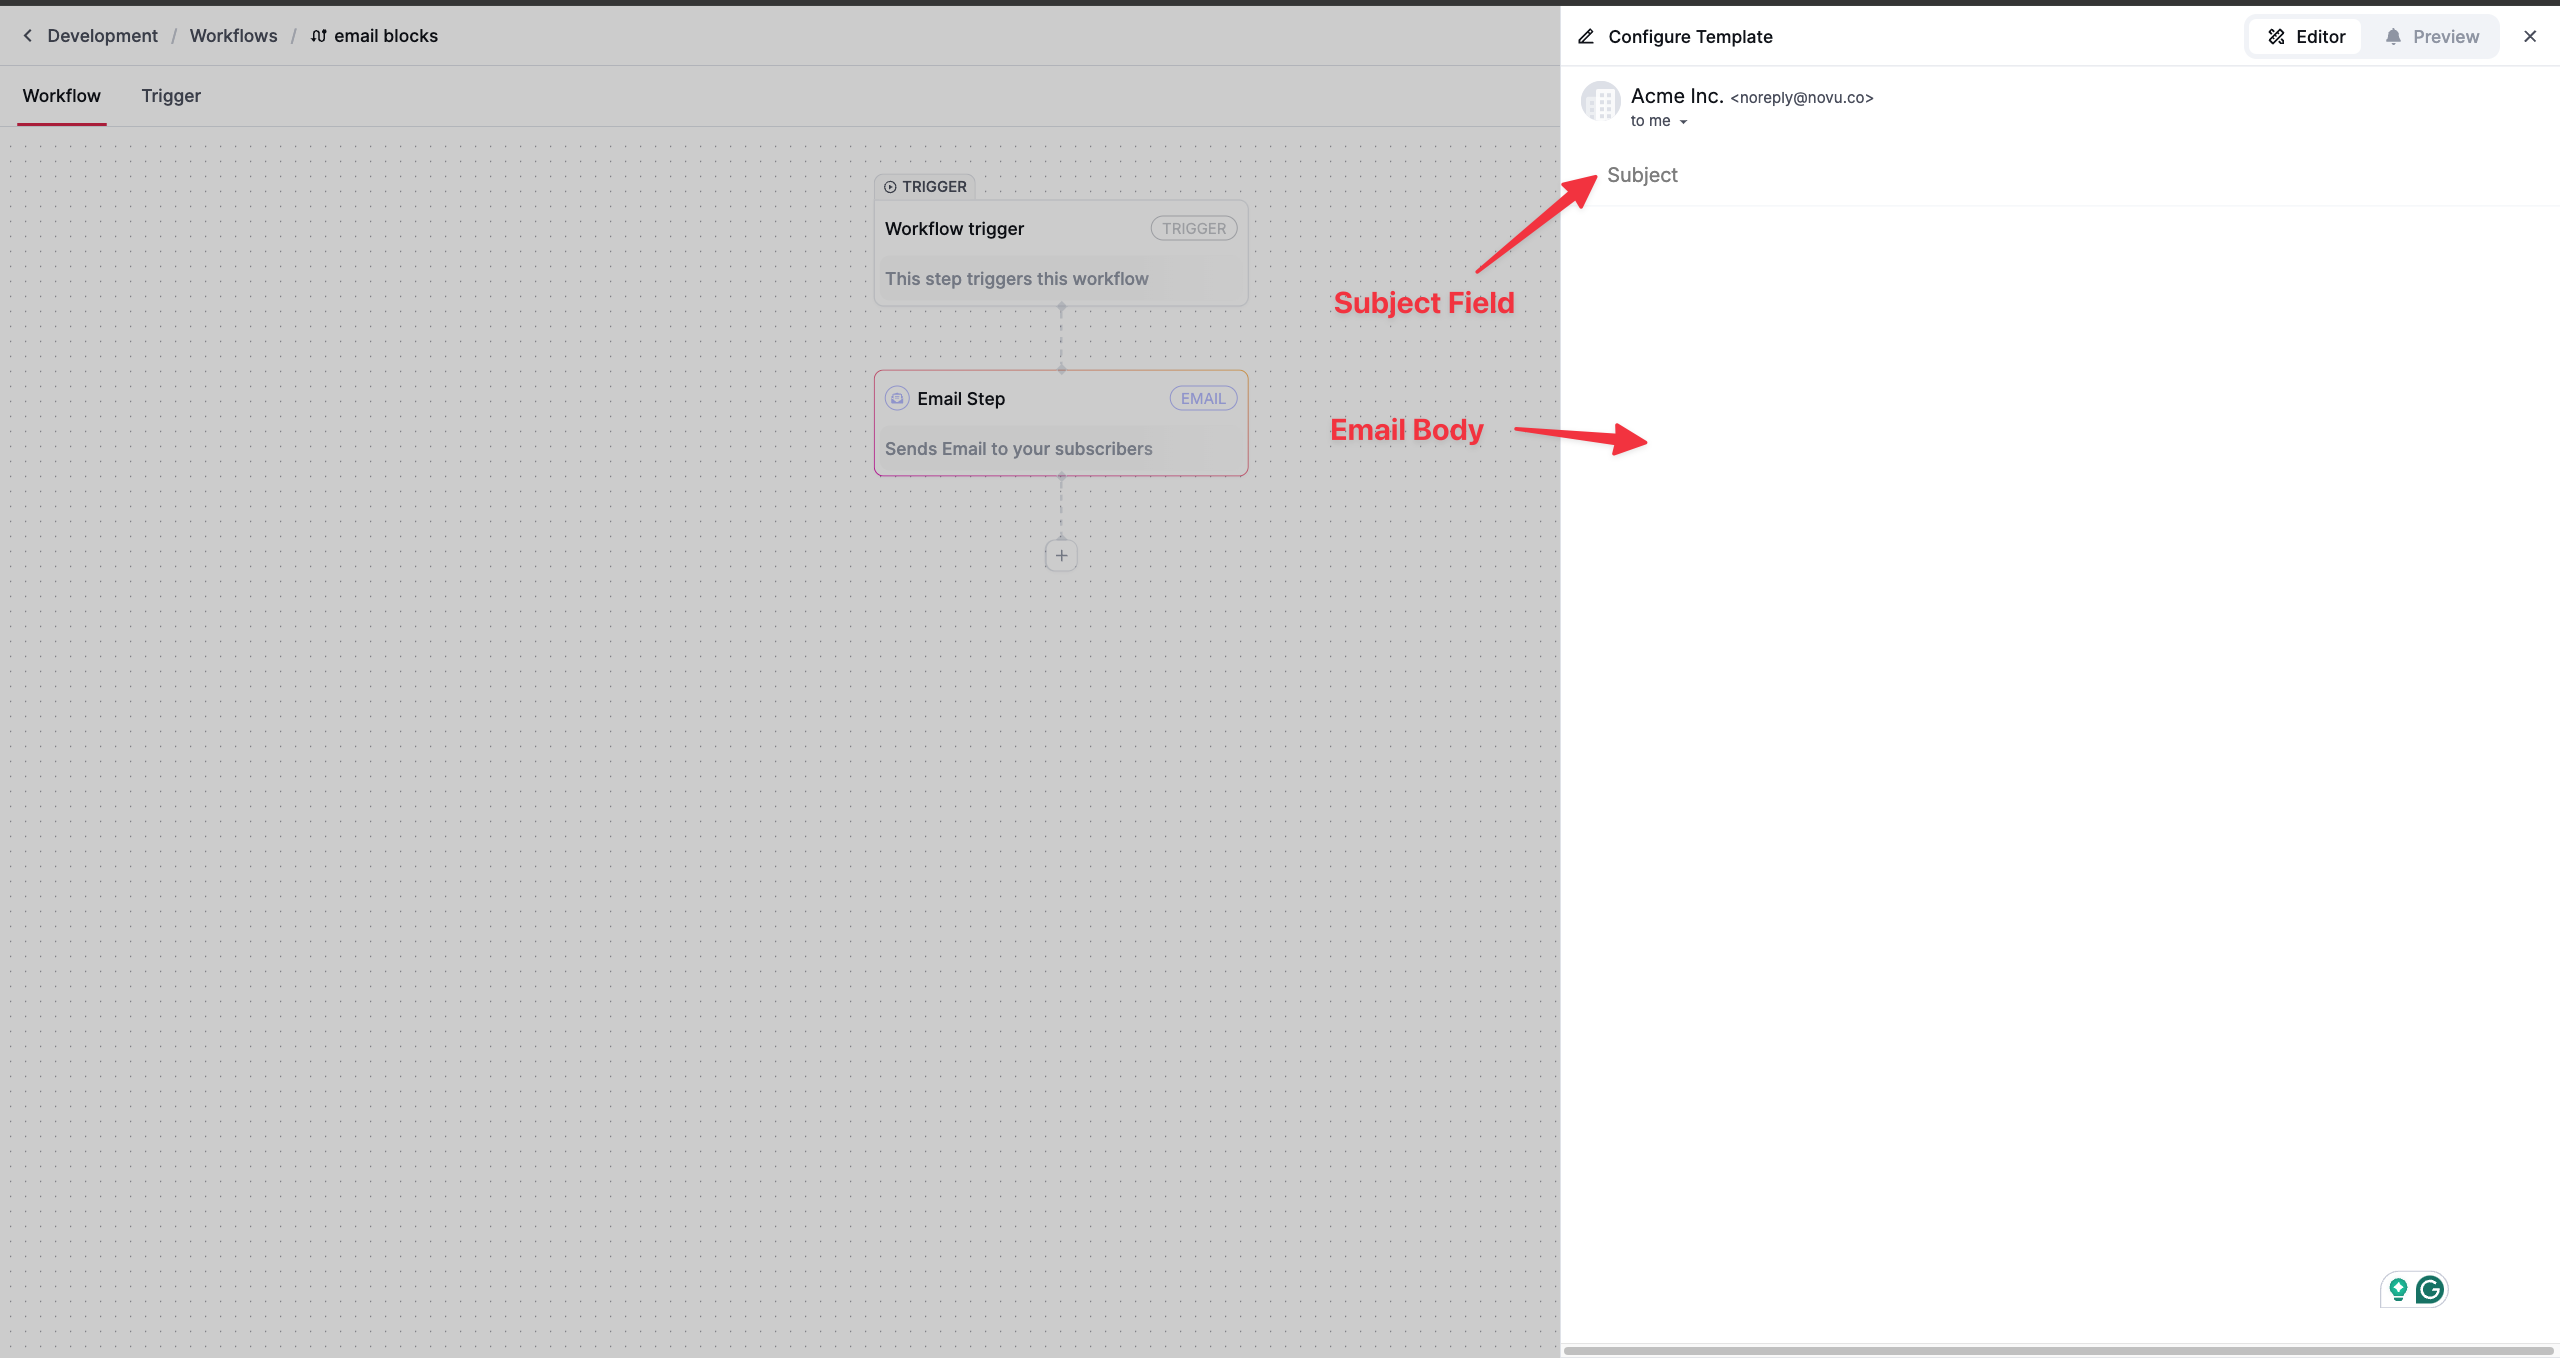 * **Subject** - Title of the email. It supports variables and can be customized based on the subscriber properties and payload variables.
* **Body** - Main content of the email. It is made of blocks.
## Email Editor Blocks
Email editor body is made of blocks. A block can be added by clicking on the plus icon on the top left corner of the editor or by adding a forward slash `/`. In both the cases, a popover will appear with the list of supported blocks. Click on the desired block to add it to the editor. Menu option besides plus (+) icon can be used to **duplicate** or **delete** the block.
* **Subject** - Title of the email. It supports variables and can be customized based on the subscriber properties and payload variables.
* **Body** - Main content of the email. It is made of blocks.
## Email Editor Blocks
Email editor body is made of blocks. A block can be added by clicking on the plus icon on the top left corner of the editor or by adding a forward slash `/`. In both the cases, a popover will appear with the list of supported blocks. Click on the desired block to add it to the editor. Menu option besides plus (+) icon can be used to **duplicate** or **delete** the block.
 The Email Editor supports the following blocks:
* **Text** - Regular text
* **Heading 1** - Large heading (H1)
* **Heading 2** - Medium heading (H2)
* **Heading 3** - Small heading (H3)
* **Bullet List** - Bullet list (bullet points like •)
* **Numbered List** - Numbered list (numeric digits like 1,2,3)
* **Image** - Full widh image with absolute url, image position can be customized
* **Section** - Create a section to group content together
* **Column** - Creates columns to group content together, useful for responsive design
* **Divider** - Separates the content, adds a line to highlight the separation
* **Spacer** - Spacer to add space between two blocks (available in sm, lg and xl sizes)
* **Button** - Call to action button to link to a page or url (can be customised with text, url, color and size and background color)
* **Hard Break** - Adds a line break
* **Blockquote** - Adds a blockquote
* **Repeat** - Can be used for interation on array of data
* **Show** - Can be used to conditionally show content based on a condition, use eye icon to toggle the visibility of the content
### Repeat Block
`Repeat` block is synonym with the javascript language `for` loop. It can be used to iterate over an array of data and render a block for each item in the array. Use + icon or / to add a `Repeat` block. Checkout the below video on how to use `Repeat` block
In above video:
* `{{payload.order.items}}` is array of items in the order and can be used to iterate over the items
then each item in the iteration has following properties:
* `{{payload.order.items.name}}` is the name of the item
* `{{payload.order.items.price}}` is the price of the item
### Show Block
Show block can be used to conditionally show content based on a condition. Use the eye icon to toggle the visibility of the content. Few components supports eye icon. Conditions could be based on subscribr properties, payload variables.
The Email Editor supports the following blocks:
* **Text** - Regular text
* **Heading 1** - Large heading (H1)
* **Heading 2** - Medium heading (H2)
* **Heading 3** - Small heading (H3)
* **Bullet List** - Bullet list (bullet points like •)
* **Numbered List** - Numbered list (numeric digits like 1,2,3)
* **Image** - Full widh image with absolute url, image position can be customized
* **Section** - Create a section to group content together
* **Column** - Creates columns to group content together, useful for responsive design
* **Divider** - Separates the content, adds a line to highlight the separation
* **Spacer** - Spacer to add space between two blocks (available in sm, lg and xl sizes)
* **Button** - Call to action button to link to a page or url (can be customised with text, url, color and size and background color)
* **Hard Break** - Adds a line break
* **Blockquote** - Adds a blockquote
* **Repeat** - Can be used for interation on array of data
* **Show** - Can be used to conditionally show content based on a condition, use eye icon to toggle the visibility of the content
### Repeat Block
`Repeat` block is synonym with the javascript language `for` loop. It can be used to iterate over an array of data and render a block for each item in the array. Use + icon or / to add a `Repeat` block. Checkout the below video on how to use `Repeat` block
In above video:
* `{{payload.order.items}}` is array of items in the order and can be used to iterate over the items
then each item in the iteration has following properties:
* `{{payload.order.items.name}}` is the name of the item
* `{{payload.order.items.price}}` is the price of the item
### Show Block
Show block can be used to conditionally show content based on a condition. Use the eye icon to toggle the visibility of the content. Few components supports eye icon. Conditions could be based on subscribr properties, payload variables.
 In above example, if subscriber has `showTracking` field set to `true` in custom `data` attribute, then the `Track your order` button will be shown in the email sent to the subscriber. Similarly, payload variables can be used to conditionally show the content.
file: ./content/docs/platform/integrations/chat/adding-chat.mdx
# Adding Chat Channel
Learn how to add the Chat channel to your application
import { Card } from 'fumadocs-ui/components/card';
import { CodeIcon } from '@/components/icons/overview';
import { Tab, Tabs } from 'fumadocs-ui/components/tabs';
Chat channels allow you to deliver instant, contextual messages to your subscribers via their preferred chat platform and apps.
In above example, if subscriber has `showTracking` field set to `true` in custom `data` attribute, then the `Track your order` button will be shown in the email sent to the subscriber. Similarly, payload variables can be used to conditionally show the content.
file: ./content/docs/platform/integrations/chat/adding-chat.mdx
# Adding Chat Channel
Learn how to add the Chat channel to your application
import { Card } from 'fumadocs-ui/components/card';
import { CodeIcon } from '@/components/icons/overview';
import { Tab, Tabs } from 'fumadocs-ui/components/tabs';
Chat channels allow you to deliver instant, contextual messages to your subscribers via their preferred chat platform and apps.
{body}
{body}
{body}
{body}
{notification.subject}
{notification.body}
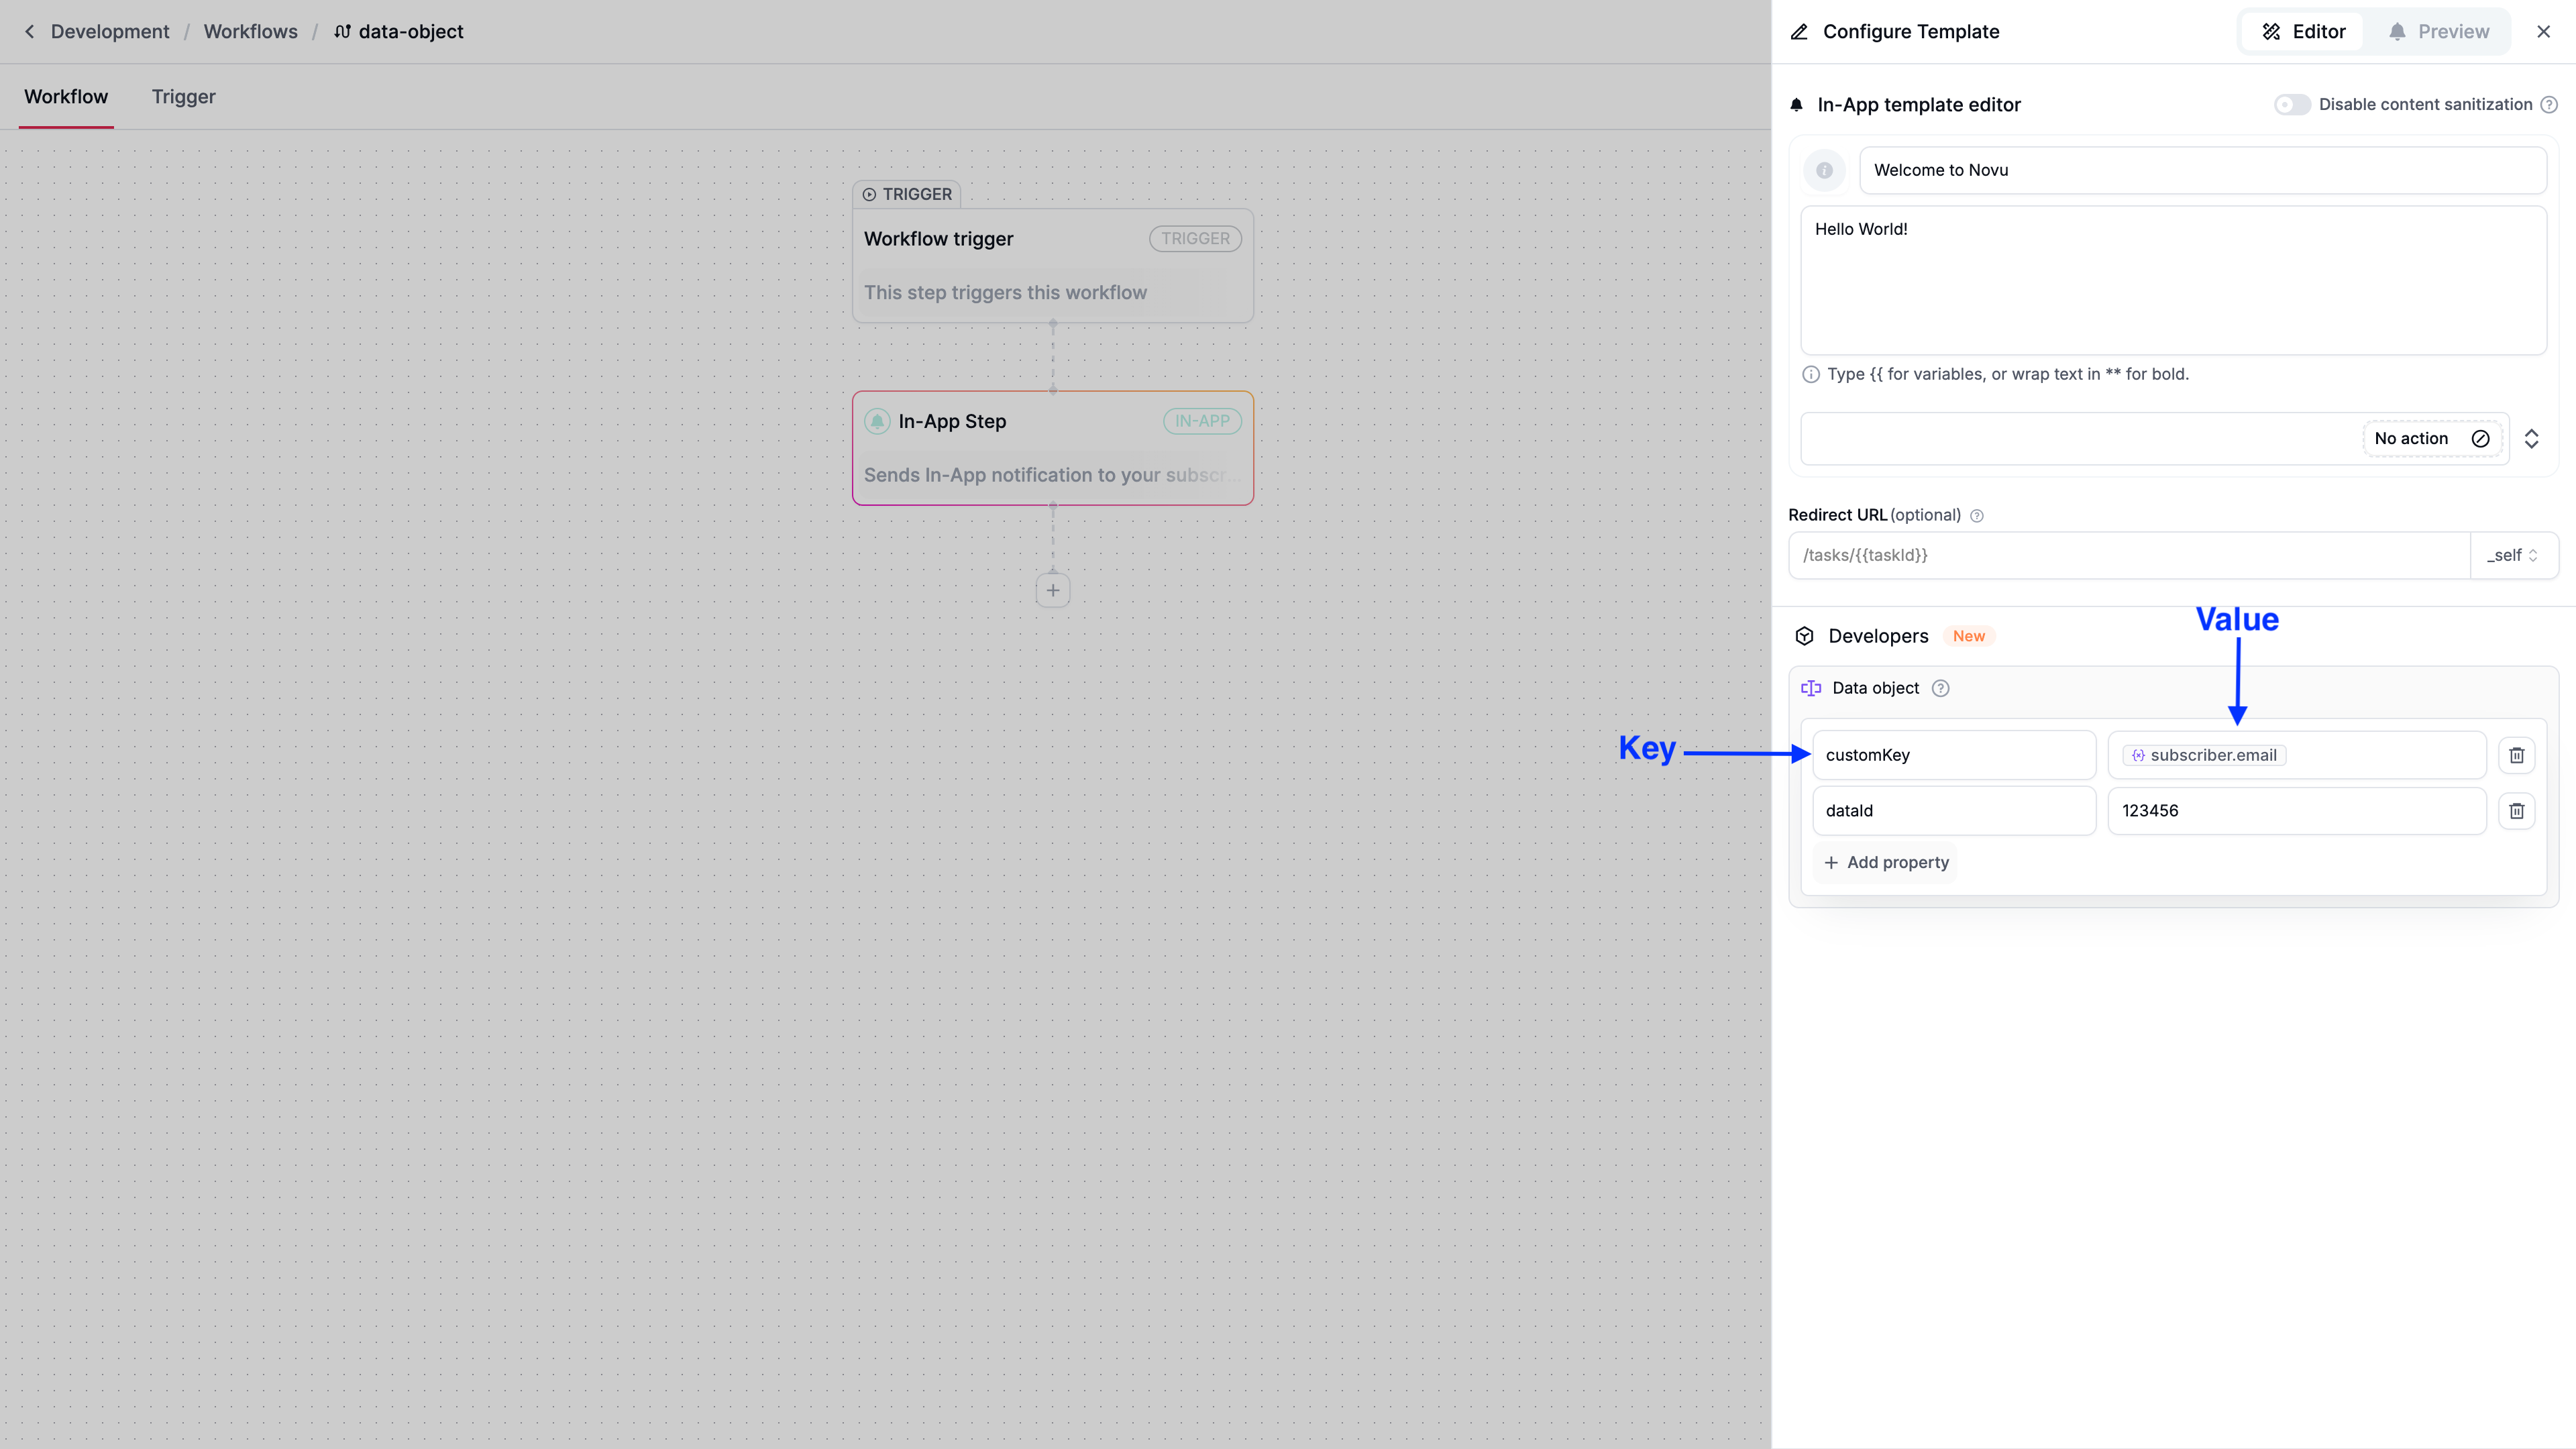 The `data` object is defined within a workflow's in-app step in the Novu dashboard. Each key-value pair, referred to as a property, can be static or dynamic, and you get up to 10 properties per in-app step. These properties are accessible on the frontend via the `notification.data` property.
```tsx
import { Inbox } from '@novu/react';
The `data` object is defined within a workflow's in-app step in the Novu dashboard. Each key-value pair, referred to as a property, can be static or dynamic, and you get up to 10 properties per in-app step. These properties are accessible on the frontend via the `notification.data` property.
```tsx
import { Inbox } from '@novu/react';
{notification.data?.customKey}
{notification.data?.dataId}

{notification.subject}
{notification.body}
{notification.subject}
{notification.body}
Custom Notification Subject
Custom Notification Body
{notification.subject}
{notification.body}
{notification.subject}
{notification.body}
{notification.subject}
{notification.body}
{notification.subject}
{notification.body}
{notification.subject}
{notification.body}
{notification.subject}
{notification.body}
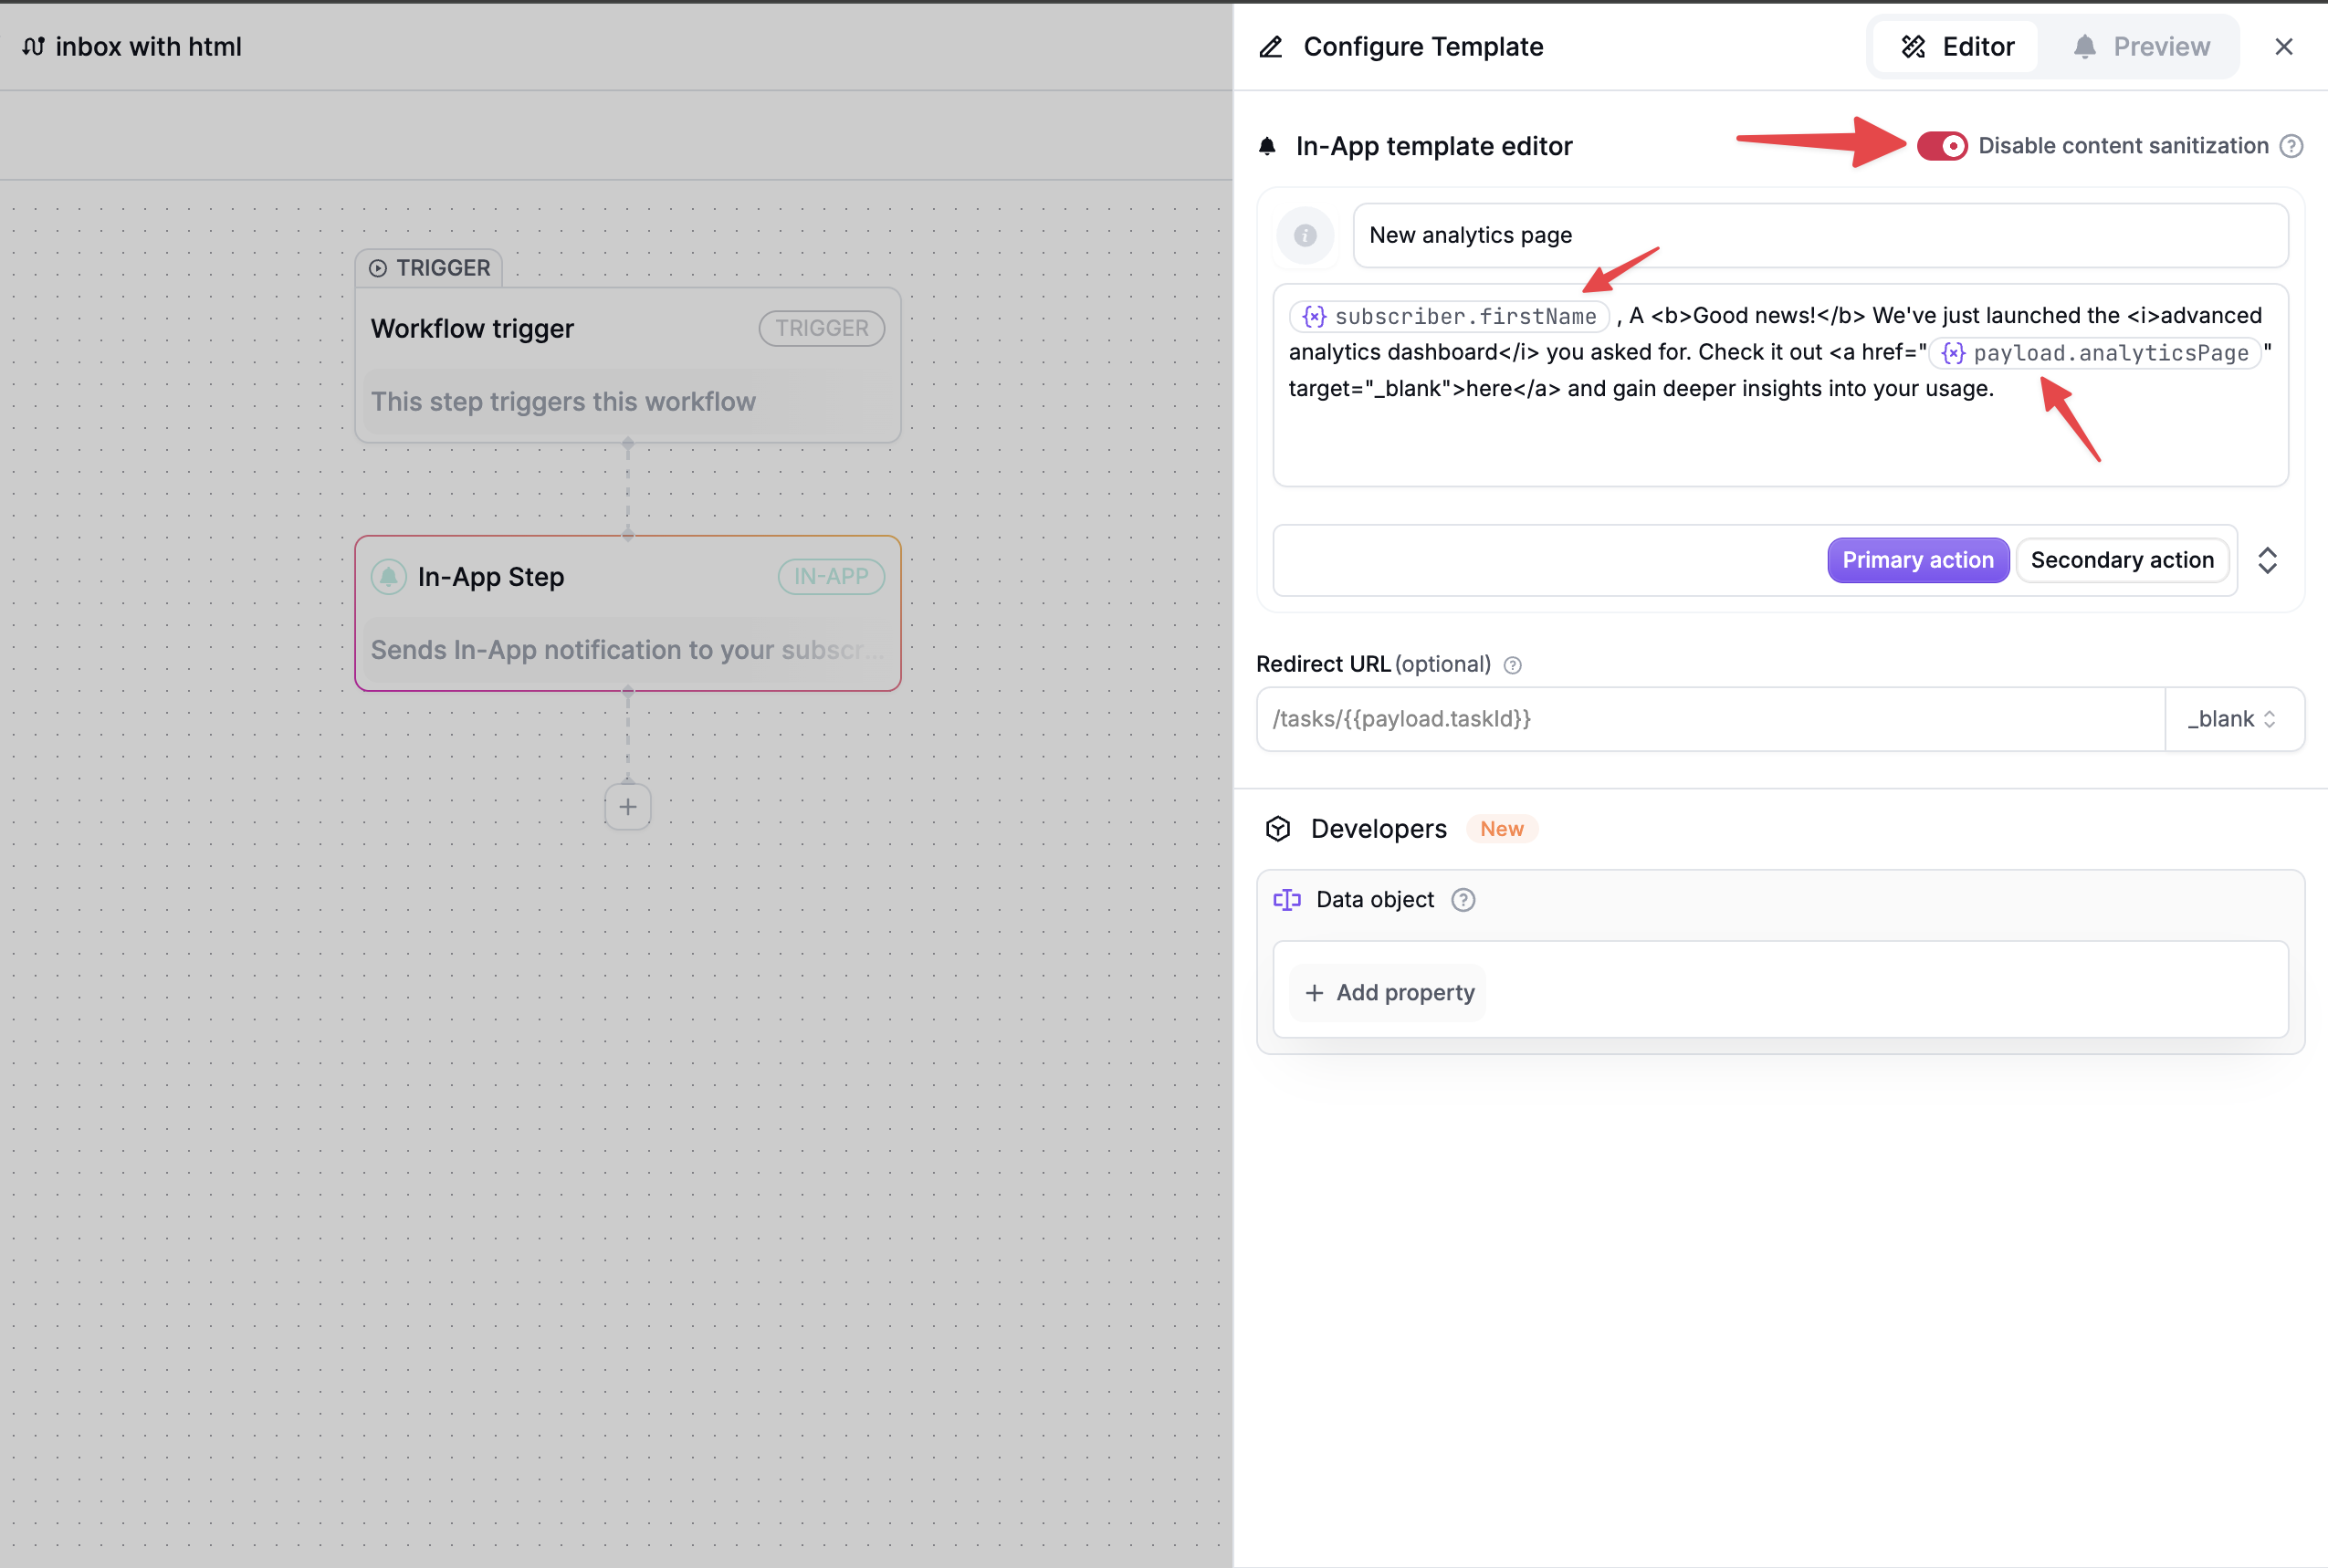 HTML Content:
```html html tags with dynamic values
{{subscriber.firstName}}, A Good news! We've just launched the advanced
analytics dashboard you asked for. Check it out here and gain deeper insights into your usage.
```
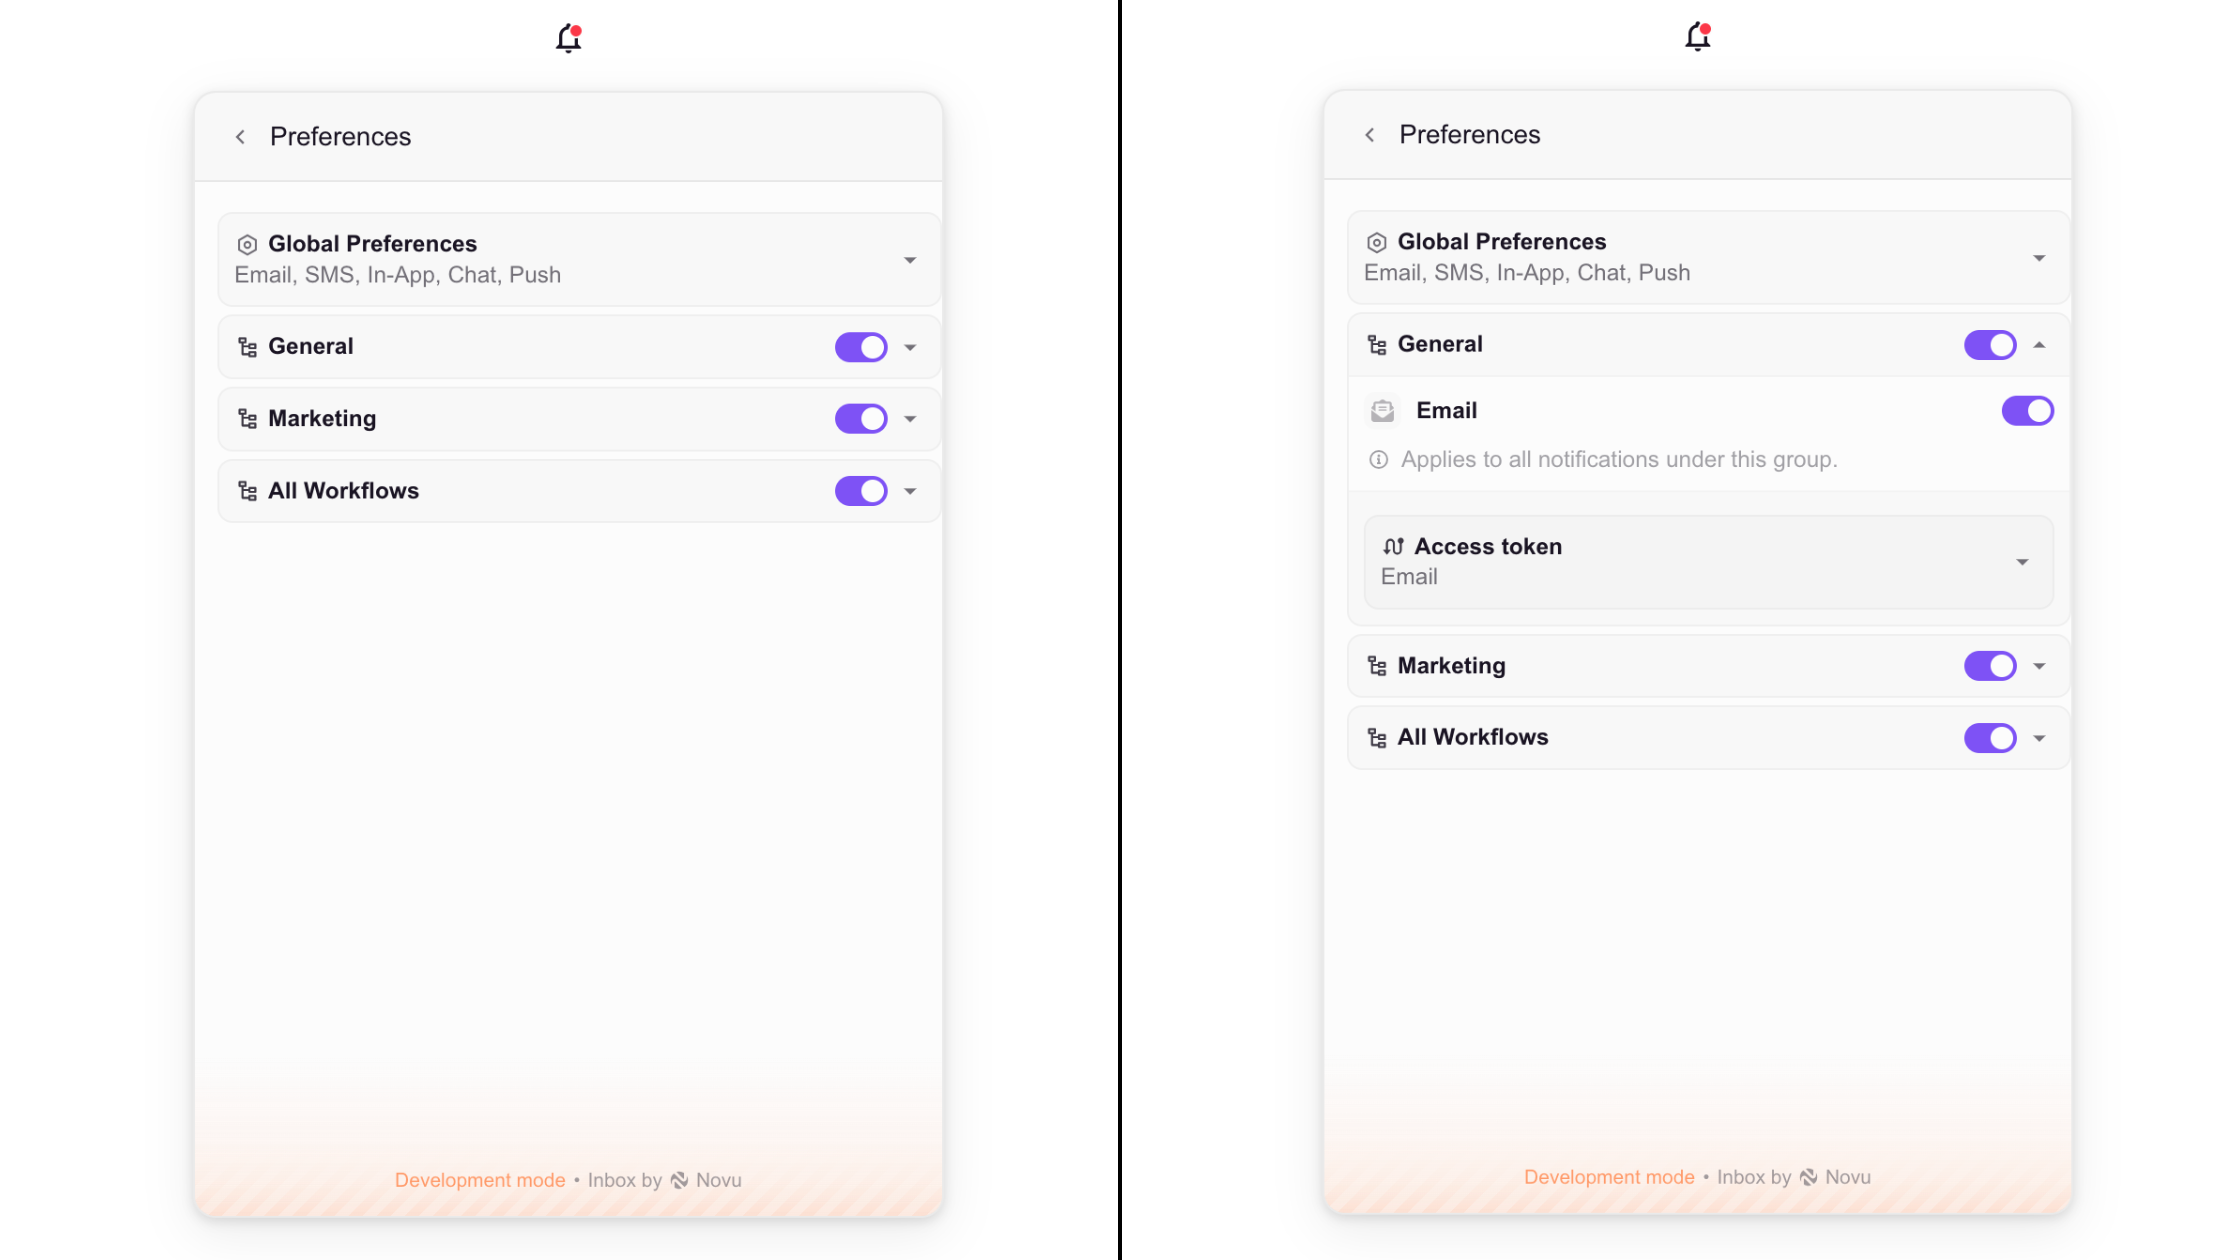
## Filtering Preferences
HTML Content:
```html html tags with dynamic values
{{subscriber.firstName}}, A Good news! We've just launched the advanced
analytics dashboard you asked for. Check it out here and gain deeper insights into your usage.
```
## Filtering Preferences
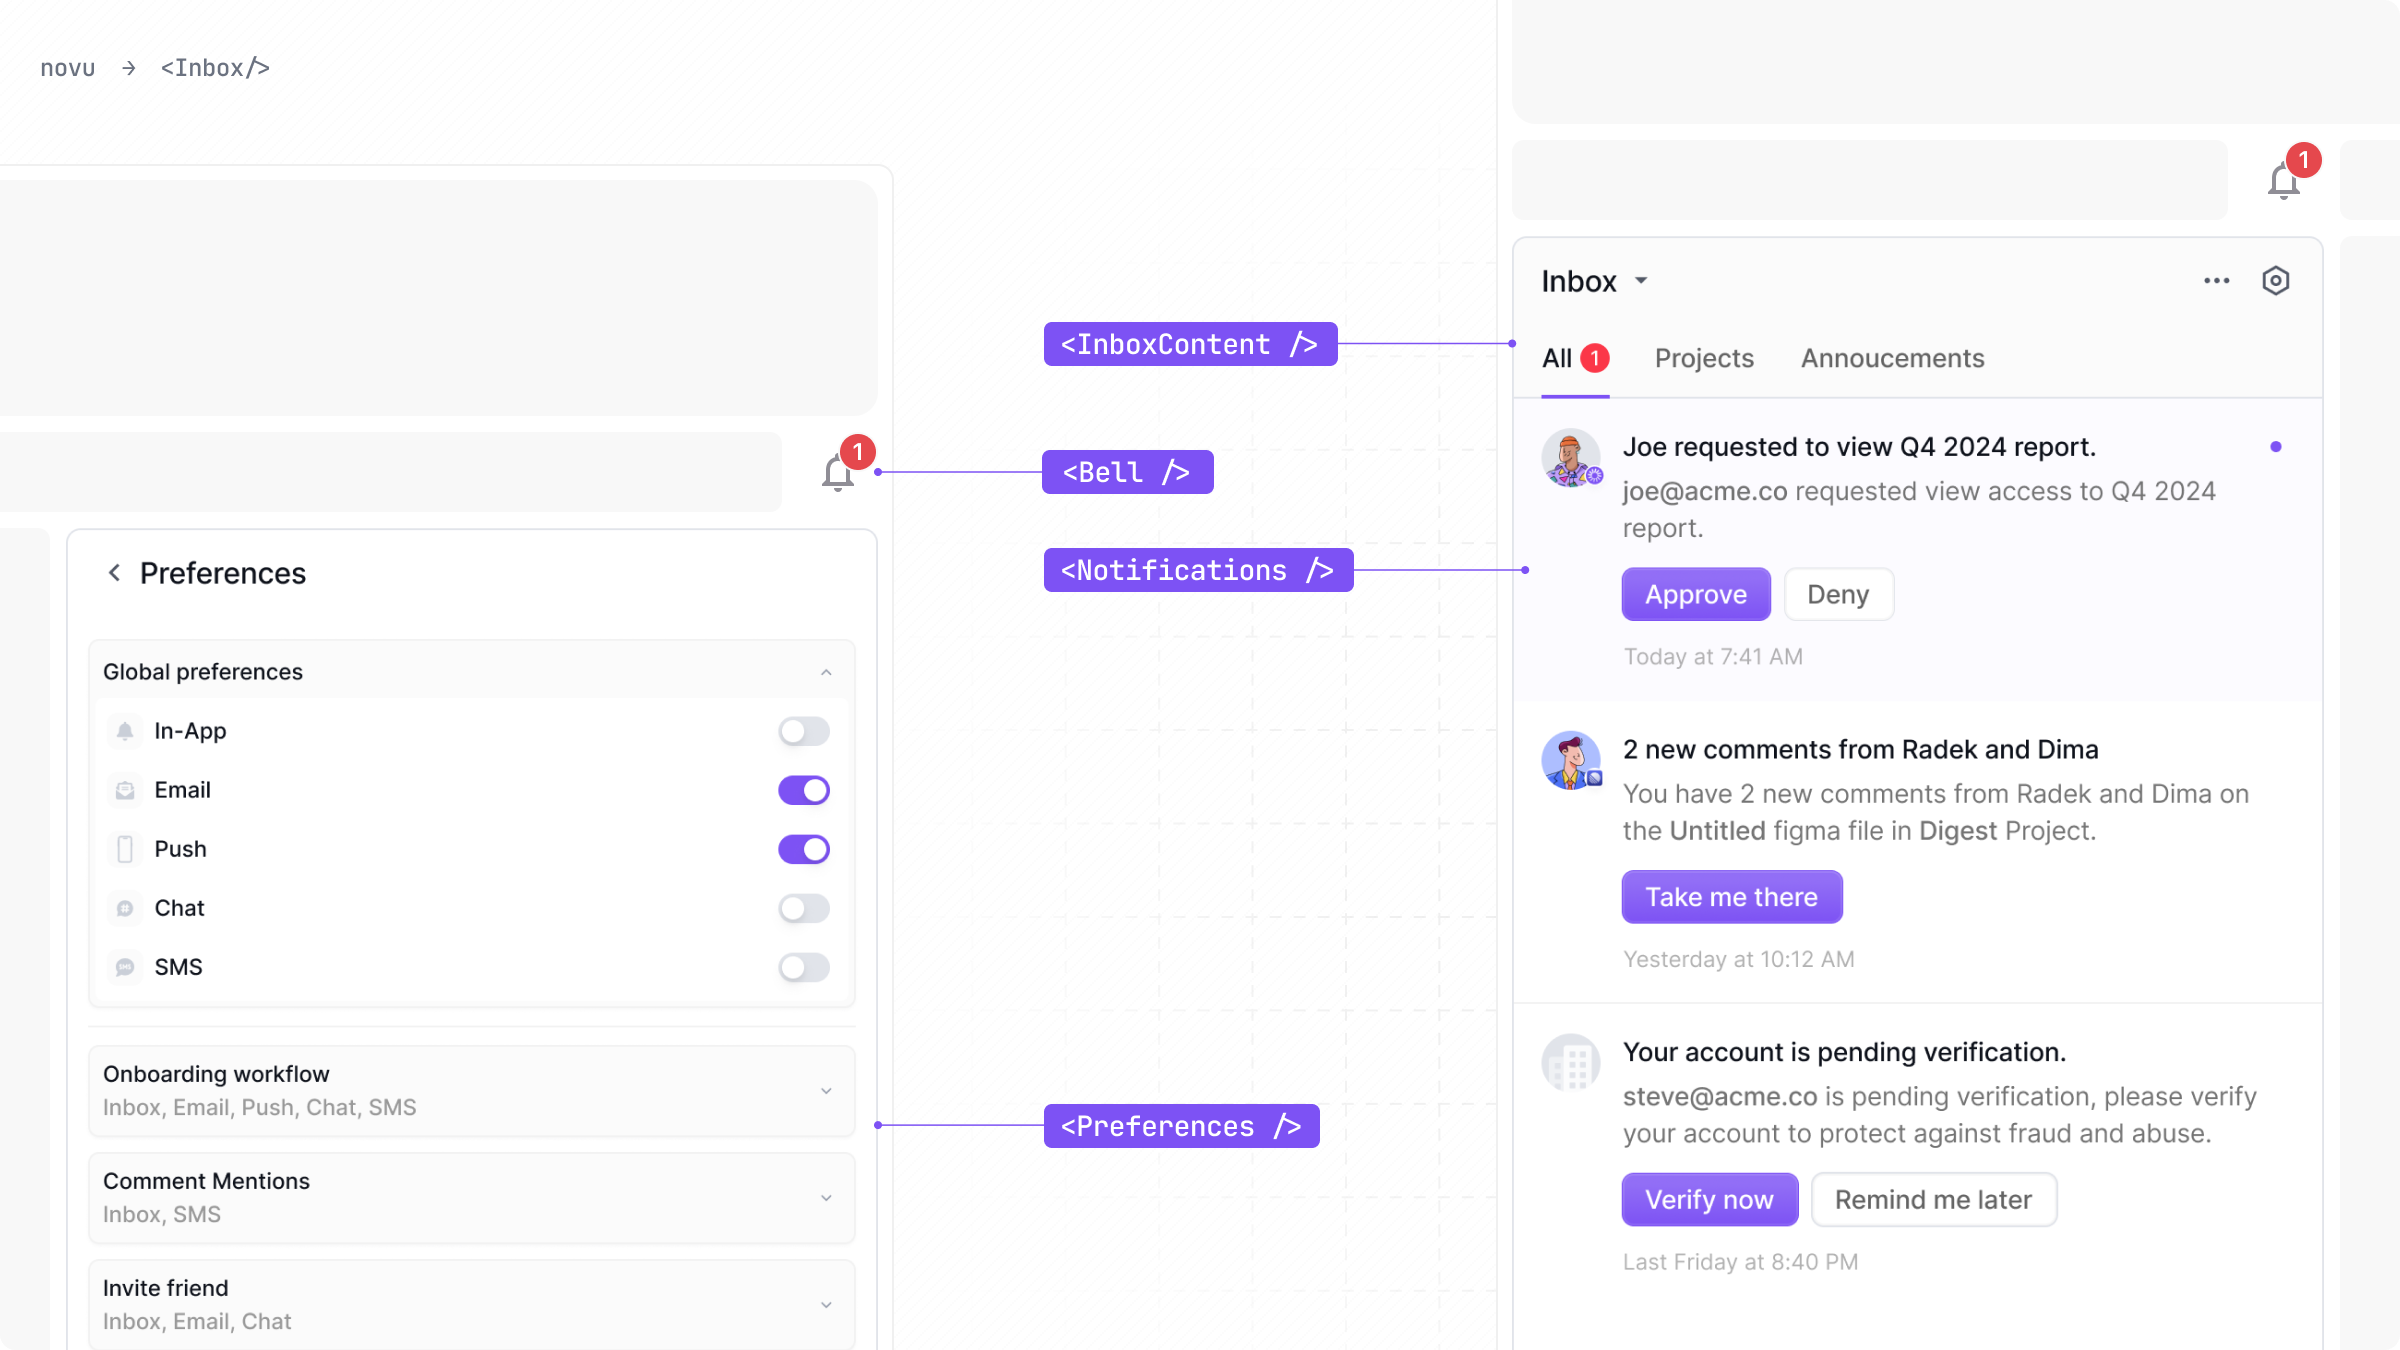 ## Layouts
The composition of the indivudal components can generate multiple different popular inbox layouts.
### Inbox with Bell (Default)
A trigger button usually located at the top right corner of the screen, which triggers the popover component when clicked.
## Layouts
The composition of the indivudal components can generate multiple different popular inbox layouts.
### Inbox with Bell (Default)
A trigger button usually located at the top right corner of the screen, which triggers the popover component when clicked.
{notification.subject}
{notification.body}
 file: ./content/docs/platform/integrations/email/(providers)/amazon-ses.mdx
# Amazon SES
Learn how to use the Amazon SES provider to send email notifications using Novu
import { EmailProviderNextSteps } from '@/snippets/channels/email/email-provider-next-steps.tsx';
import { Accordion, Accordions } from 'fumadocs-ui/components/accordion';
You can use the [Amazon SES](https://aws.amazon.com/ses/) provider to send transactional emails to your customers using the Novu Platform with a single API to create multi-channel experiences.
## Getting Started
To use the Amazon SES provider in the email channel, you will need to create an SES account and add your credentials to the Amazon SES integration on the Novu platform.
## Setting up SES in AWS?
* Create a new IAM account with appropriate permission policies.
file: ./content/docs/platform/integrations/email/(providers)/amazon-ses.mdx
# Amazon SES
Learn how to use the Amazon SES provider to send email notifications using Novu
import { EmailProviderNextSteps } from '@/snippets/channels/email/email-provider-next-steps.tsx';
import { Accordion, Accordions } from 'fumadocs-ui/components/accordion';
You can use the [Amazon SES](https://aws.amazon.com/ses/) provider to send transactional emails to your customers using the Novu Platform with a single API to create multi-channel experiences.
## Getting Started
To use the Amazon SES provider in the email channel, you will need to create an SES account and add your credentials to the Amazon SES integration on the Novu platform.
## Setting up SES in AWS?
* Create a new IAM account with appropriate permission policies.
 file: ./content/docs/platform/integrations/push/(providers)/push-webhook.mdx
# Push Webhook
Learn how to use the Push Webhook provider to send notifications using Novu
import { Tab, Tabs } from 'fumadocs-ui/components/tabs';
Push Webhook provider is a bit different different from other push providers as it does not depend on other third party services.
Users can use their own api url as webhook url and novu will make a post request on that webhook url.
## Steps To Configure
1. Go to [integration store](https://dashboard.novu.co/integrations?utm_campaign=docs-push-webhook) and click on `Add a provider` button. Choose `Push` channel and then `Push Webhook` provider.
2. Enter your Webhook URL. For quick testing use [this](https://webhook.site/) website.
3. Enter Secret Hmac Key. Novu will use this secret hmac key to encrypt the data using `HMAC SHA256` algorithm and send the hash as value of `x-novu-signature` header. User can use `x-novu-signature` header to test authenticity of the request. Read more [here](#checking-authenticity)
4. Click on the update button.
5. Update the subscriber credentials using SDK or API. Read more [here](#set-device-token)
file: ./content/docs/platform/integrations/push/(providers)/push-webhook.mdx
# Push Webhook
Learn how to use the Push Webhook provider to send notifications using Novu
import { Tab, Tabs } from 'fumadocs-ui/components/tabs';
Push Webhook provider is a bit different different from other push providers as it does not depend on other third party services.
Users can use their own api url as webhook url and novu will make a post request on that webhook url.
## Steps To Configure
1. Go to [integration store](https://dashboard.novu.co/integrations?utm_campaign=docs-push-webhook) and click on `Add a provider` button. Choose `Push` channel and then `Push Webhook` provider.
2. Enter your Webhook URL. For quick testing use [this](https://webhook.site/) website.
3. Enter Secret Hmac Key. Novu will use this secret hmac key to encrypt the data using `HMAC SHA256` algorithm and send the hash as value of `x-novu-signature` header. User can use `x-novu-signature` header to test authenticity of the request. Read more [here](#checking-authenticity)
4. Click on the update button.
5. Update the subscriber credentials using SDK or API. Read more [here](#set-device-token)
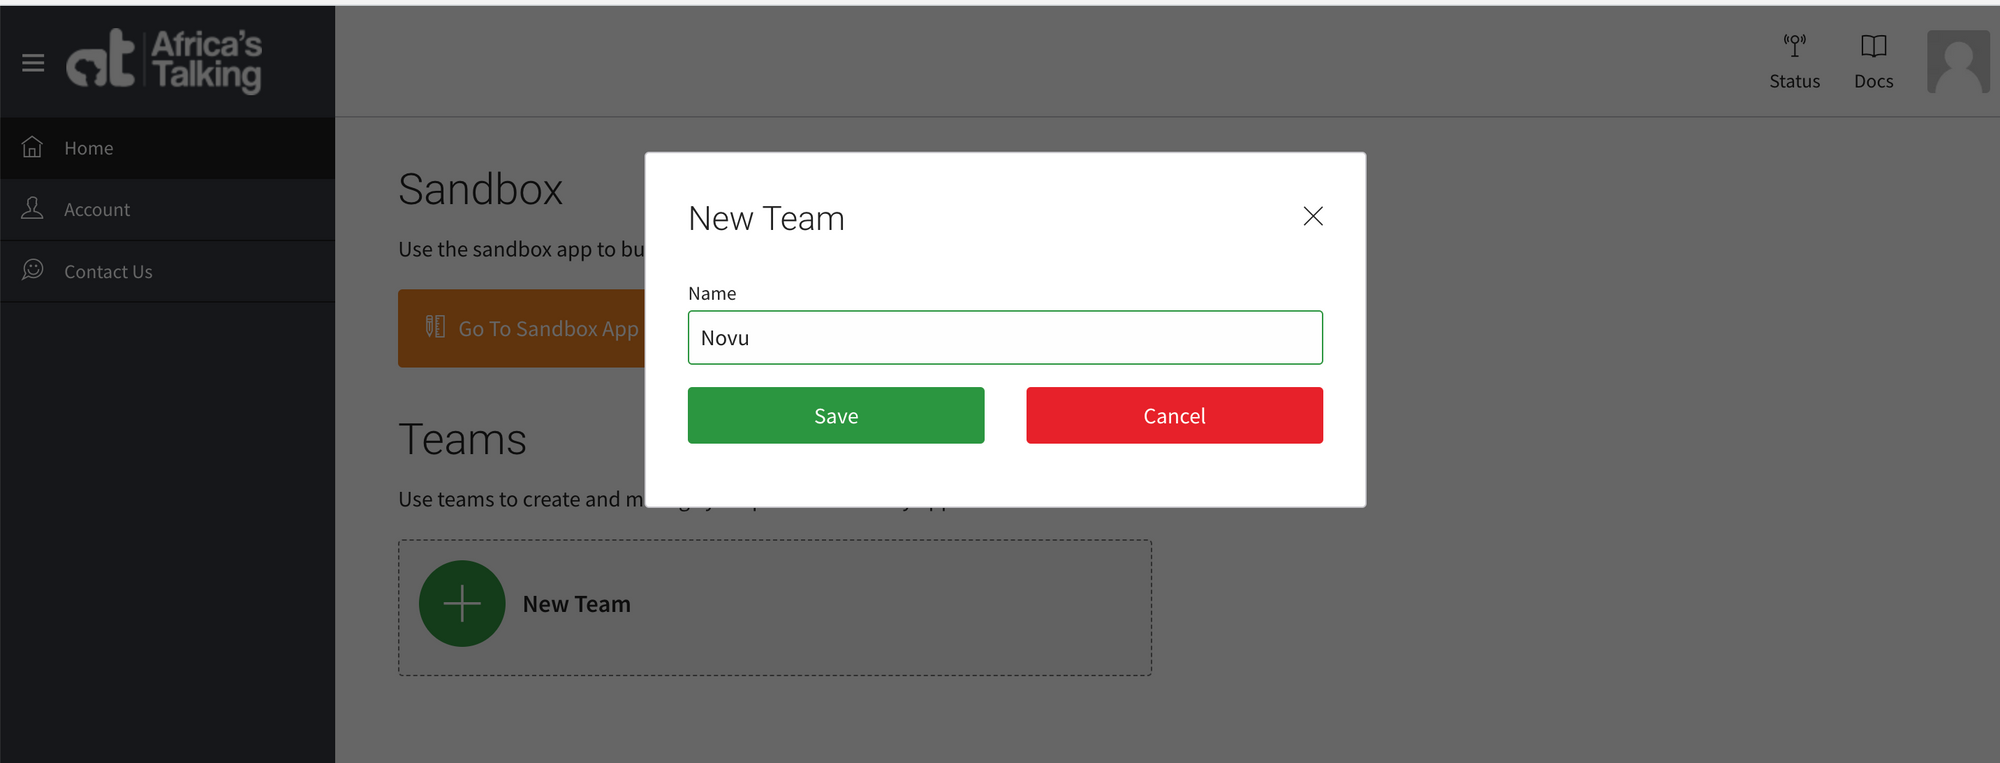
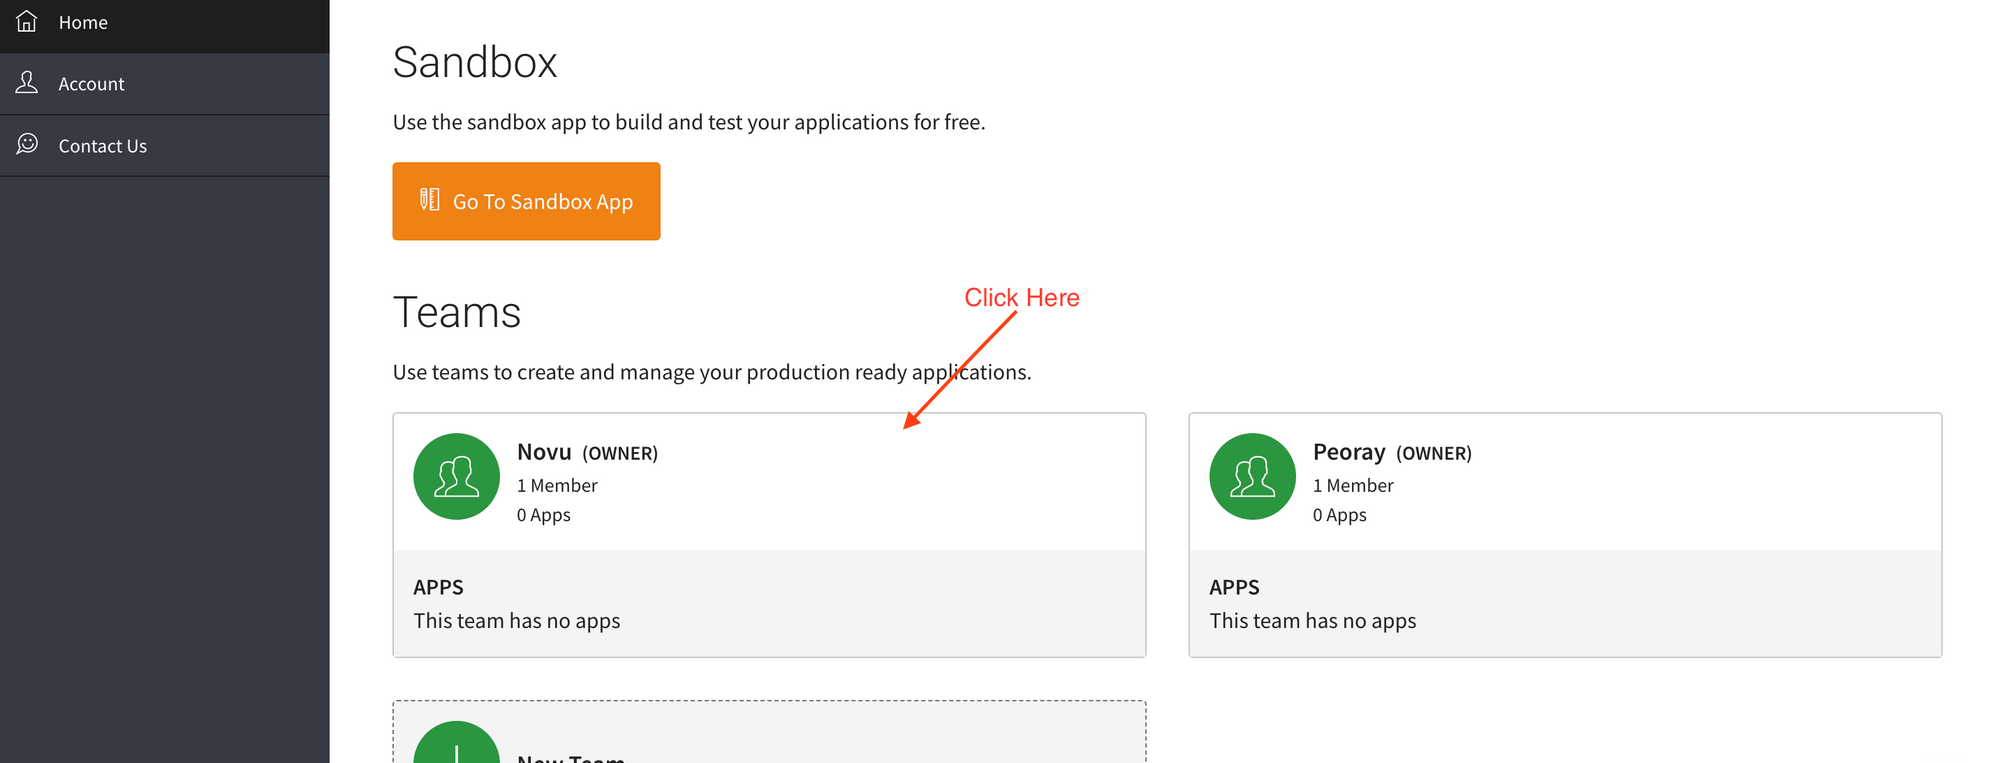 * If you're a new user and don't have a team yet, you'll have to do so by clicking on New Team and entering your team name. Click on Save when you're done.
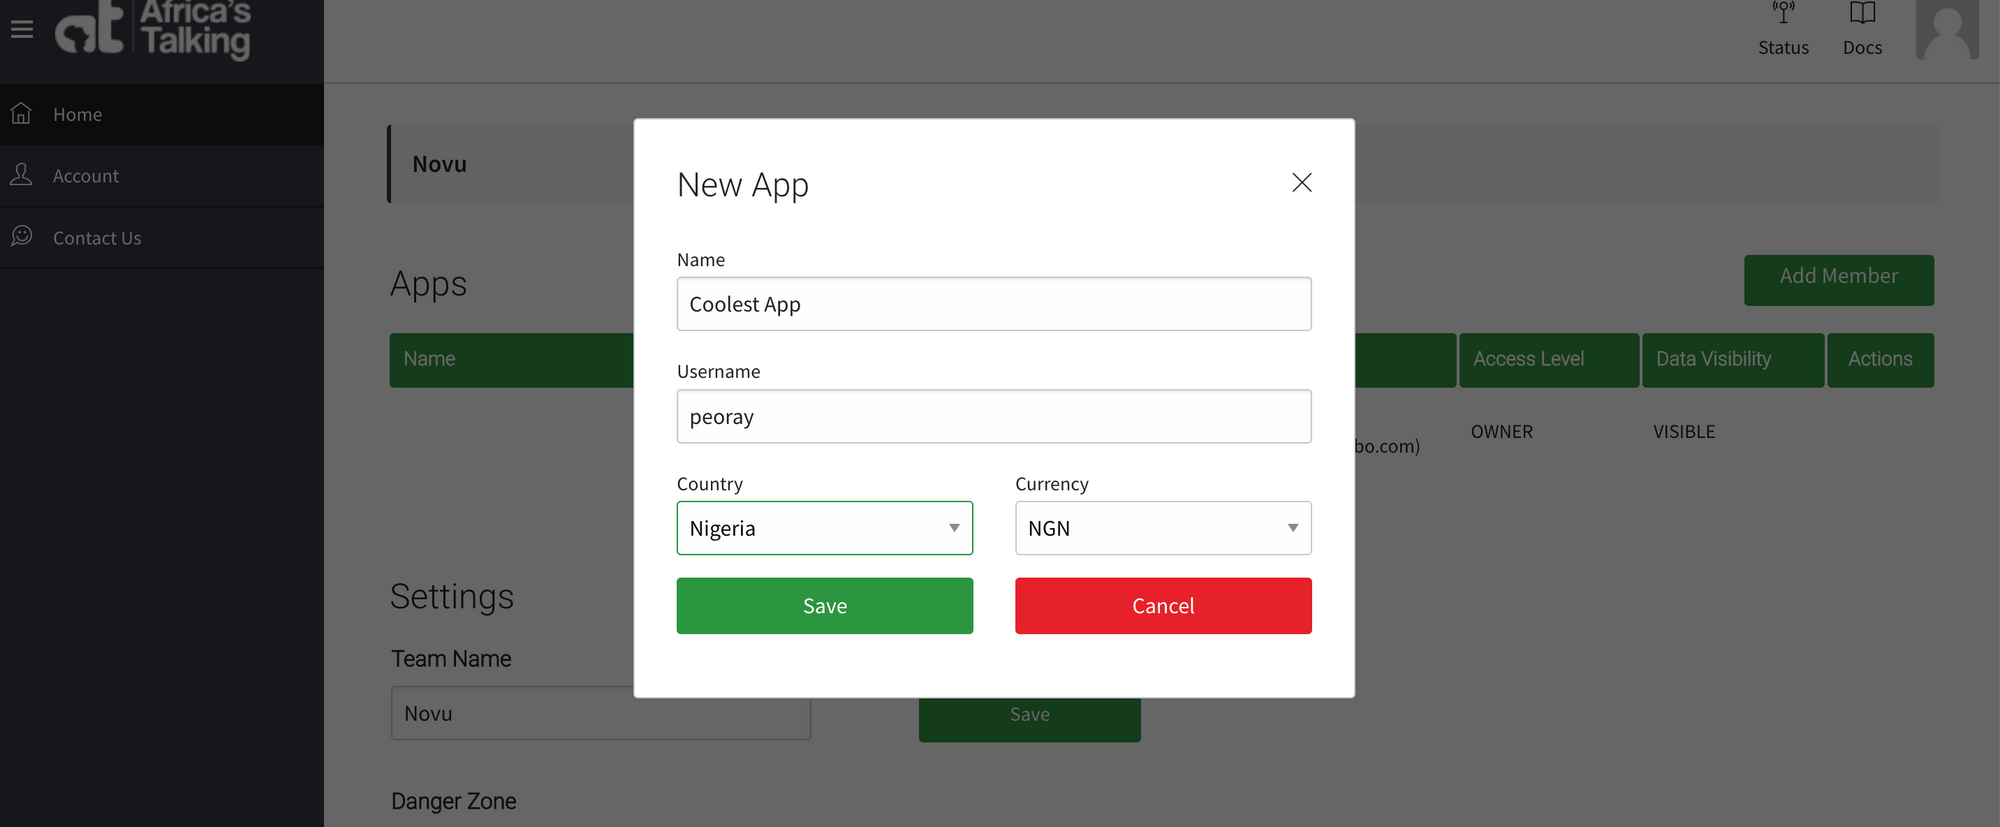
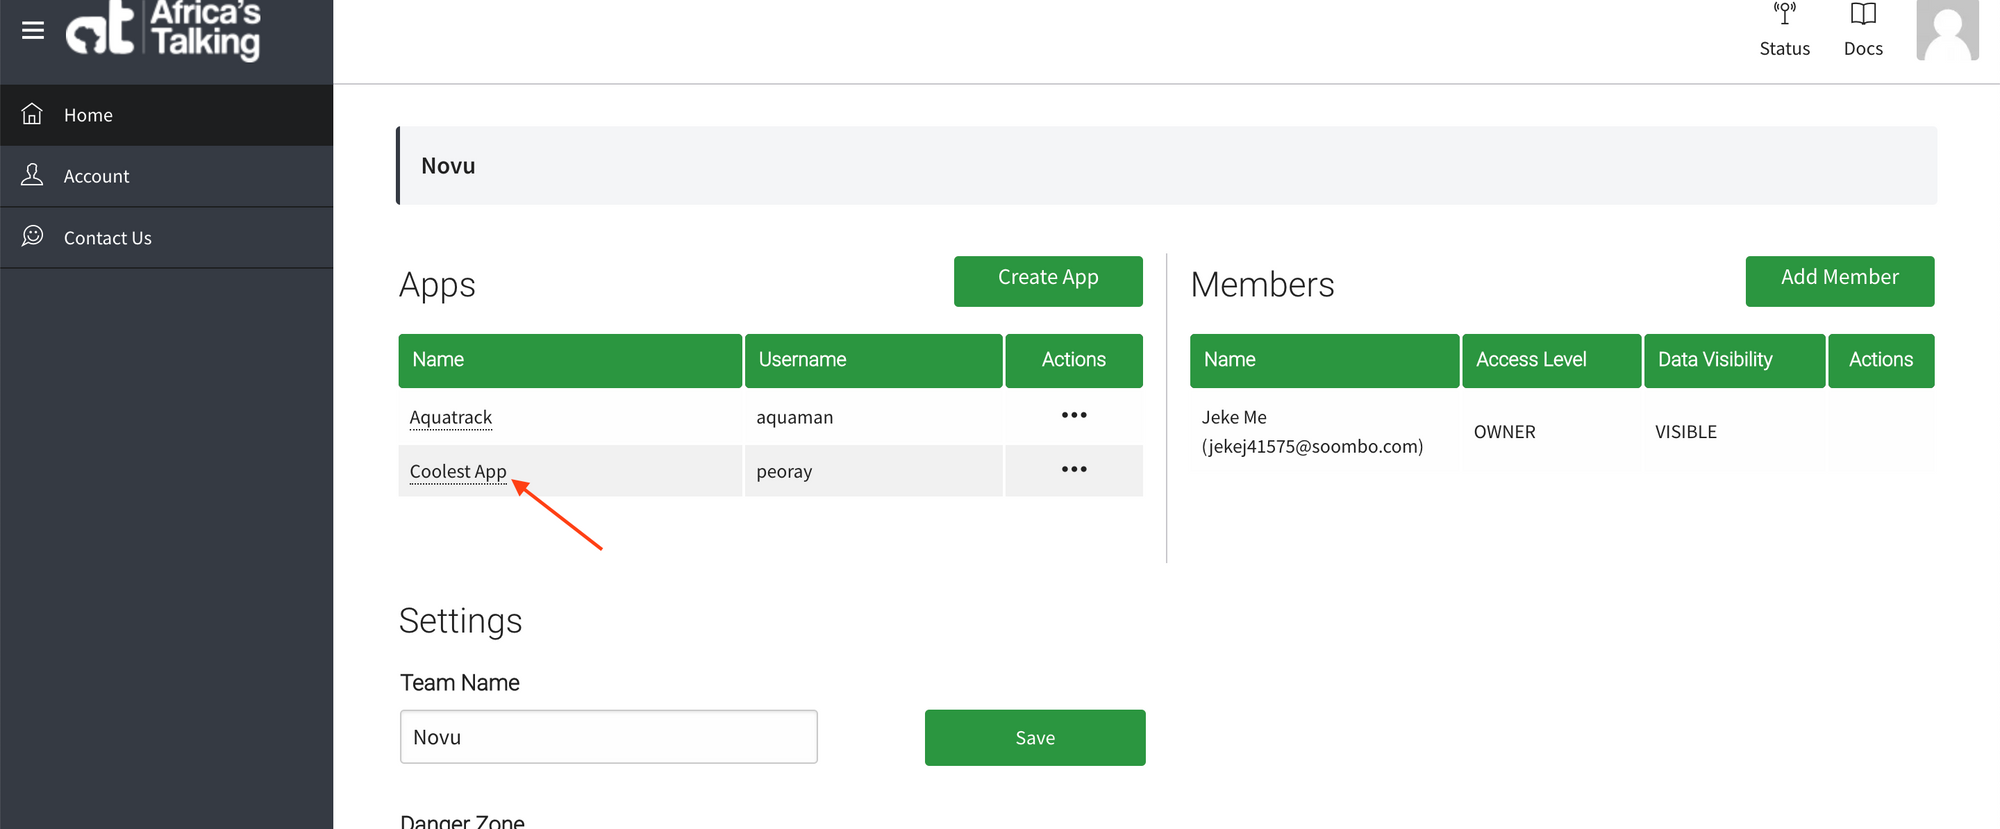
 * On the page that appears, click on the Create App button.
* On the pop-up that appears, enter your application name, username and select a country. Then click Save. The `username` is what you will use on the Novu platform.
* On the page that appears, click on the Create App button.
* On the pop-up that appears, enter your application name, username and select a country. Then click Save. The `username` is what you will use on the Novu platform.
 ## Generating an API key
To generate a new API key, you can follow these steps:
## Generating an API key
To generate a new API key, you can follow these steps:
 * On the page that appears, click on Settings(on the menu on your left). This will display a dropdown. Click on API Key from the dropdown options.
 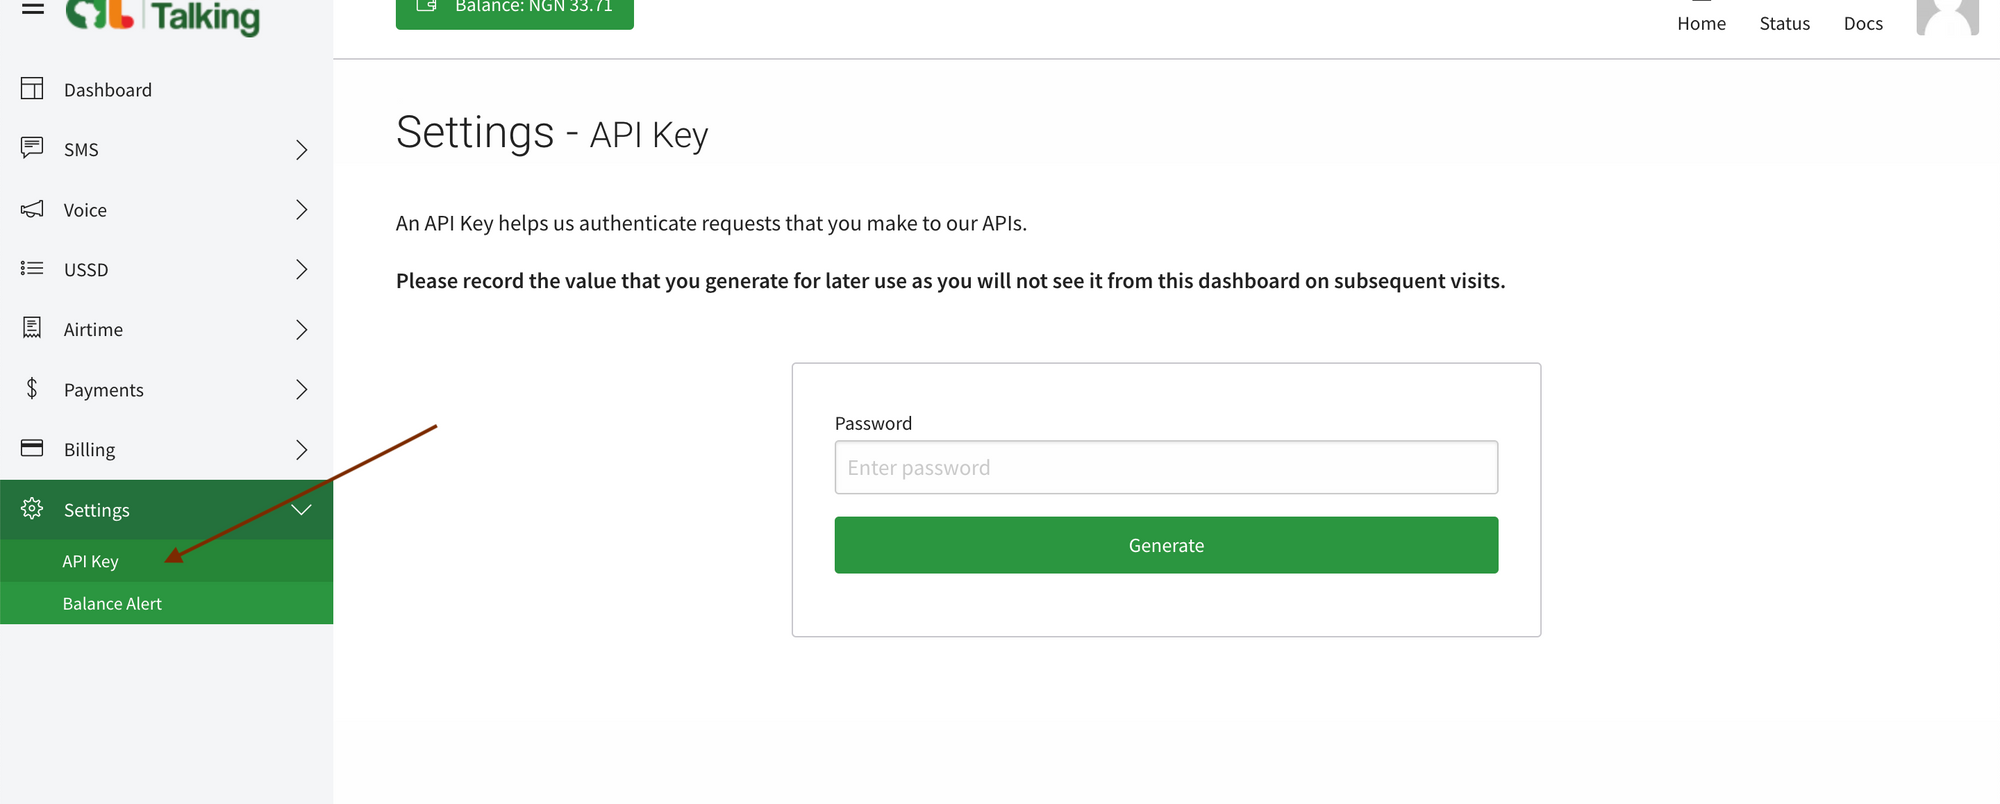 * On the page that appears, enter your password and click Generate.
  * Copy the API Key generated and paste it into the Novu platform or record it somewhere safe for later use because you will not see it from the dashboard on subsequent visits.
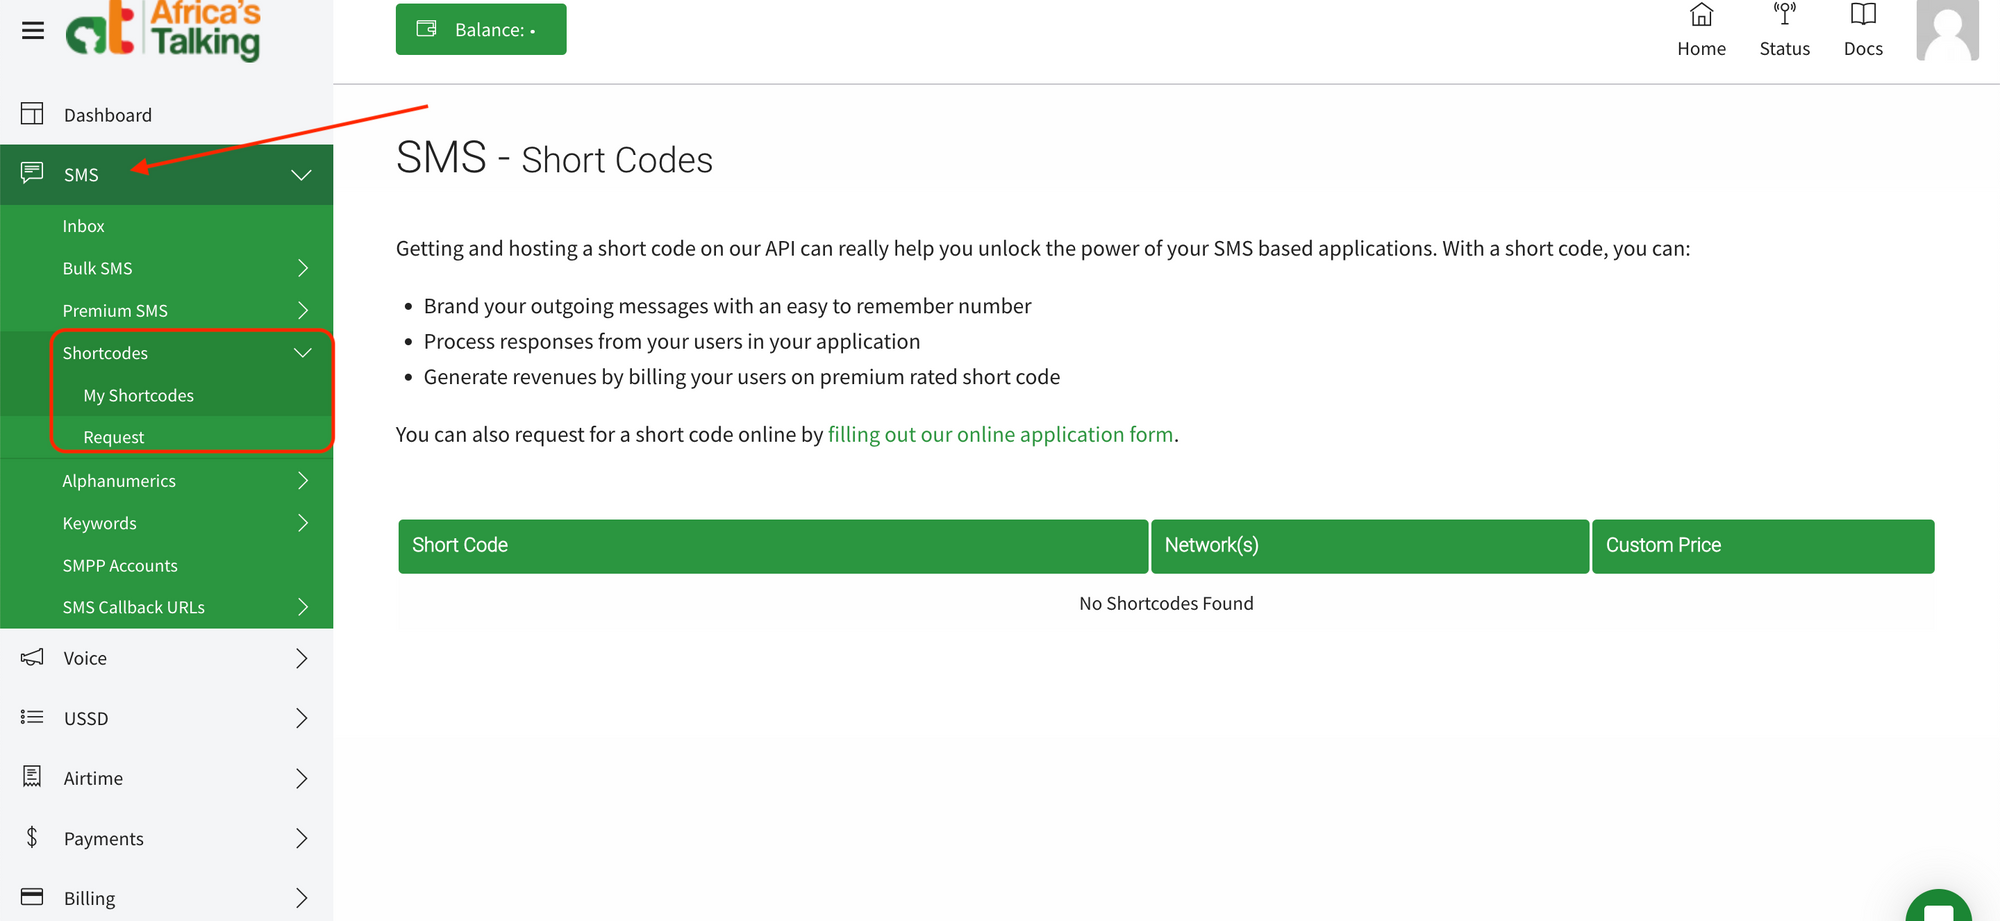 * If you have not created one yet, on the `Shortcodes` dropdown option, click on `Request`. On the page that appears, fill in the form and submit.
 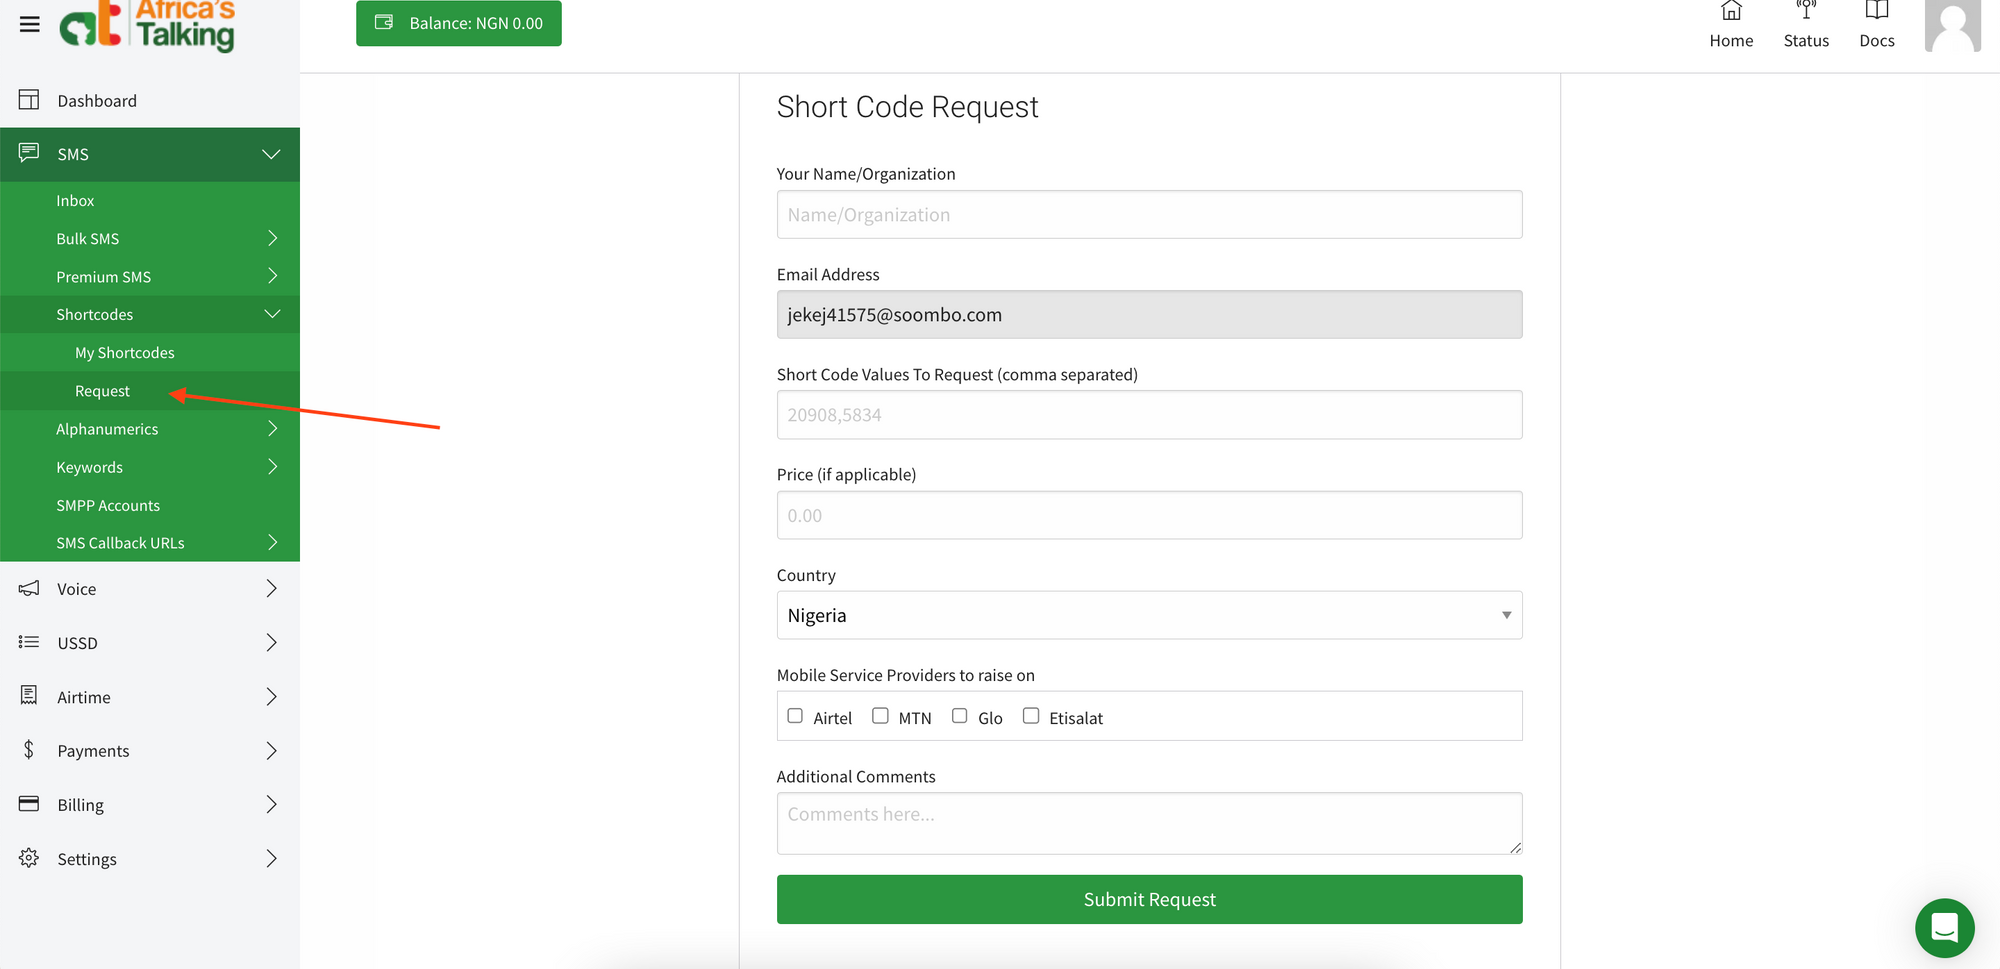 ## To create an Alphanumeric:
* On your app dashboard, click on SMS (on the menu on your left). This will display a dropdown. Click on `Alphanumerics` from the dropdown options. This will also display a dropdown from which you can then click on `My Alphanumerics` to view your codes.
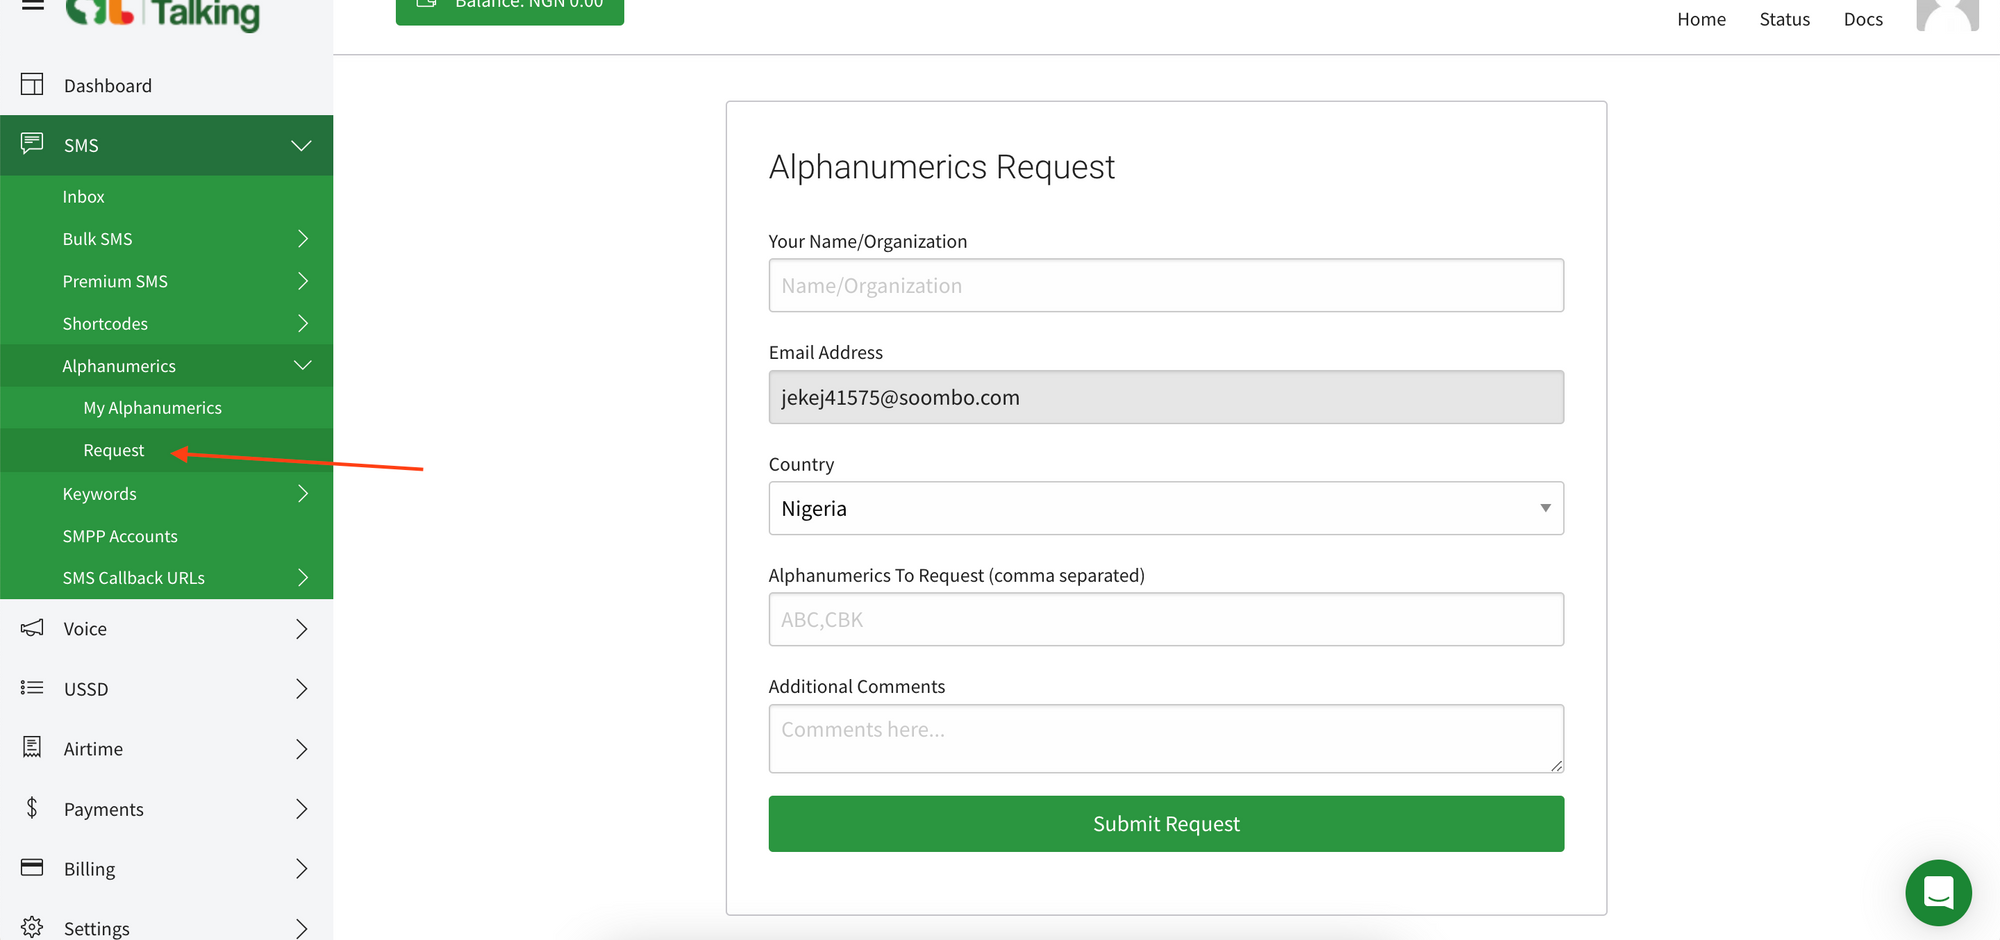
## To create an Alphanumeric:
* On your app dashboard, click on SMS (on the menu on your left). This will display a dropdown. Click on `Alphanumerics` from the dropdown options. This will also display a dropdown from which you can then click on `My Alphanumerics` to view your codes.
 * If you have not created one yet, on the `Alphanumerics` dropdown option, click on `Request`. On the page that appears, fill in the form and submit
 * Once you're done, add either your short code or alphanumeric to the `from` field on the Novu platform.
## Creating an Africa's Talking integration with Novu
* Visit the [Integrations](https://dashboard.novu.co/integrations?utm_campaign=docs-africastalking) page on Novu.
* Click the "Add a provider" button.
* Locate **Africa's Talking** under the SMS section and click on the **Connect** button.
* Enter the `API key`.
* Fill in the `username` field.
* Fill in the `from` field. This is your registered `short code` or `alphanumeric` value.
* Click on the `Disabled` button and mark it as `Active`.
* Click on the **Connect** button.
Now it is possible to send SMS notifications using Africa's Talking in Novu.
file: ./content/docs/platform/integrations/sms/(providers)/aws-sns.mdx
# AWS SNS
Learn how to use the AWS SNS provider to send sms notifications using Novu
You can use the [AWS SNS](https://aws.amazon.com/sns/) provider to send transactional emails to your customers using the Novu Platform with a single API to create multi-channel experiences.
## Getting Started
To integrate AWS SNS on the Novu platform, you will need to have in AWS, an IAM user who has the `sns:Publish` permission.
## Create User
To create a user, log in to AWS Console and follow these steps:
* Go to the `IAM` service page.
* Create a new user with `sns:Publish` permission, or add `sns:Publish` permission to an existing user.
* Add the `Access Key` credential to the user and copy the `Access key ID` and the `Secret access key`.
For security reasons, it is suggested that you create a new User to use with Novu.
## Create an AWS SNS integration with Novu
* Visit the [Integrations](https://dashboard.novu.co/integrations?utm_campaign=docs-sms-sns) page on Novu.
* Click the "Add a provider" button.
* Locate **Amazon SNS** and click on the **Connect** button.
* Enter your `Access Key ID`, `Secret Access key`, and `AWS region`.
* Click on the `Disabled` button and mark it as `Active`.
* Click on the **Save** button.
* You should now be able to send SMS notifications using **Amazon SNS** in Novu.
file: ./content/docs/platform/integrations/sms/(providers)/azure.mdx
# Azure SMS
Learn how to use the Azure SMS provider to send sms notifications using Novu
You can use the [Azure SMS](https://learn.microsoft.com/en-us/azure/communication-services/quickstarts/sms/send?tabs=windows\&pivots=platform-azcli) SMS provider to send SMS messages to the customers using the Novu Platform with a single API to create multi-channel experiences.
## Getting Started
To use Azure SMS provider in the SMS channel, the first step is to create an Azure account and grab the communication services connection string from your account dashboard.
## Creating a Azure SMS integration with Novu
* Visit the [Integrations](https://dashboard.novu.co/integrations?utm_campaign=docs-sms-azure) page on Novu.
* Click the "Add a provider" button.
* Locate **Azure Sms** under the SMS section and click on the **Next** button.
* Select Your Environment add condition (Optional).
* Click on the `Create` button.
* Click on the `Disabled` button and mark it as `Active`.
* Enter the `Connection string`.
* Enter the `From` value.
* Click on the **Update** button.
Now it is possible to send SMS notifications using **Azure Sms** in Novu.
file: ./content/docs/platform/integrations/sms/(providers)/bulk-sms.mdx
# BulkSMS
Learn how to use the BulkSMS provider to send sms notifications using Novu
You can use the [BurstSMS](https://bulksms.com/) provider to send SMS messages to the customers using the Novu Platform with a single API to create multi-channel experiences.
## Getting Started
To use BulkSMS provider in the SMS channel, the first step is to create a BulkSMS account and create an [API token](https://www.bulksms.com/account/#!/advanced-settings/api-tokens).
## Creating a BulkSMS integration with Novu
* Visit the [Integrations](https://dashboard.novu.co.co/integrations?utm_campaign=docs-sms-bulksms) page on Novu.
* Click the "Add a provider" button.
* Locate **BulkSMS** under the SMS section and click on the **Next** button.
* Select Your Environment add condition (Optional).
* Click on the `Create` button.
* Click on the `Disabled` button and mark it as `Active`.
* Enter the `API Token`.
* Click on the **Update** button.
Now it is possible to send SMS notifications using **BulkSMS** in Novu.
file: ./content/docs/platform/integrations/sms/(providers)/burst-sms.mdx
# BurstSMS
Learn how to use the BurstSMS provider to send sms notifications using Novu
You can use the [BurstSMS](https://burstsms.com/) provider to send SMS messages to the customers using the Novu Platform with a single API to create multi-channel experiences.
## Getting Started
To use BurstSMS provider in the SMS channel, the first step is to create an BurstSMS account and add the personal BurstSMS API key and your BurstSMS API Secret to the BurstSMS integration on the Novu platform.
## Find the API and Secret key
To find the BurstSMS API and Secret key, log into the personal BurstSMS account and navigate to the API Keys section tab present at the end of the Navbar. It is suggested to create a new API and Secret key for use with Novu. Copy the newly created API and Secret key.
## Creating a BurstSMS integration with Novu
* Visit the [Integrations](https://dashboard.novu.co/integrations?utm_campaign=docs-sms-burstsms) page on Novu.
* Click the "Add a provider" button.
* Locate **BurstSMS** under the SMS section and click on the **Next** button.
* Select Your Environment add condition (Optional)
* Click on the `Disabled` button and mark it as `Active`.
* Enter the `API key` and `API Secret`.
* Click on the **Upload** button.
* Now it is possible to send SMS notifications using **BurstSMS** in Novu.
file: ./content/docs/platform/integrations/sms/(providers)/clickatell.mdx
# Clickatell
Learn how to use the Clickatell provider to send sms notifications using Novu
You can use the [Clickatell](https://www.clickatell.com/) provider to send SMS messages to your customers using the Novu Platform. Let's see how to do it:
## Setting up Clickatell
* Once you're done, add either your short code or alphanumeric to the `from` field on the Novu platform.
## Creating an Africa's Talking integration with Novu
* Visit the [Integrations](https://dashboard.novu.co/integrations?utm_campaign=docs-africastalking) page on Novu.
* Click the "Add a provider" button.
* Locate **Africa's Talking** under the SMS section and click on the **Connect** button.
* Enter the `API key`.
* Fill in the `username` field.
* Fill in the `from` field. This is your registered `short code` or `alphanumeric` value.
* Click on the `Disabled` button and mark it as `Active`.
* Click on the **Connect** button.
Now it is possible to send SMS notifications using Africa's Talking in Novu.
file: ./content/docs/platform/integrations/sms/(providers)/aws-sns.mdx
# AWS SNS
Learn how to use the AWS SNS provider to send sms notifications using Novu
You can use the [AWS SNS](https://aws.amazon.com/sns/) provider to send transactional emails to your customers using the Novu Platform with a single API to create multi-channel experiences.
## Getting Started
To integrate AWS SNS on the Novu platform, you will need to have in AWS, an IAM user who has the `sns:Publish` permission.
## Create User
To create a user, log in to AWS Console and follow these steps:
* Go to the `IAM` service page.
* Create a new user with `sns:Publish` permission, or add `sns:Publish` permission to an existing user.
* Add the `Access Key` credential to the user and copy the `Access key ID` and the `Secret access key`.
For security reasons, it is suggested that you create a new User to use with Novu.
## Create an AWS SNS integration with Novu
* Visit the [Integrations](https://dashboard.novu.co/integrations?utm_campaign=docs-sms-sns) page on Novu.
* Click the "Add a provider" button.
* Locate **Amazon SNS** and click on the **Connect** button.
* Enter your `Access Key ID`, `Secret Access key`, and `AWS region`.
* Click on the `Disabled` button and mark it as `Active`.
* Click on the **Save** button.
* You should now be able to send SMS notifications using **Amazon SNS** in Novu.
file: ./content/docs/platform/integrations/sms/(providers)/azure.mdx
# Azure SMS
Learn how to use the Azure SMS provider to send sms notifications using Novu
You can use the [Azure SMS](https://learn.microsoft.com/en-us/azure/communication-services/quickstarts/sms/send?tabs=windows\&pivots=platform-azcli) SMS provider to send SMS messages to the customers using the Novu Platform with a single API to create multi-channel experiences.
## Getting Started
To use Azure SMS provider in the SMS channel, the first step is to create an Azure account and grab the communication services connection string from your account dashboard.
## Creating a Azure SMS integration with Novu
* Visit the [Integrations](https://dashboard.novu.co/integrations?utm_campaign=docs-sms-azure) page on Novu.
* Click the "Add a provider" button.
* Locate **Azure Sms** under the SMS section and click on the **Next** button.
* Select Your Environment add condition (Optional).
* Click on the `Create` button.
* Click on the `Disabled` button and mark it as `Active`.
* Enter the `Connection string`.
* Enter the `From` value.
* Click on the **Update** button.
Now it is possible to send SMS notifications using **Azure Sms** in Novu.
file: ./content/docs/platform/integrations/sms/(providers)/bulk-sms.mdx
# BulkSMS
Learn how to use the BulkSMS provider to send sms notifications using Novu
You can use the [BurstSMS](https://bulksms.com/) provider to send SMS messages to the customers using the Novu Platform with a single API to create multi-channel experiences.
## Getting Started
To use BulkSMS provider in the SMS channel, the first step is to create a BulkSMS account and create an [API token](https://www.bulksms.com/account/#!/advanced-settings/api-tokens).
## Creating a BulkSMS integration with Novu
* Visit the [Integrations](https://dashboard.novu.co.co/integrations?utm_campaign=docs-sms-bulksms) page on Novu.
* Click the "Add a provider" button.
* Locate **BulkSMS** under the SMS section and click on the **Next** button.
* Select Your Environment add condition (Optional).
* Click on the `Create` button.
* Click on the `Disabled` button and mark it as `Active`.
* Enter the `API Token`.
* Click on the **Update** button.
Now it is possible to send SMS notifications using **BulkSMS** in Novu.
file: ./content/docs/platform/integrations/sms/(providers)/burst-sms.mdx
# BurstSMS
Learn how to use the BurstSMS provider to send sms notifications using Novu
You can use the [BurstSMS](https://burstsms.com/) provider to send SMS messages to the customers using the Novu Platform with a single API to create multi-channel experiences.
## Getting Started
To use BurstSMS provider in the SMS channel, the first step is to create an BurstSMS account and add the personal BurstSMS API key and your BurstSMS API Secret to the BurstSMS integration on the Novu platform.
## Find the API and Secret key
To find the BurstSMS API and Secret key, log into the personal BurstSMS account and navigate to the API Keys section tab present at the end of the Navbar. It is suggested to create a new API and Secret key for use with Novu. Copy the newly created API and Secret key.
## Creating a BurstSMS integration with Novu
* Visit the [Integrations](https://dashboard.novu.co/integrations?utm_campaign=docs-sms-burstsms) page on Novu.
* Click the "Add a provider" button.
* Locate **BurstSMS** under the SMS section and click on the **Next** button.
* Select Your Environment add condition (Optional)
* Click on the `Disabled` button and mark it as `Active`.
* Enter the `API key` and `API Secret`.
* Click on the **Upload** button.
* Now it is possible to send SMS notifications using **BurstSMS** in Novu.
file: ./content/docs/platform/integrations/sms/(providers)/clickatell.mdx
# Clickatell
Learn how to use the Clickatell provider to send sms notifications using Novu
You can use the [Clickatell](https://www.clickatell.com/) provider to send SMS messages to your customers using the Novu Platform. Let's see how to do it:
## Setting up Clickatell
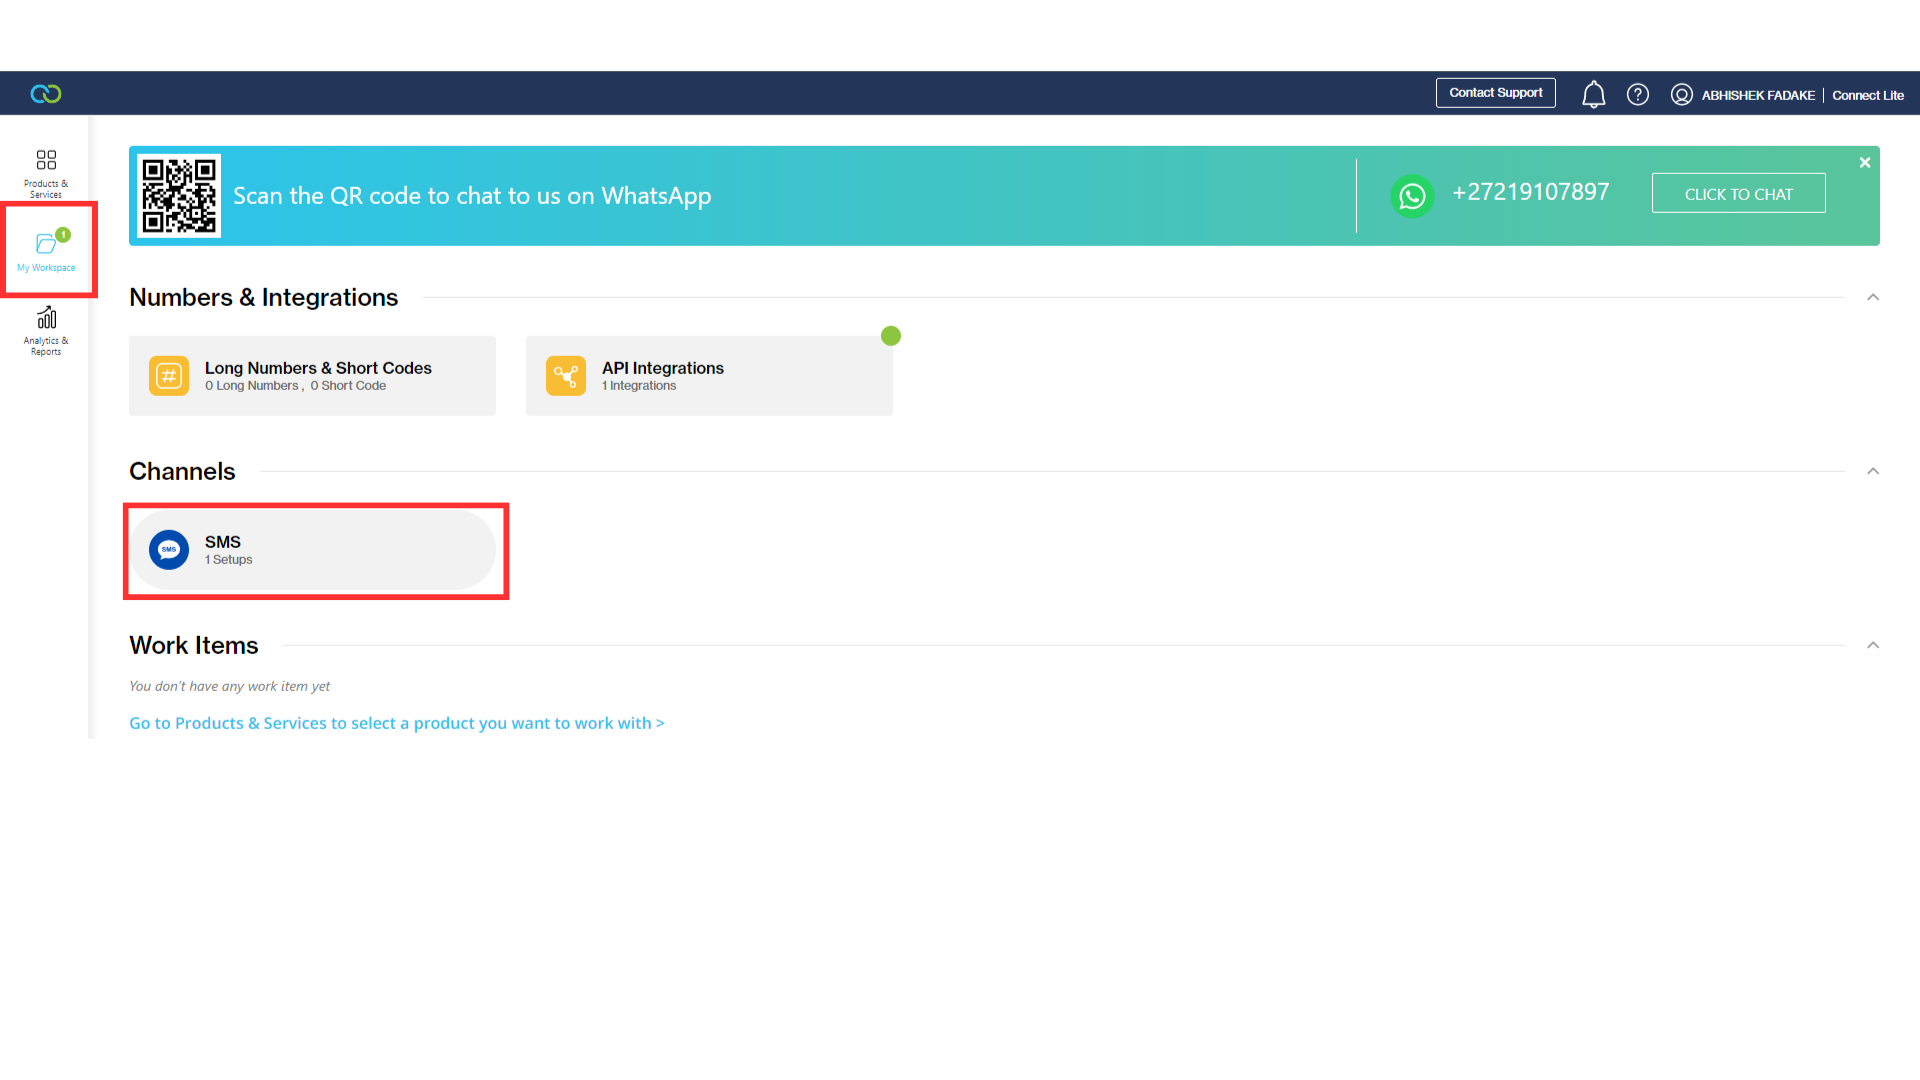
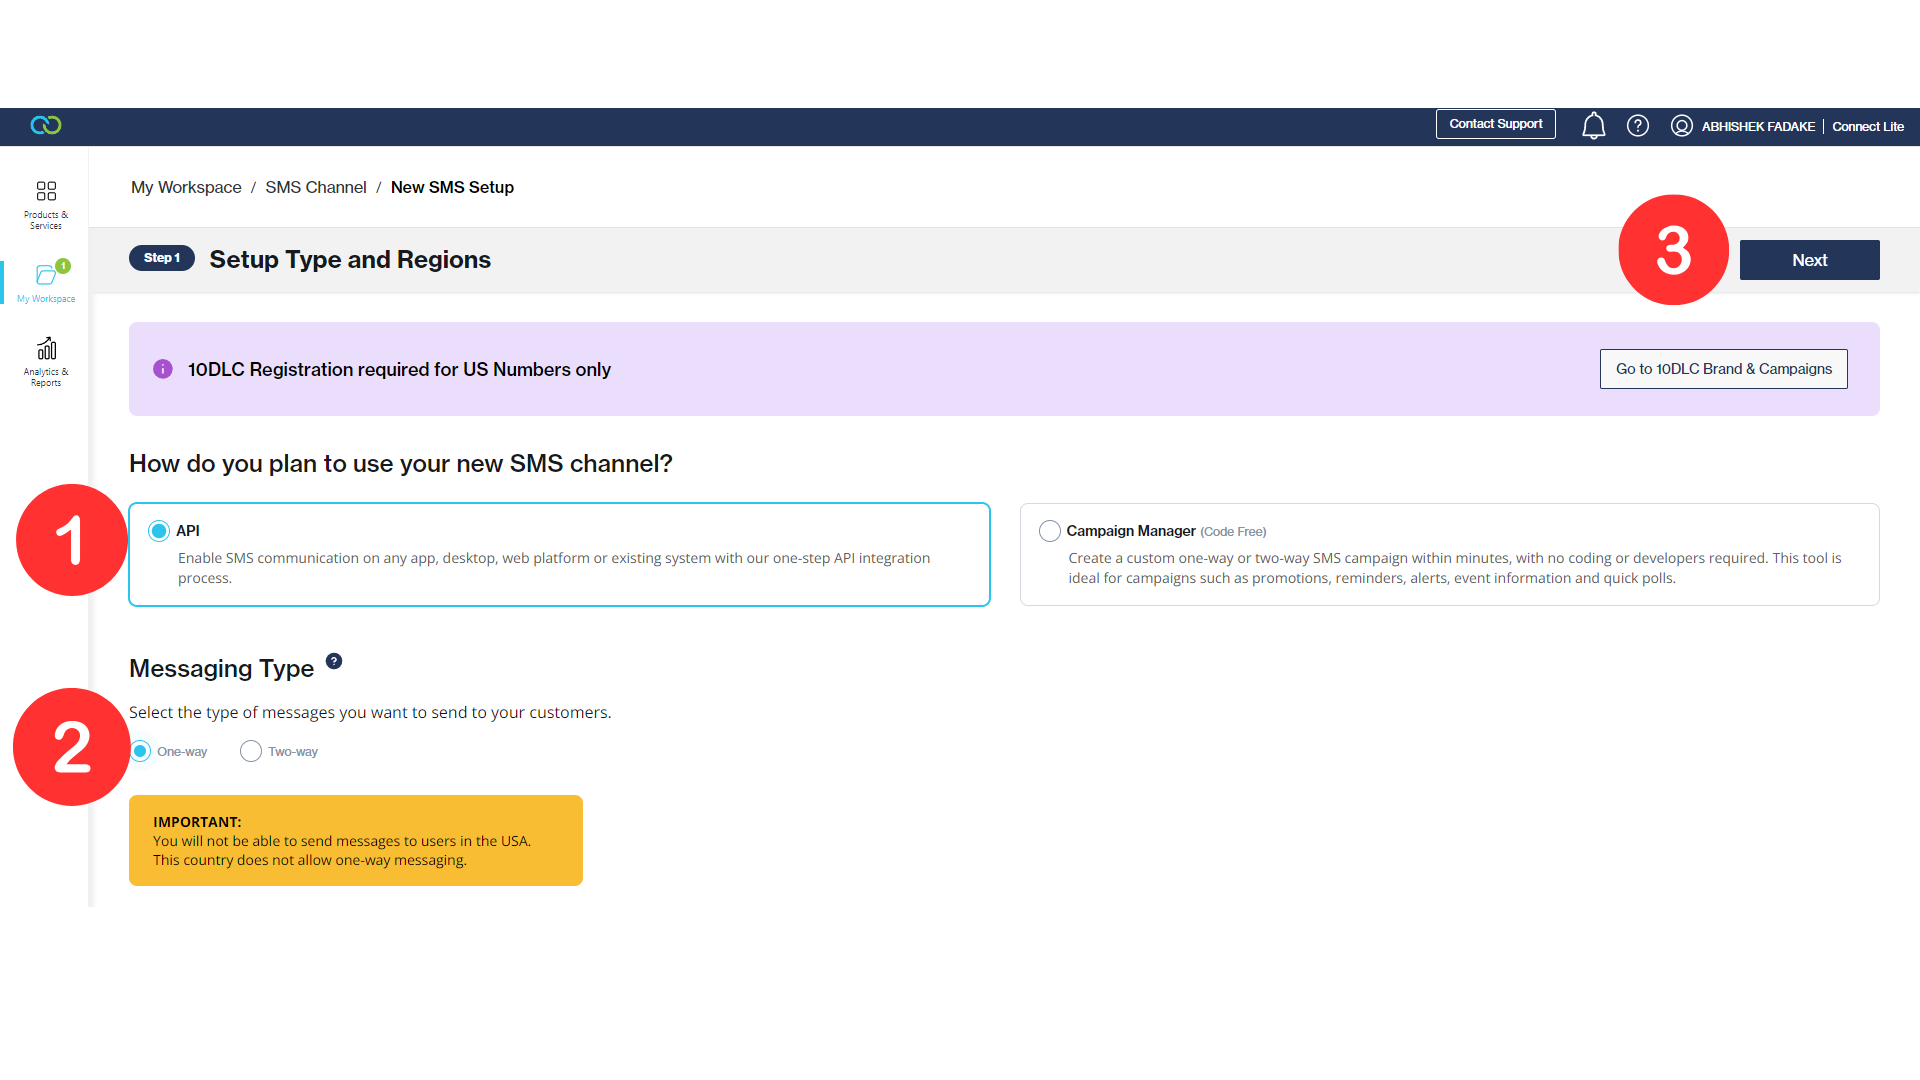
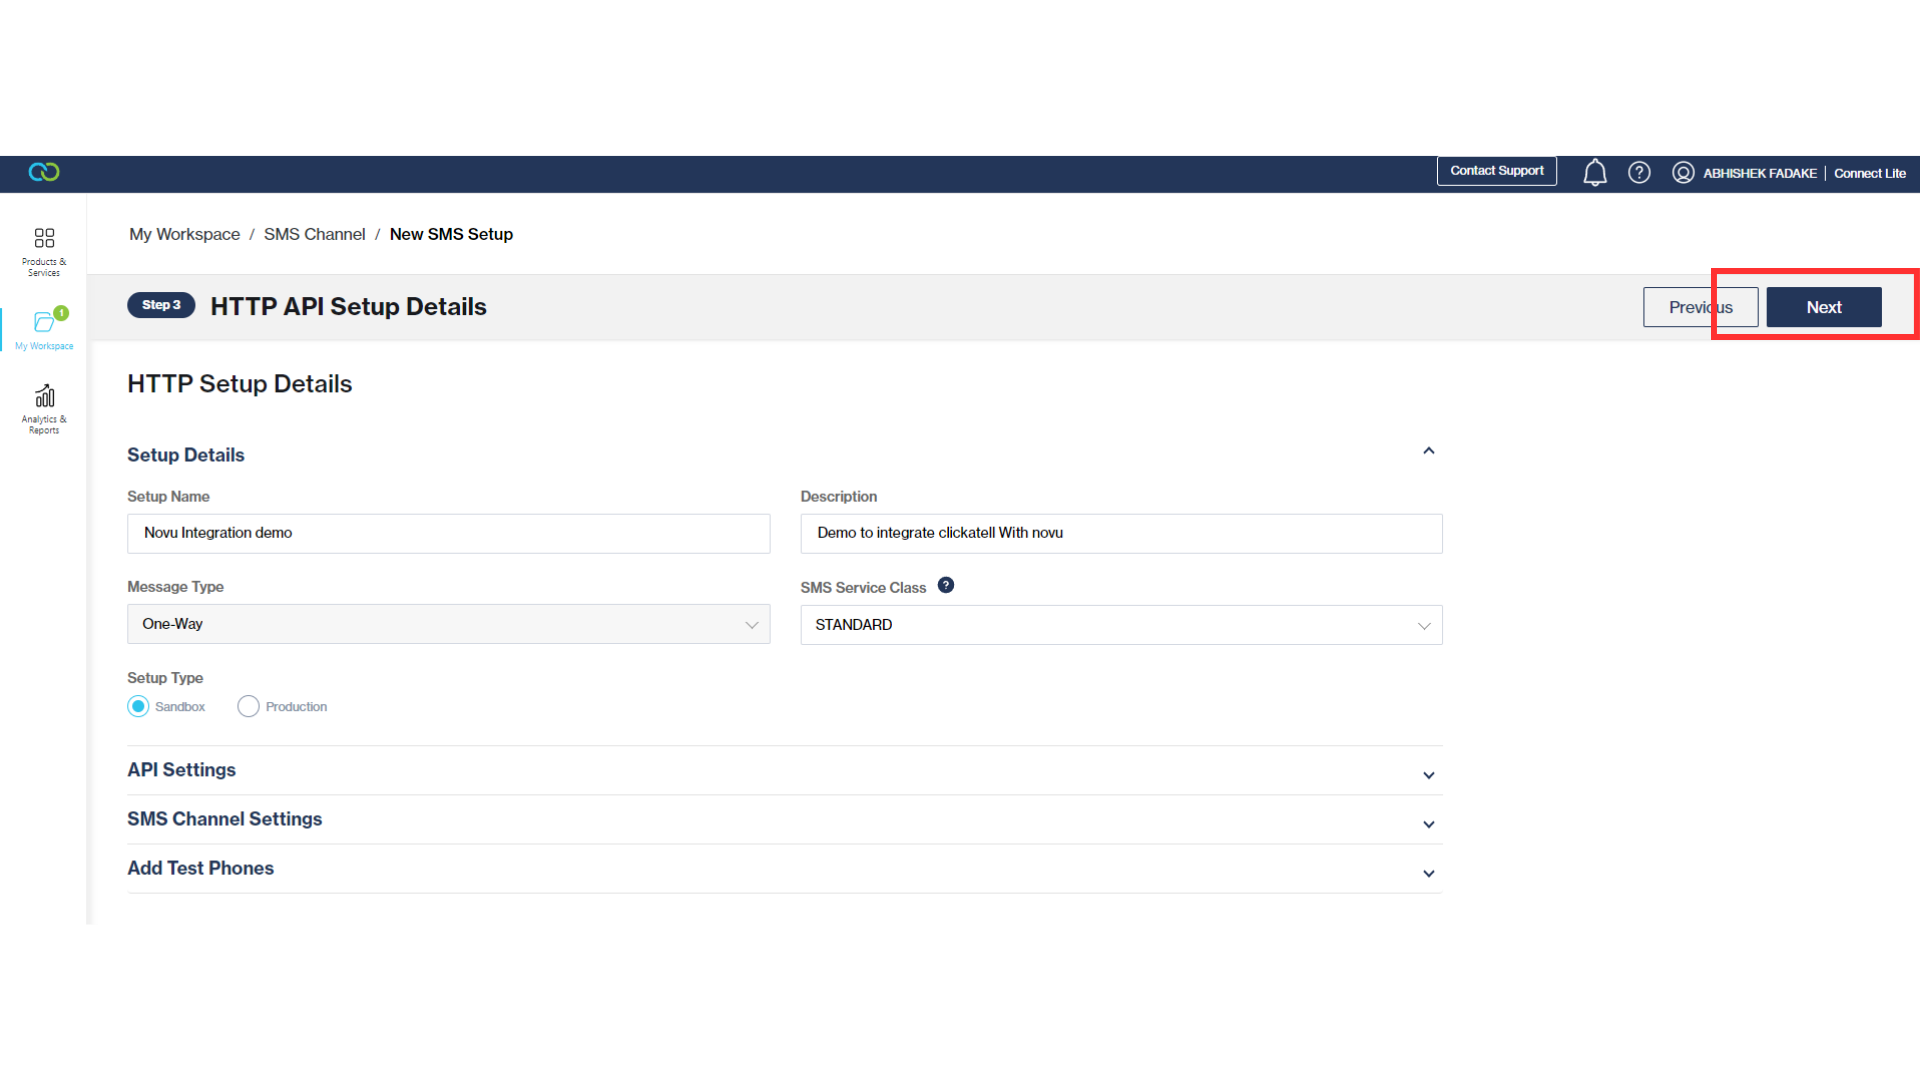
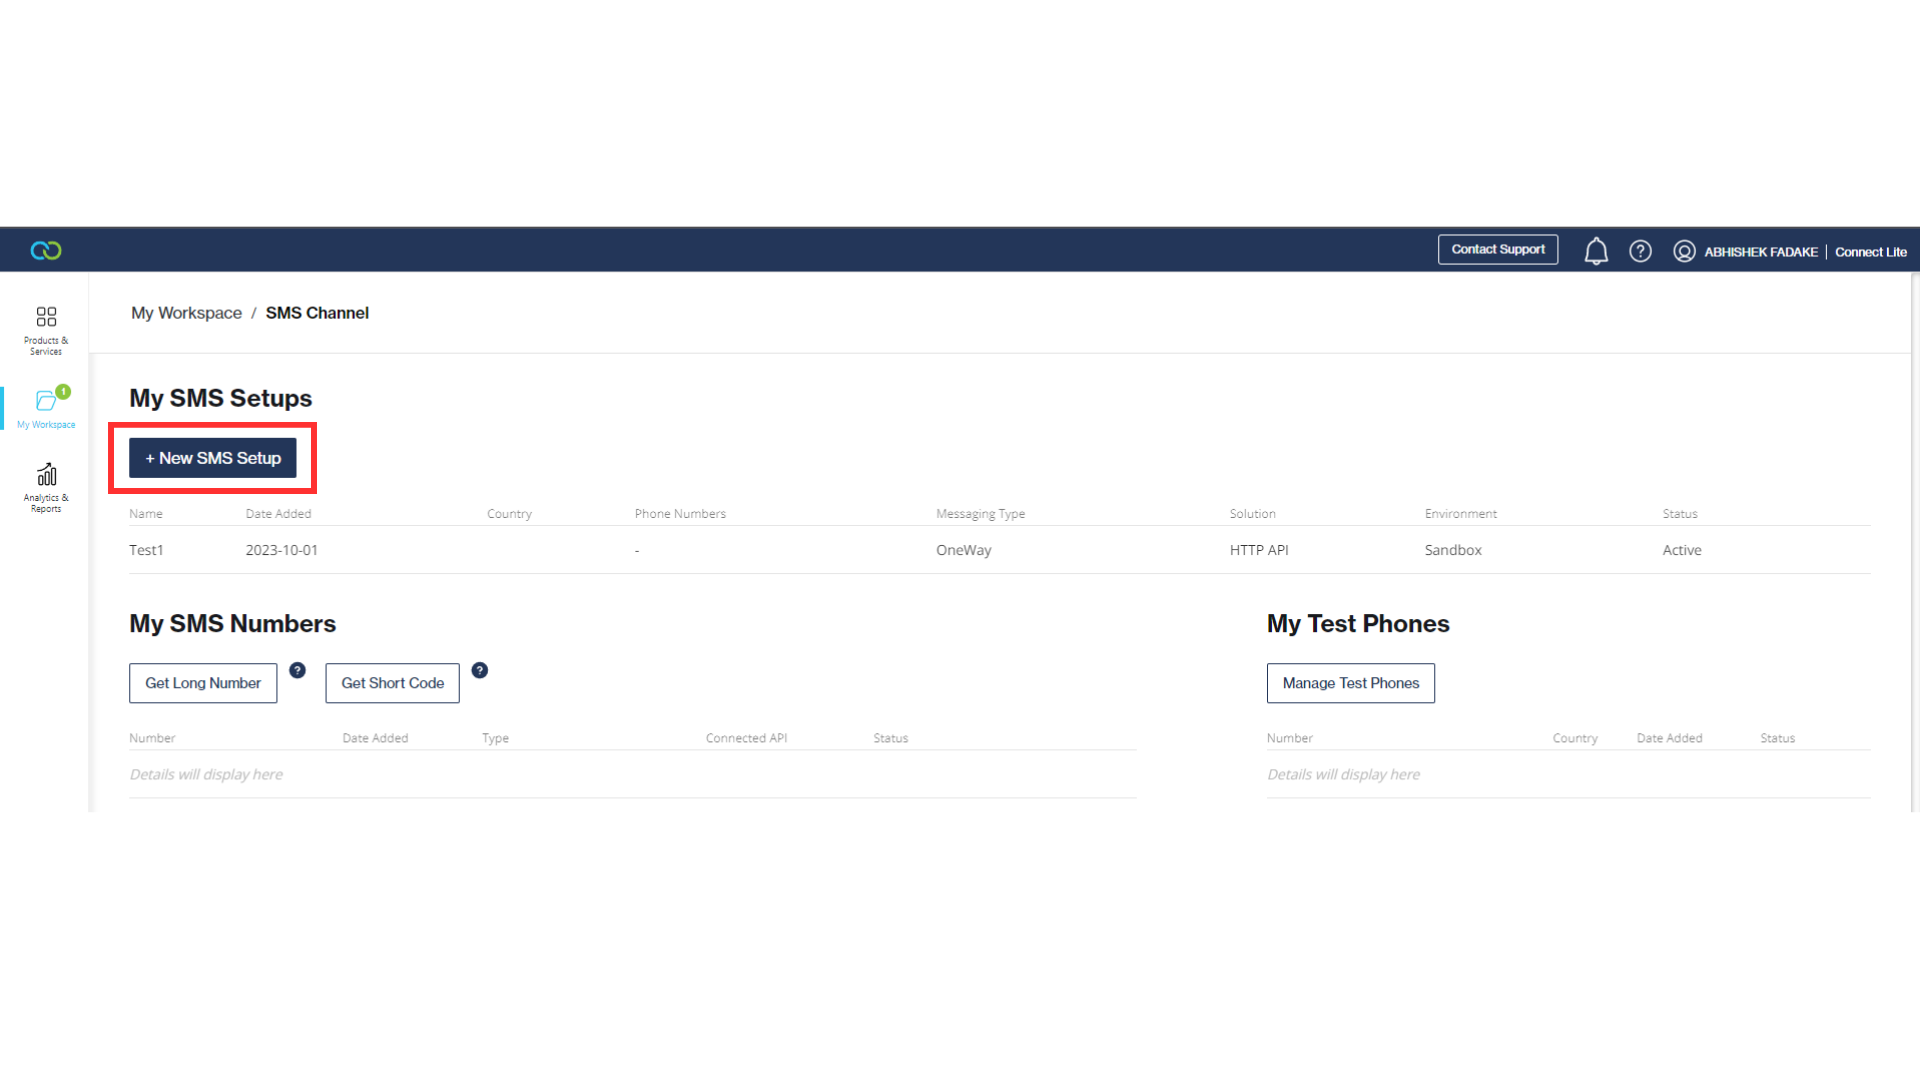 2. Select `API` then `Messaging Type` and click Next
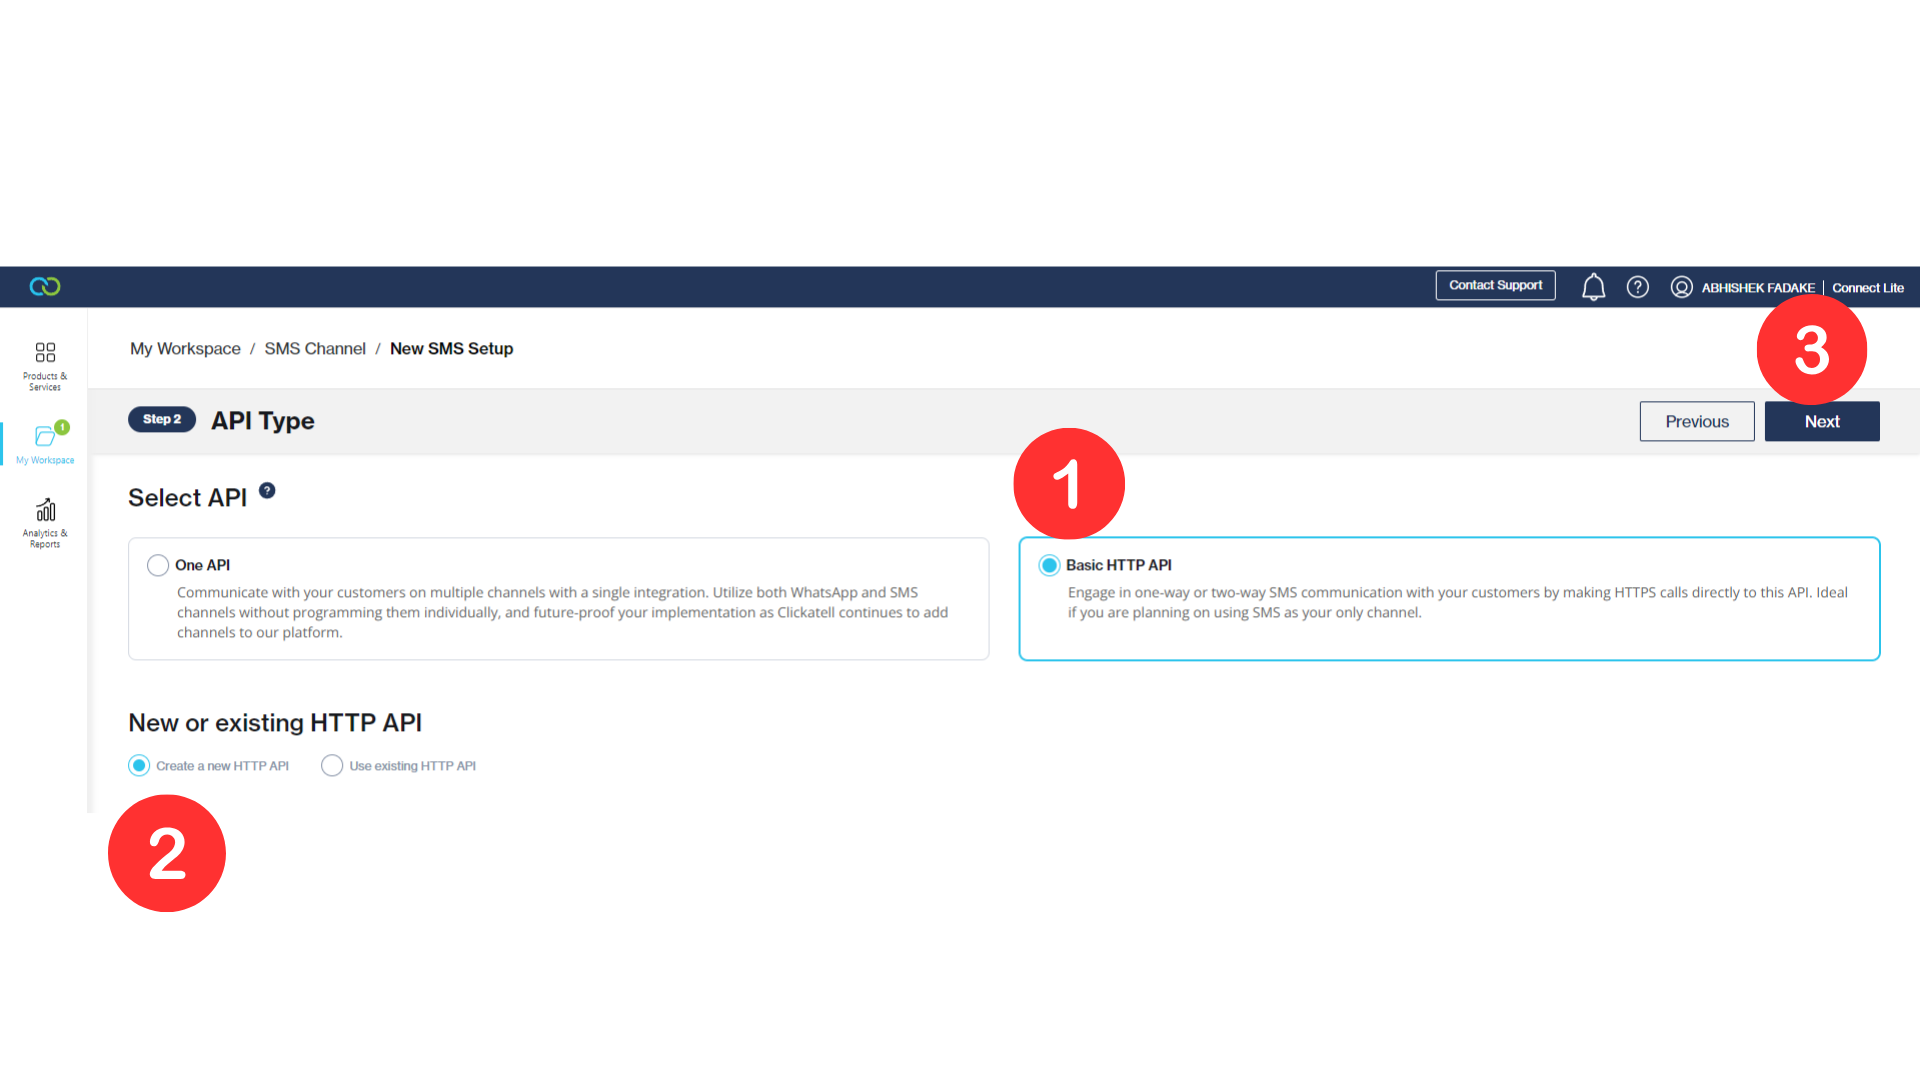
 3. Select `Basic HTTP API` then `create a new HTTP API` and click Next
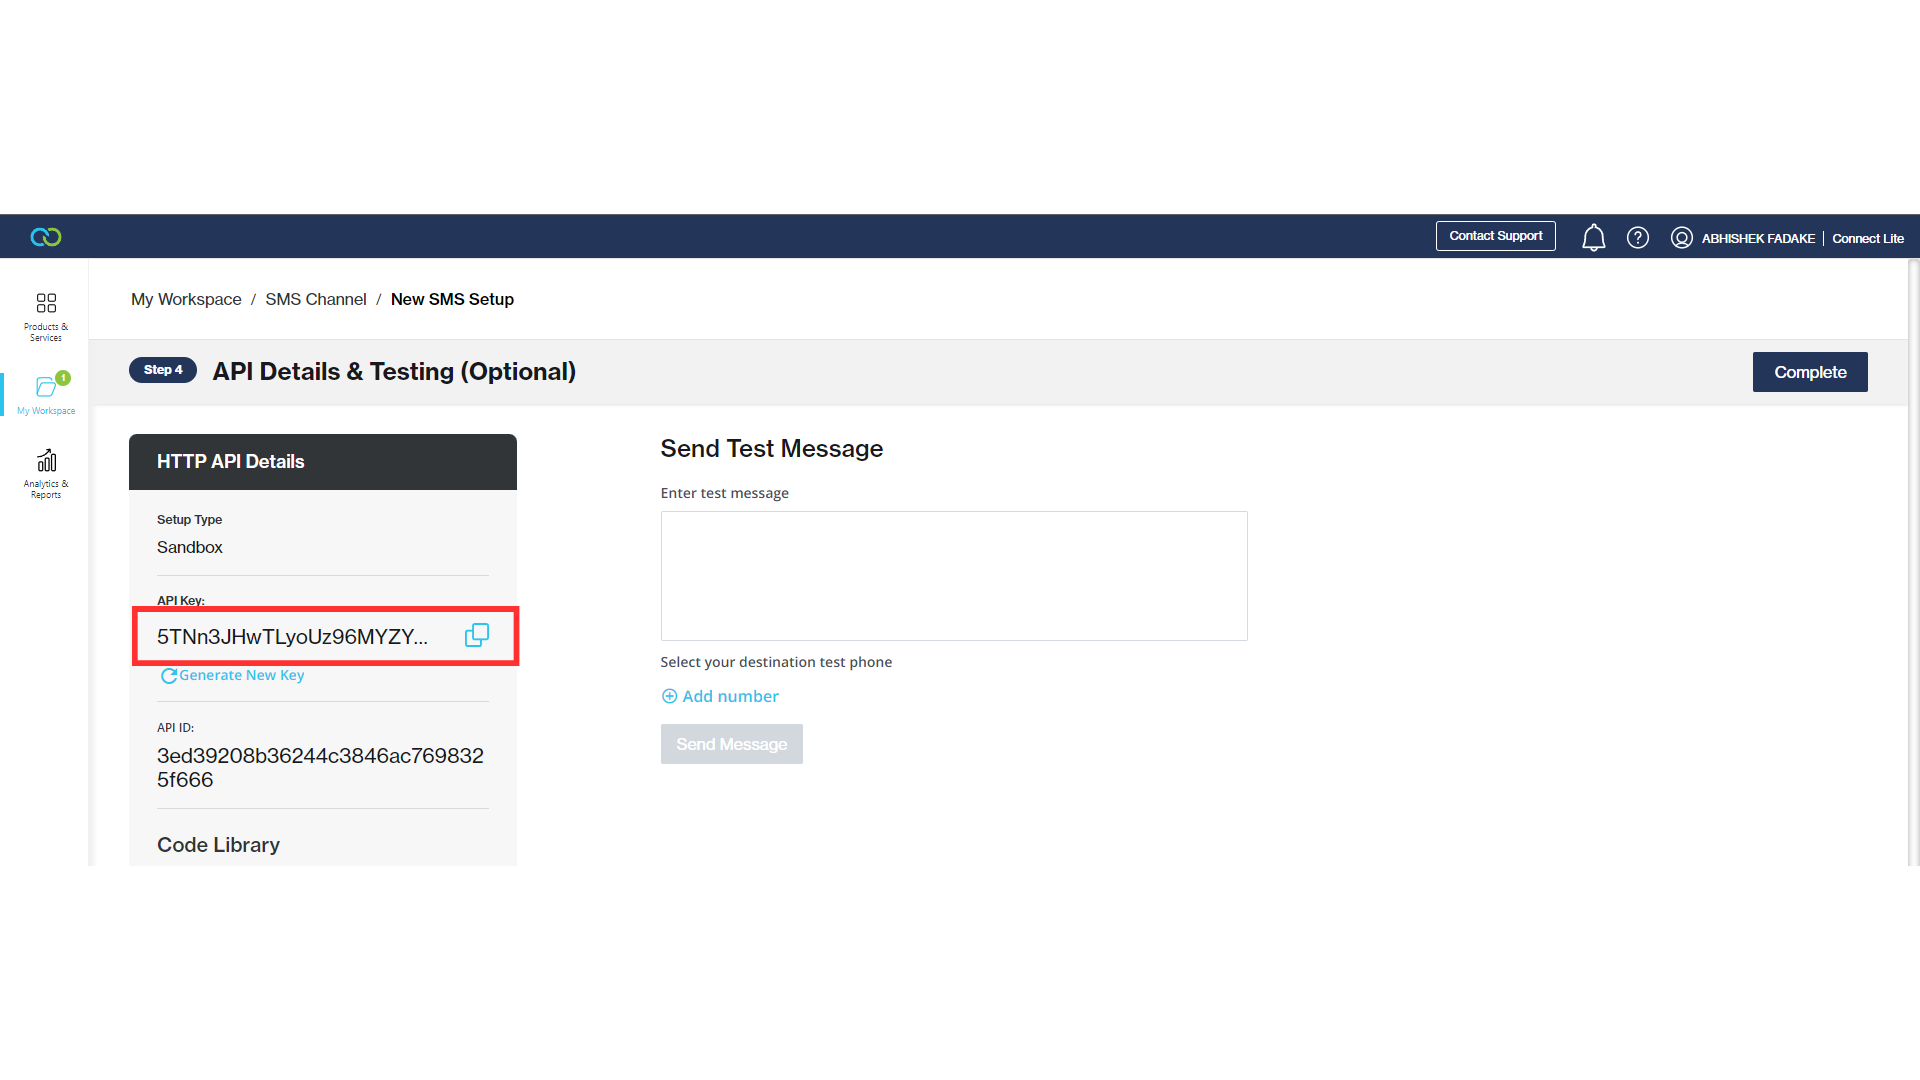
 2. Copy the API key and click complete
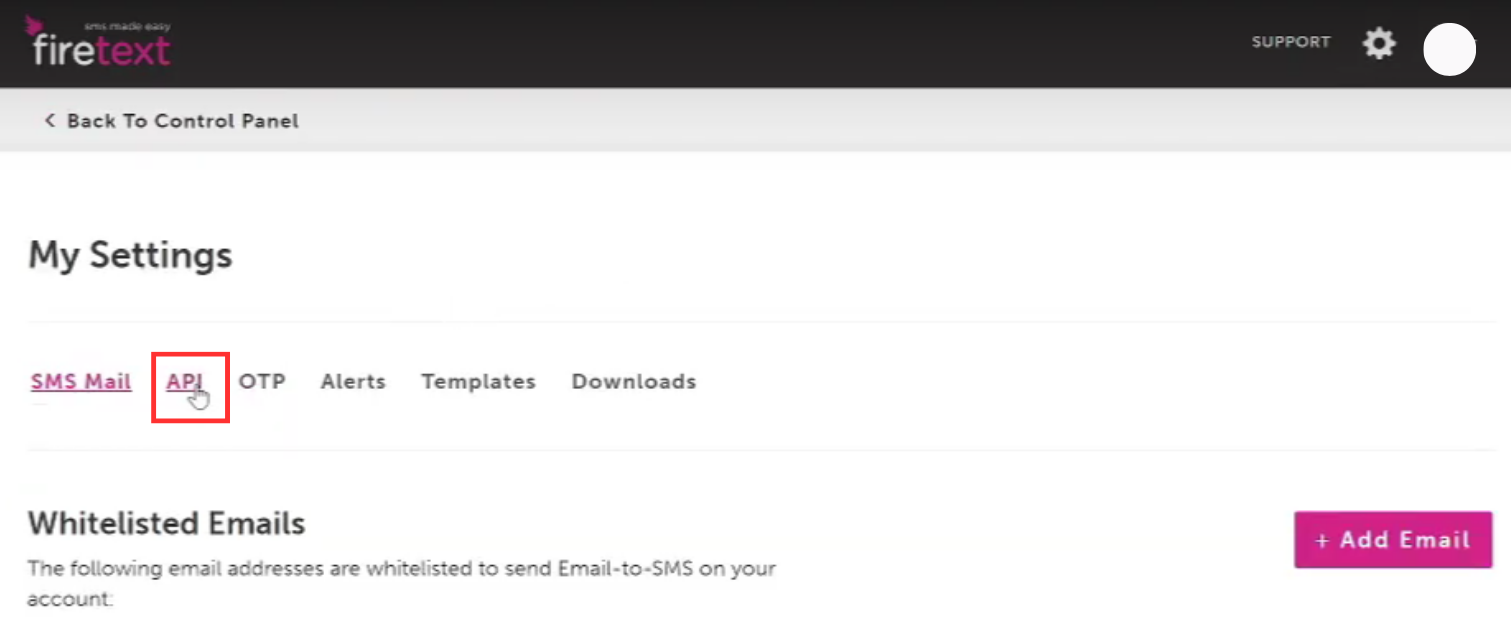
 3. Click on the `API` in `My Settings` Section
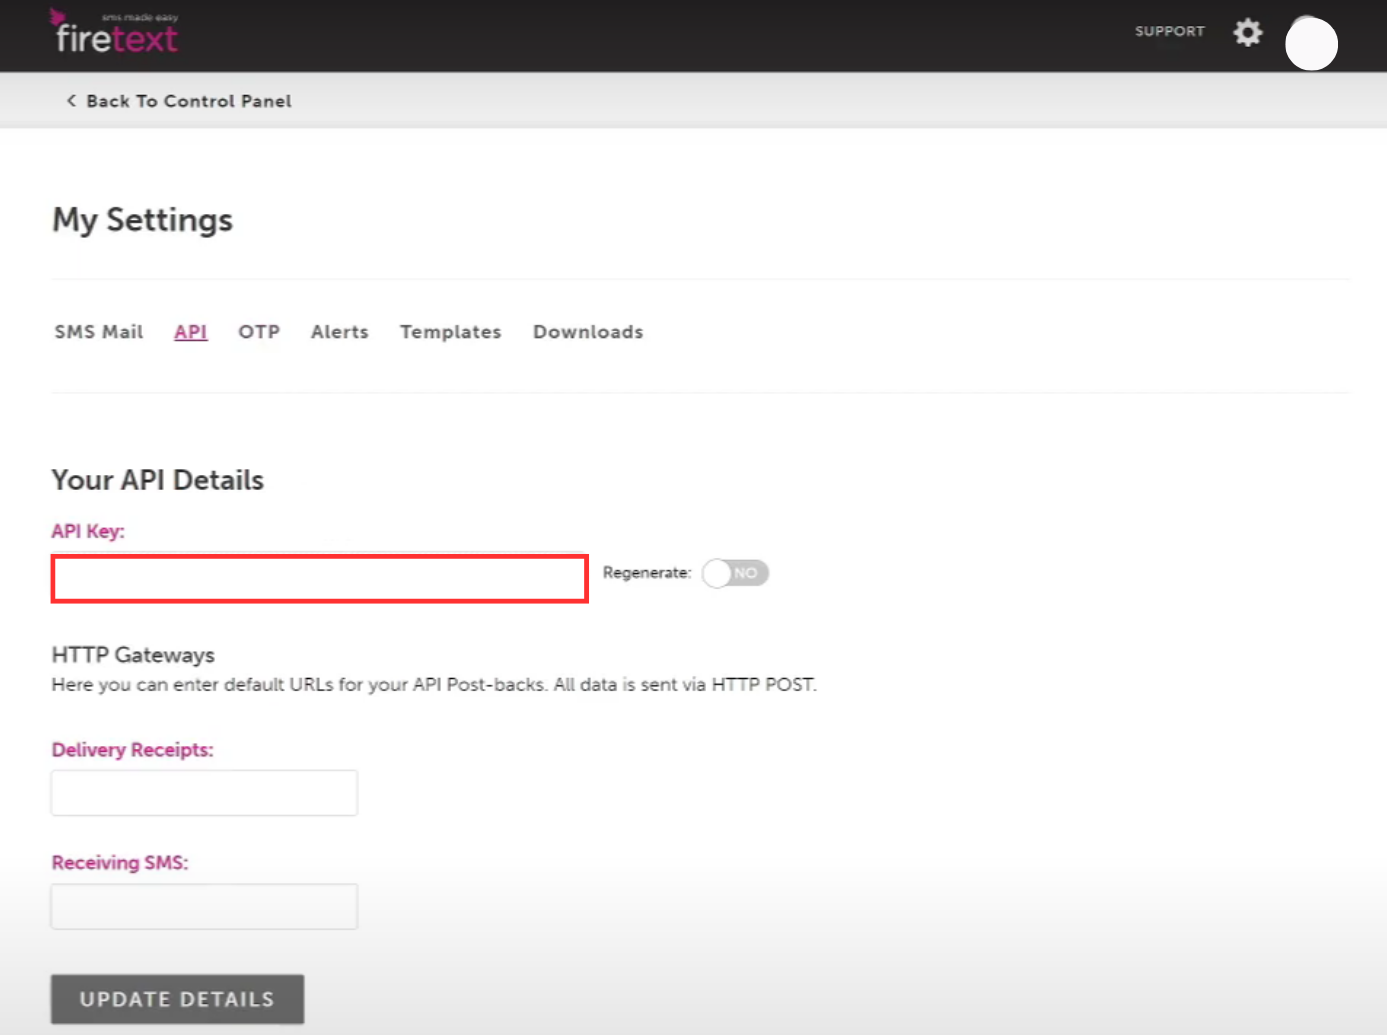 4. On the API Keys page, copy the `API key`
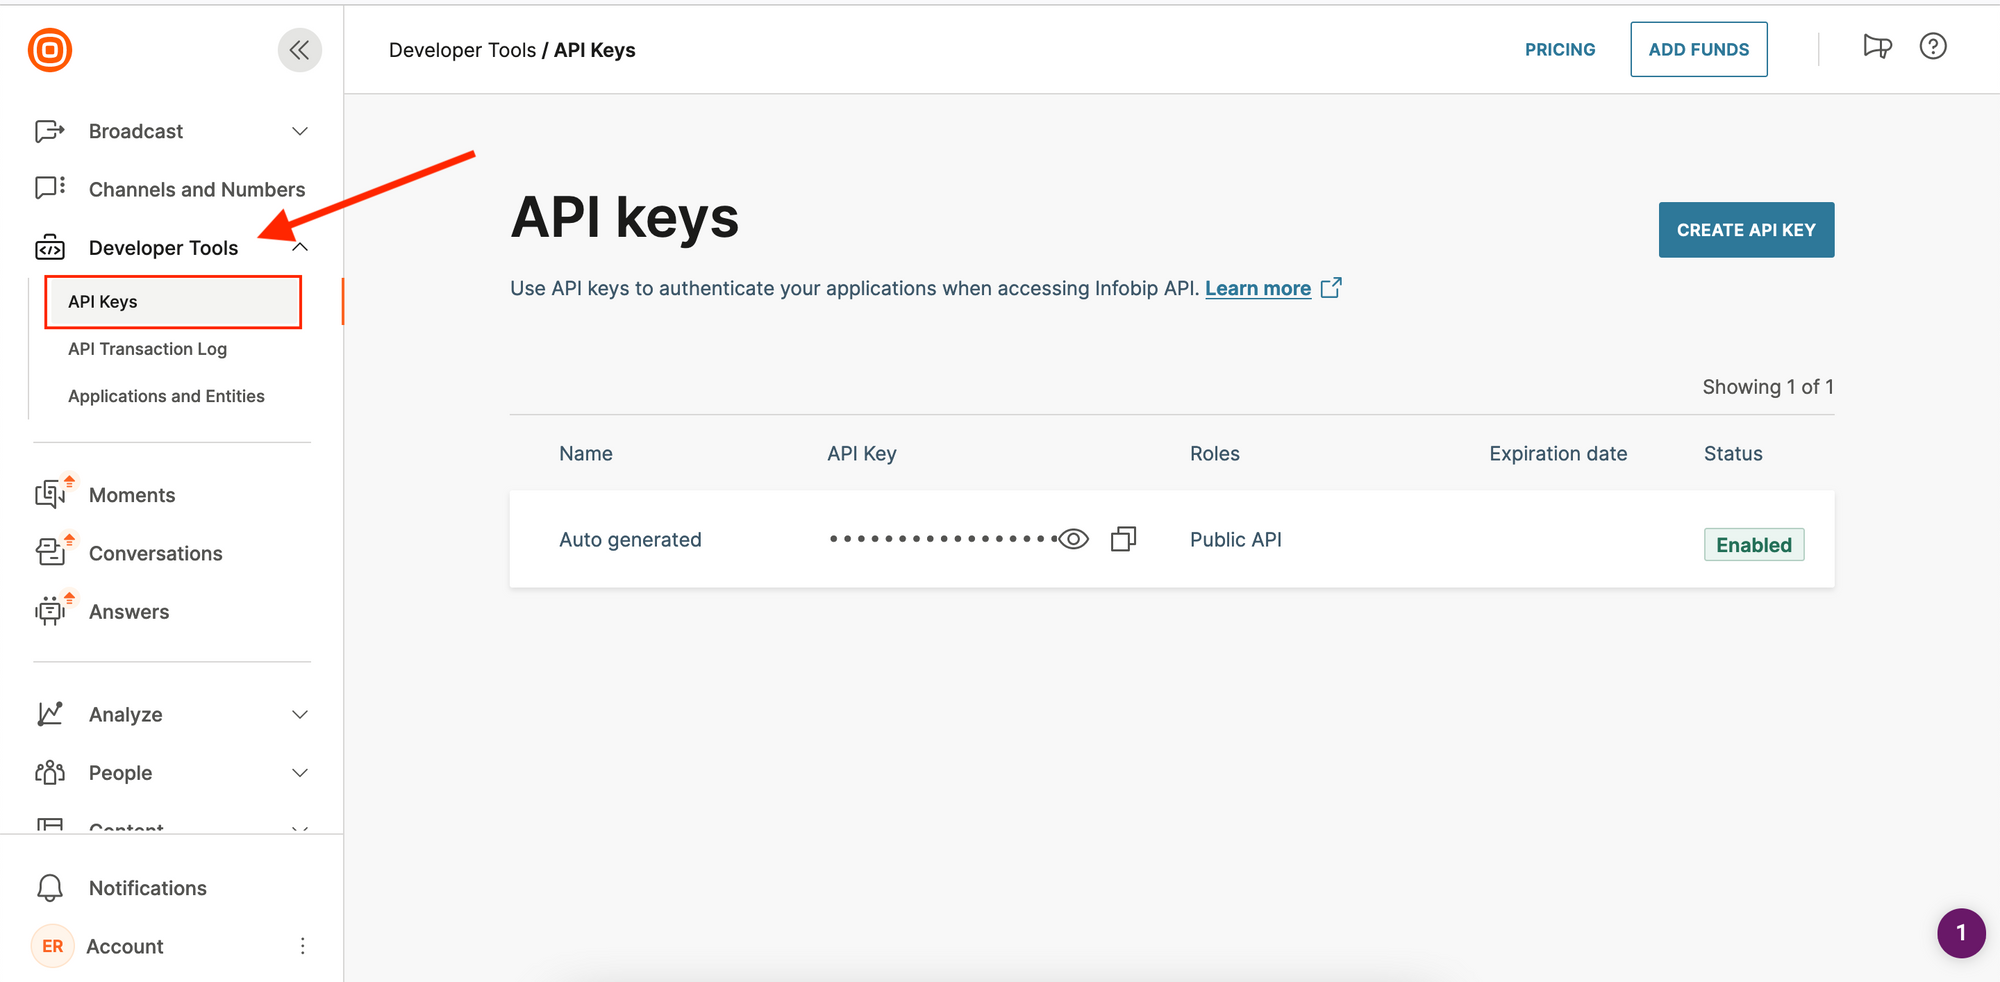
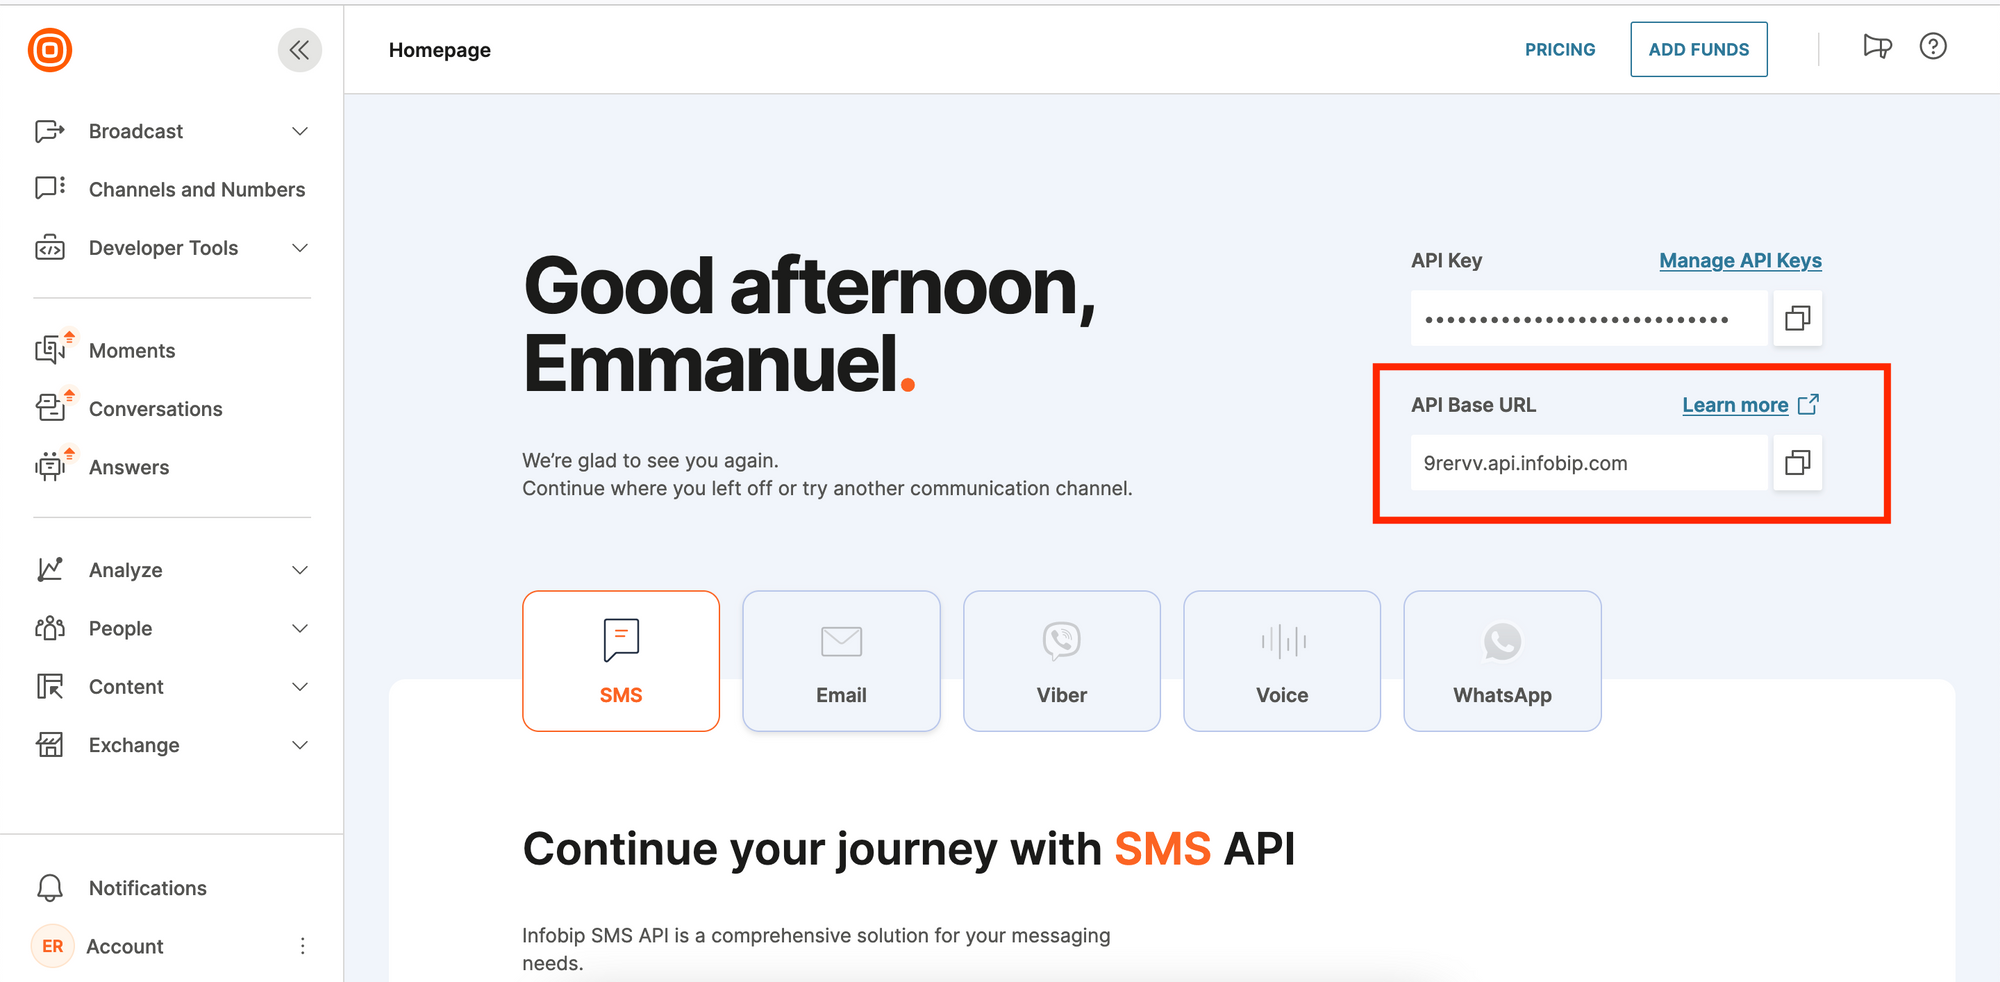
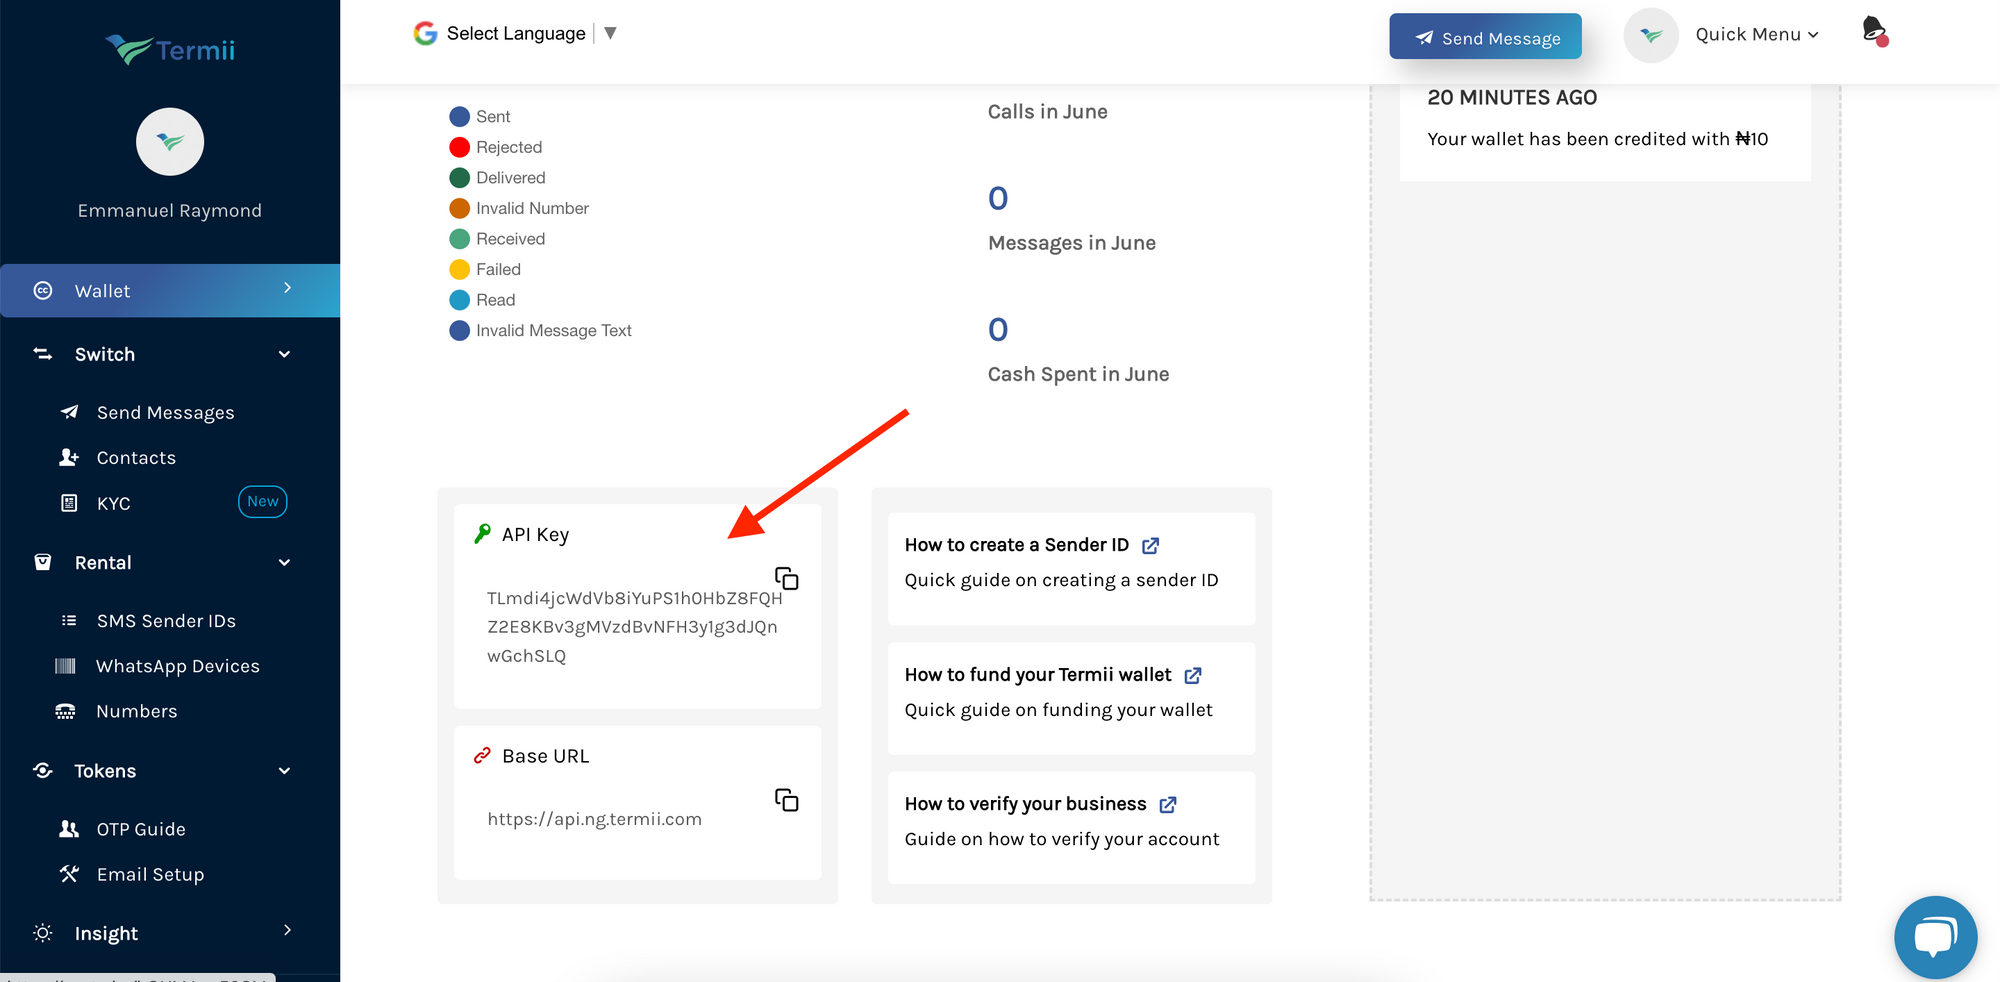
 Alternatively, you can find your API key in the Developer Tools:
1. Click on Developer Tools in the left sidebar
2. Select API Keys from the dropdown menu
Alternatively, you can find your API key in the Developer Tools:
1. Click on Developer Tools in the left sidebar
2. Select API Keys from the dropdown menu
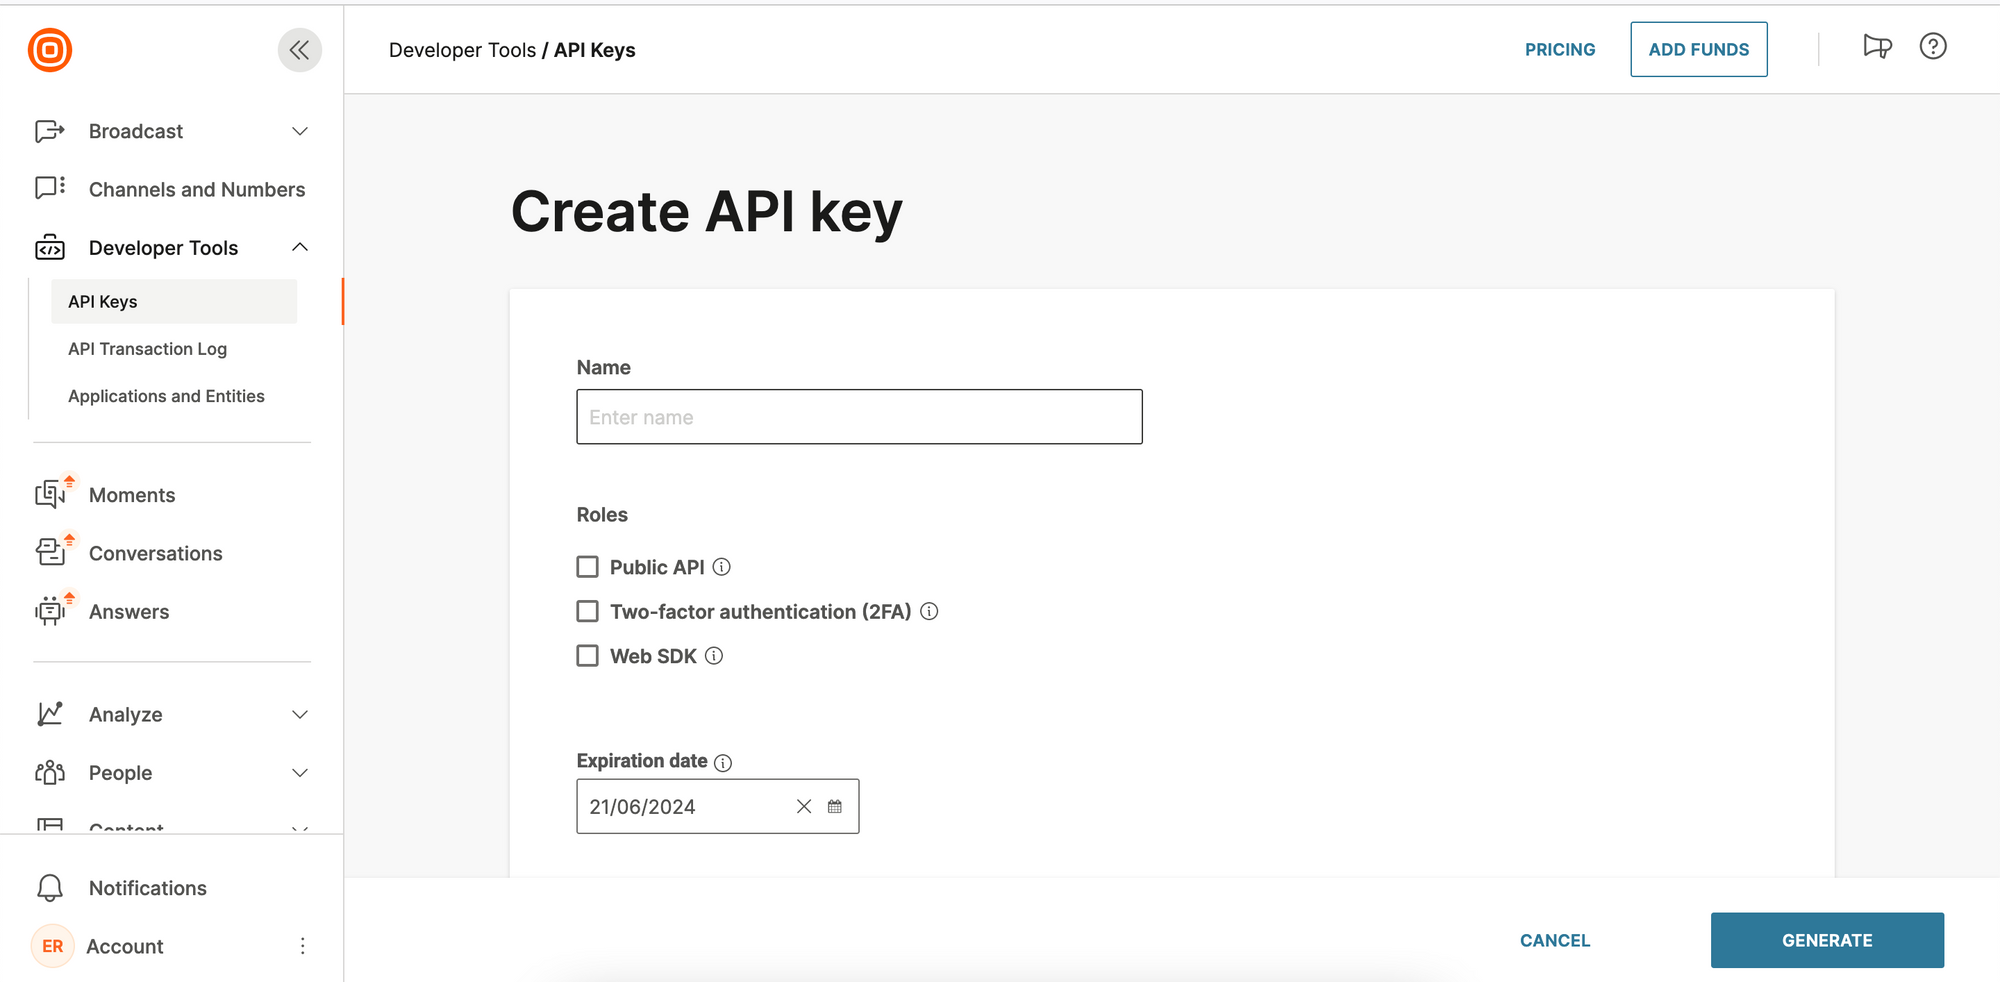
 3. Click on Generate API Key to create a new key
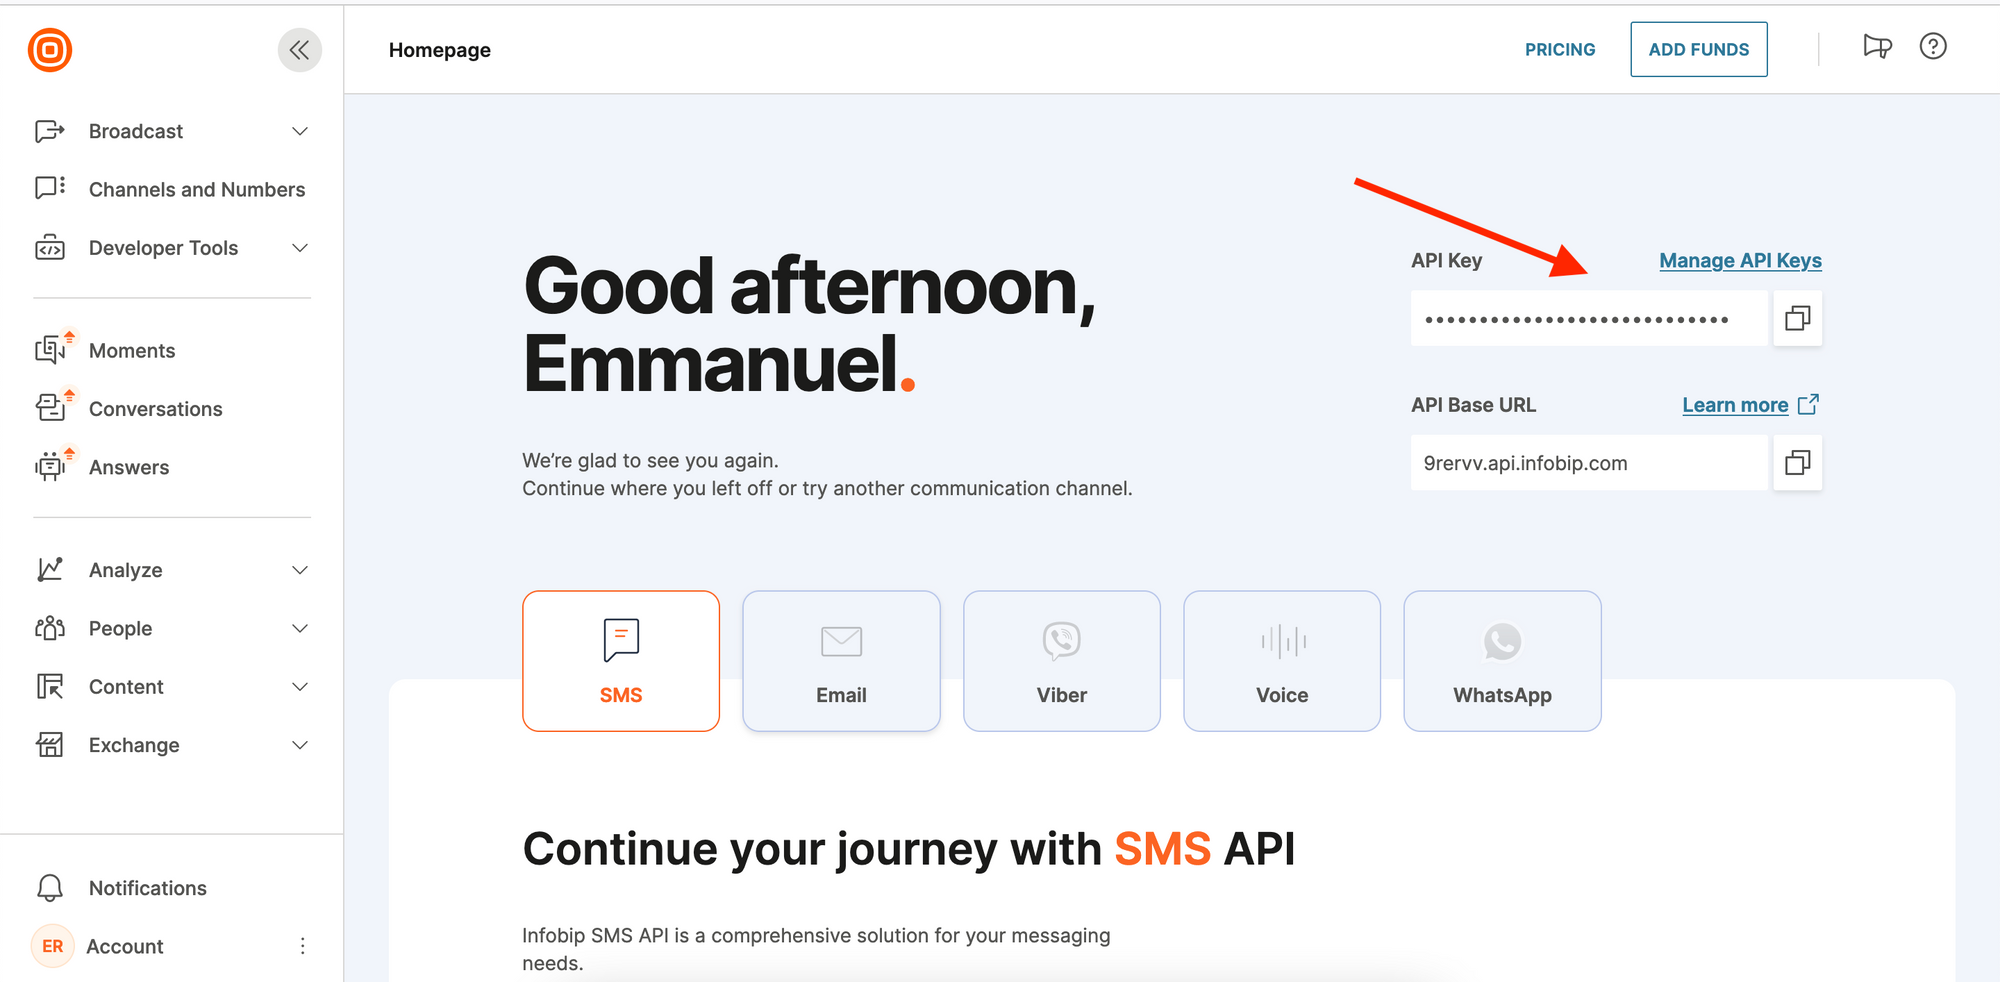
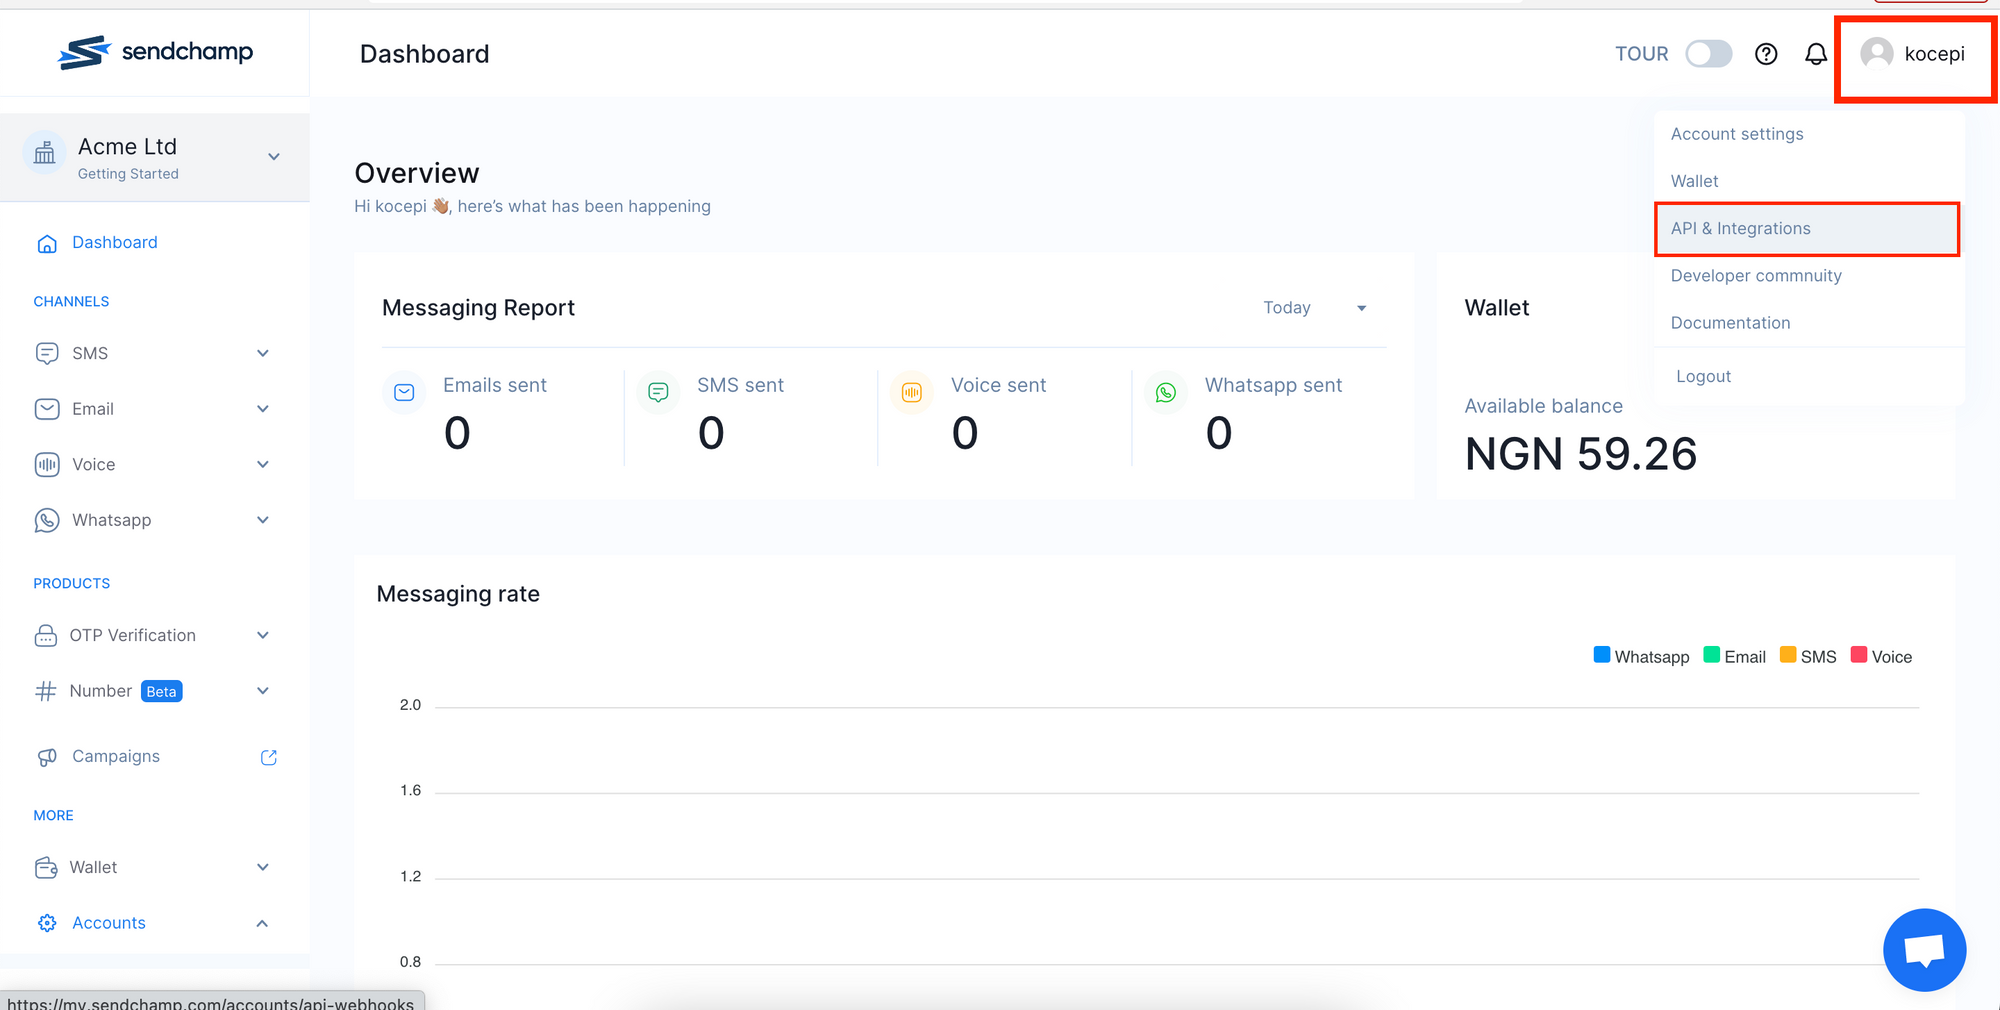 Alternatively, you can access the API key from the Accounts menu:
1. Scroll to the bottom of the sidebar and click on `Accounts`
2. Click on `API keys & Webhooks` from the dropdown
Alternatively, you can access the API key from the Accounts menu:
1. Scroll to the bottom of the sidebar and click on `Accounts`
2. Click on `API keys & Webhooks` from the dropdown
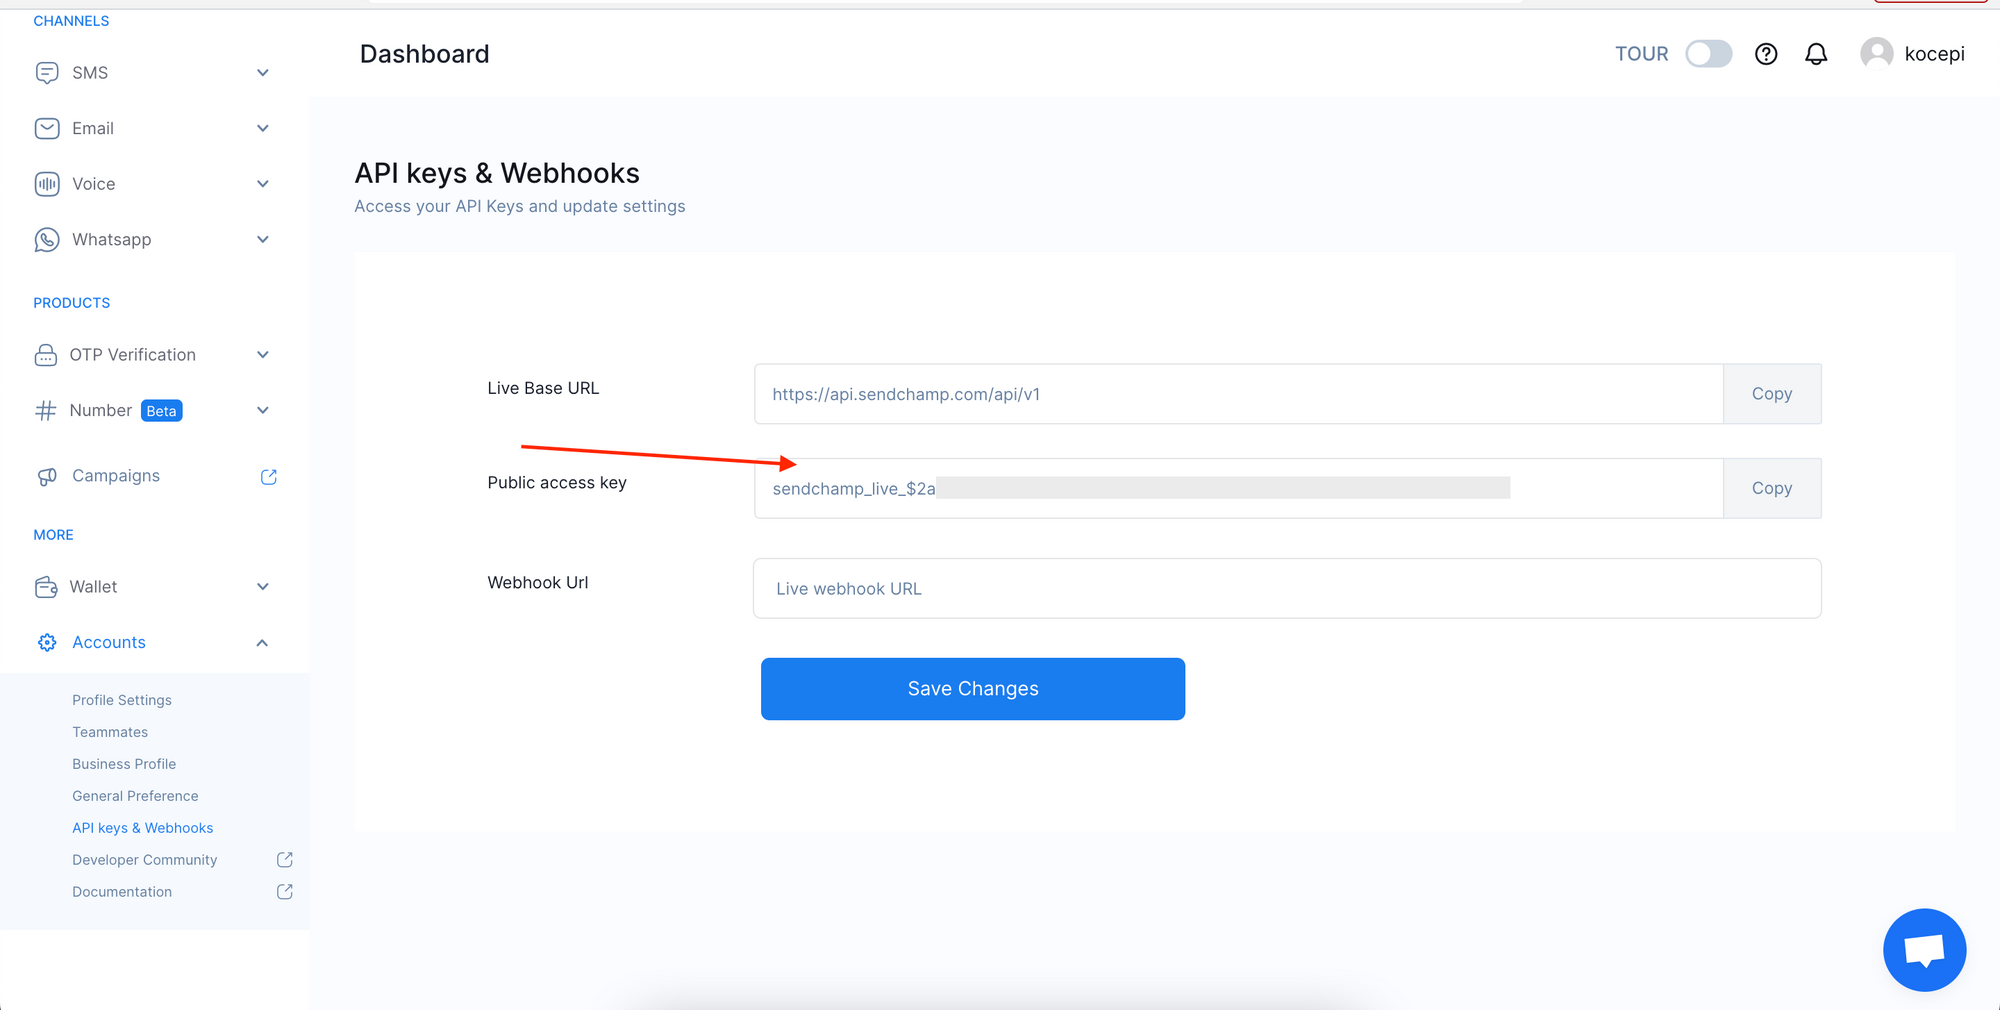
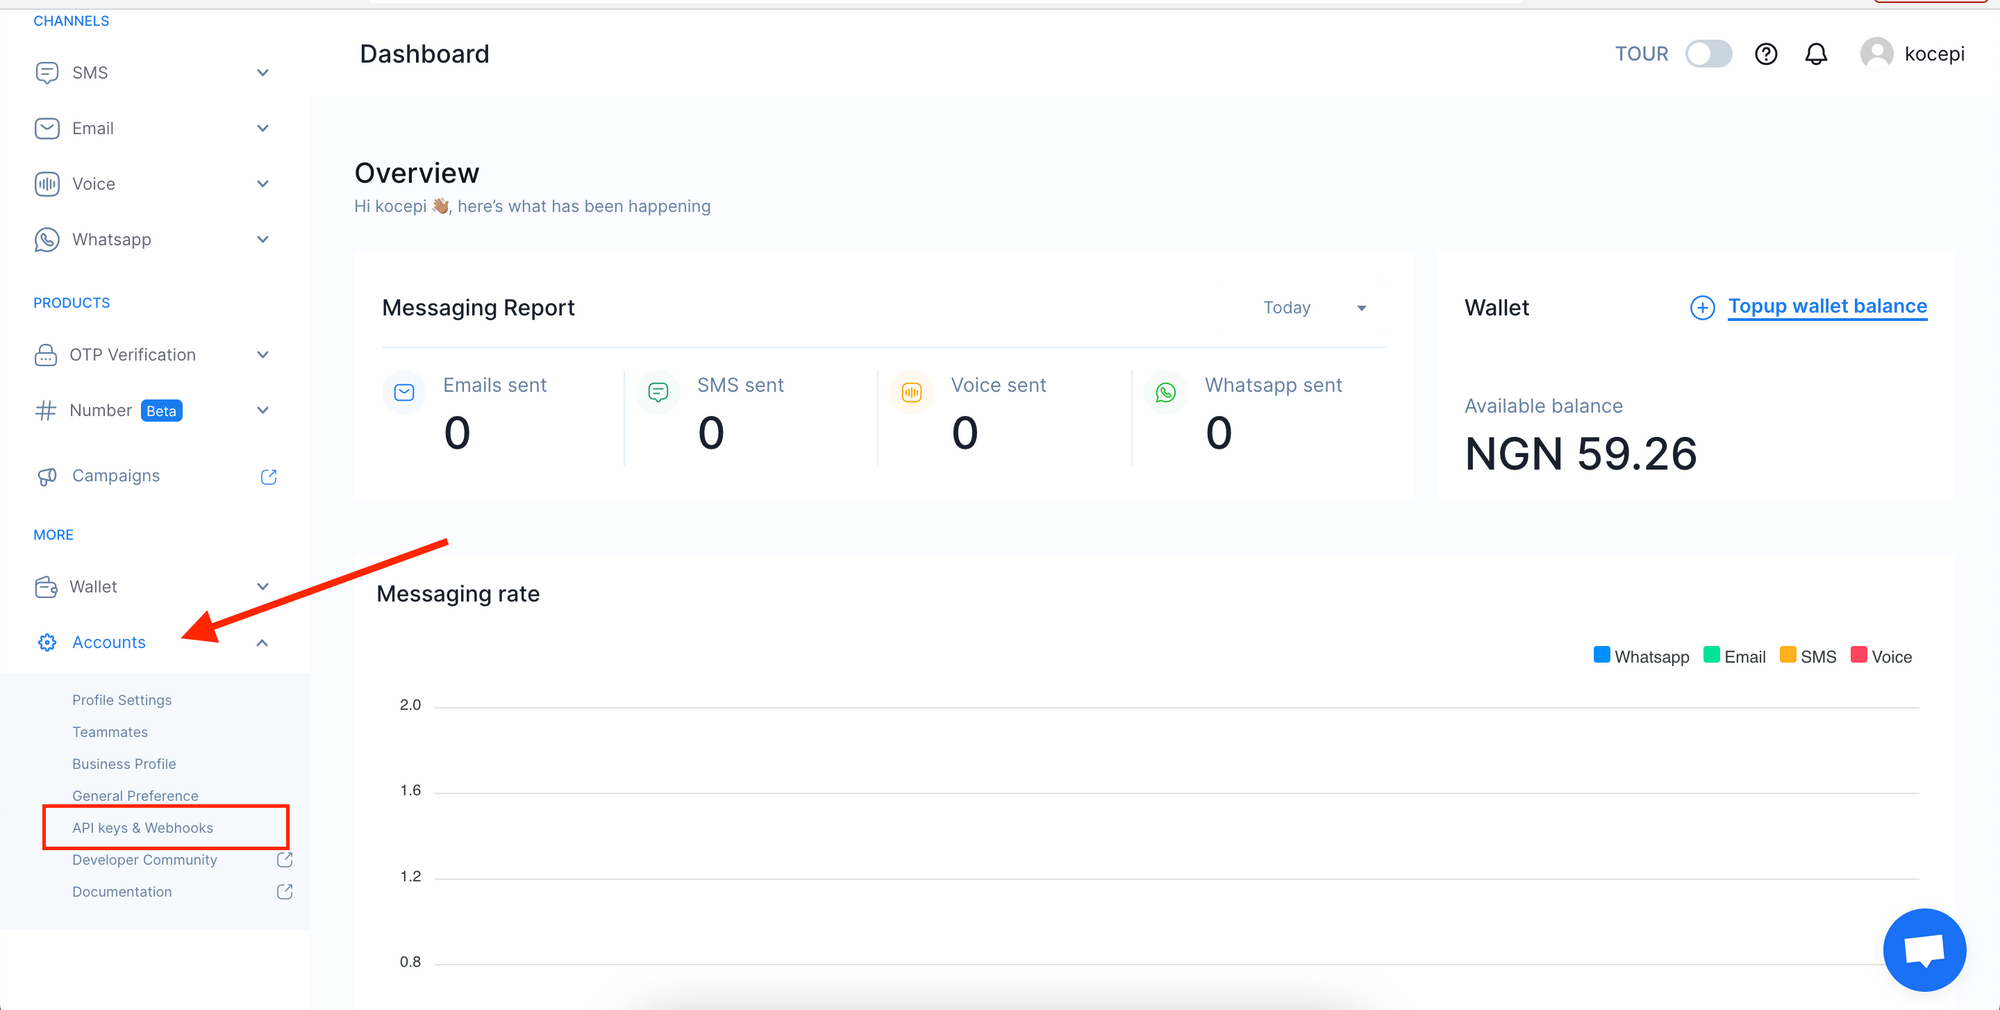 3. On the API Keys page, copy the Public access key
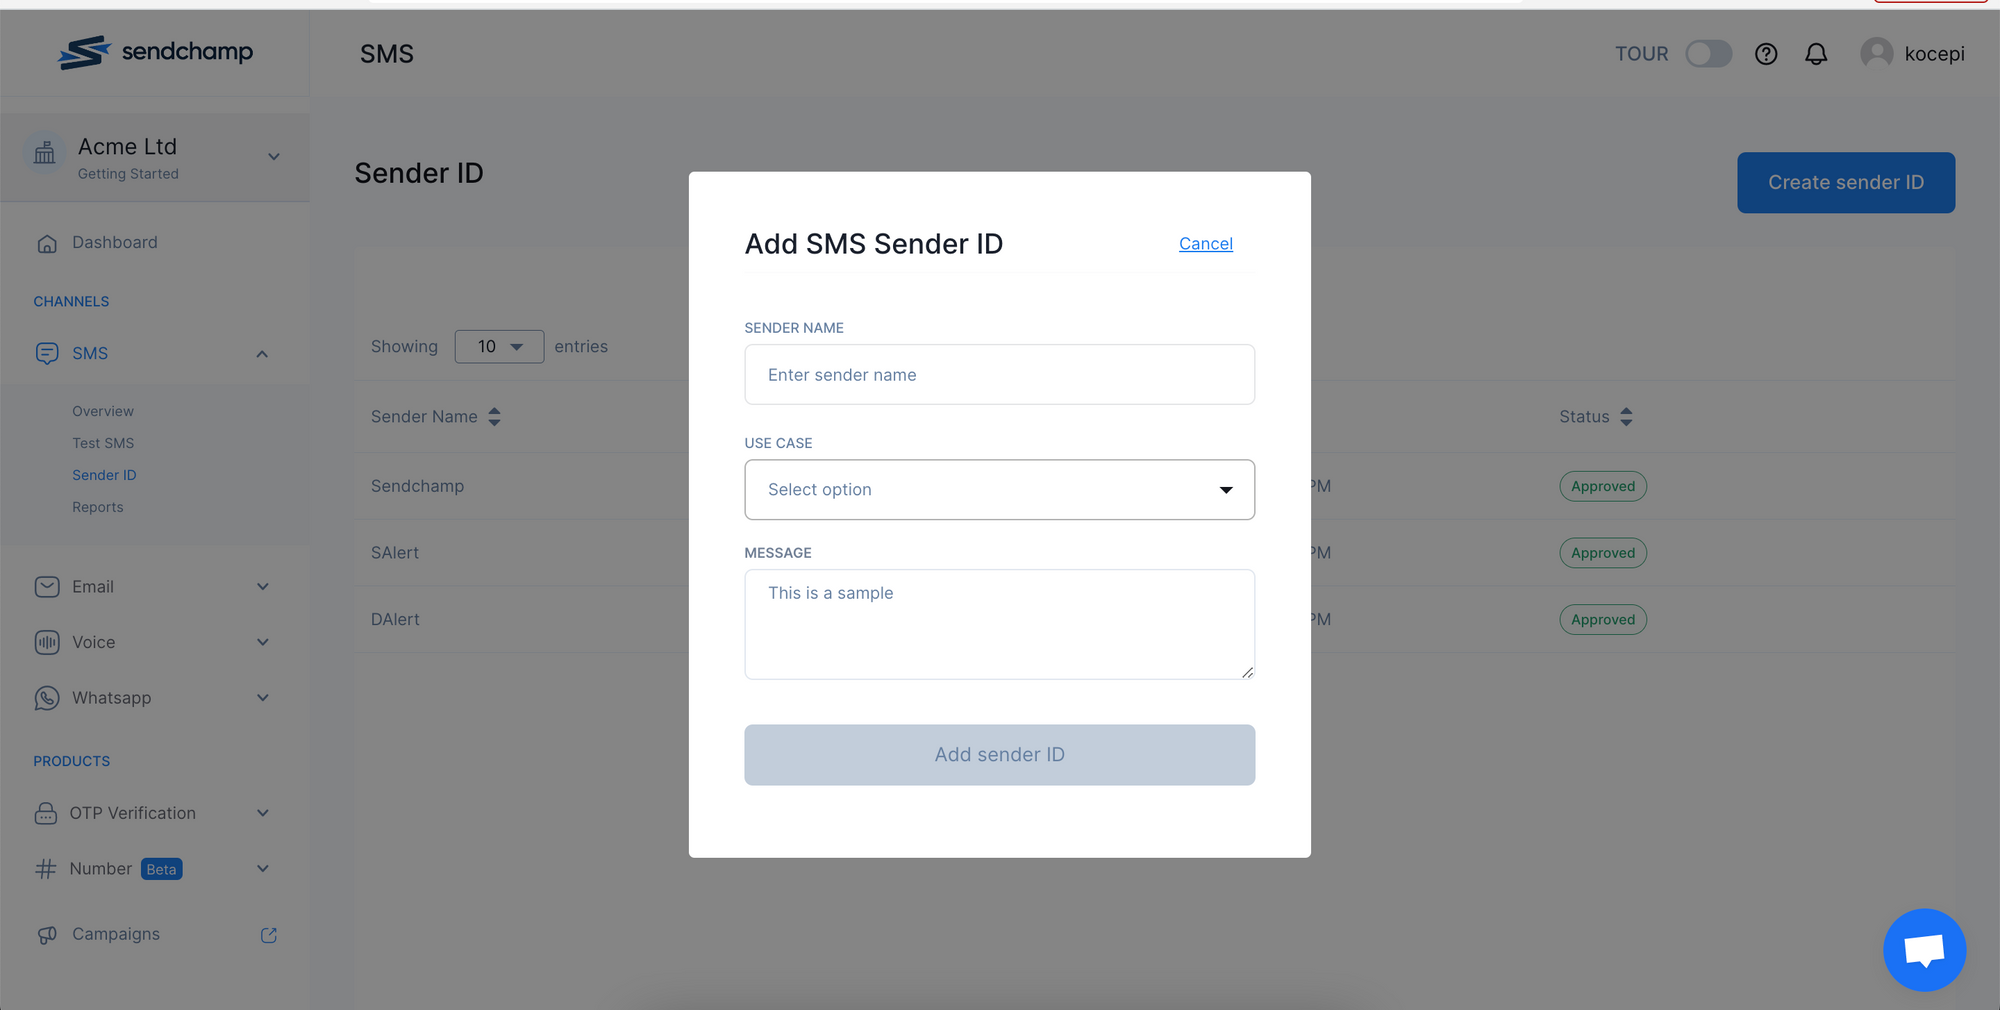
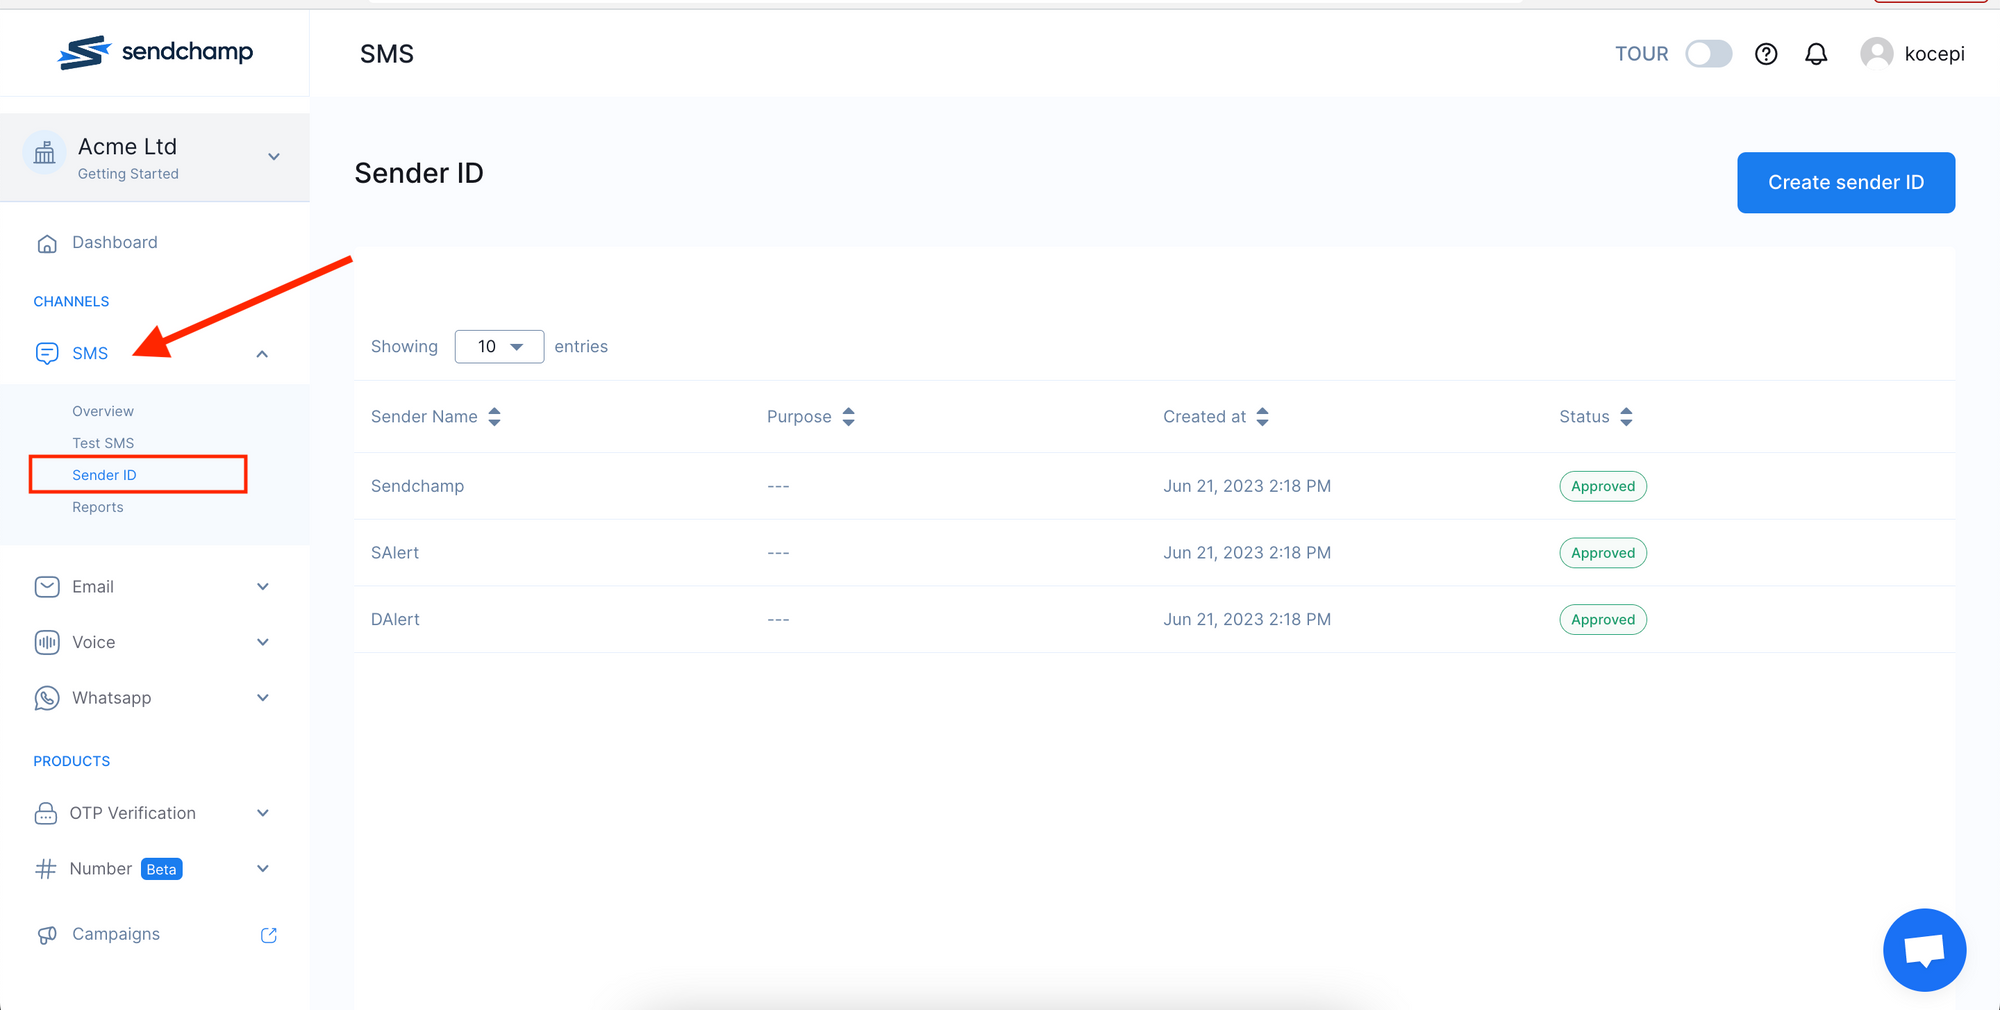 To create a new Sender ID:
1. Click on the `Create Sender ID` button
2. Fill in the form
3. Click on `Add Sender ID` button
To create a new Sender ID:
1. Click on the `Create Sender ID` button
2. Fill in the form
3. Click on `Add Sender ID` button
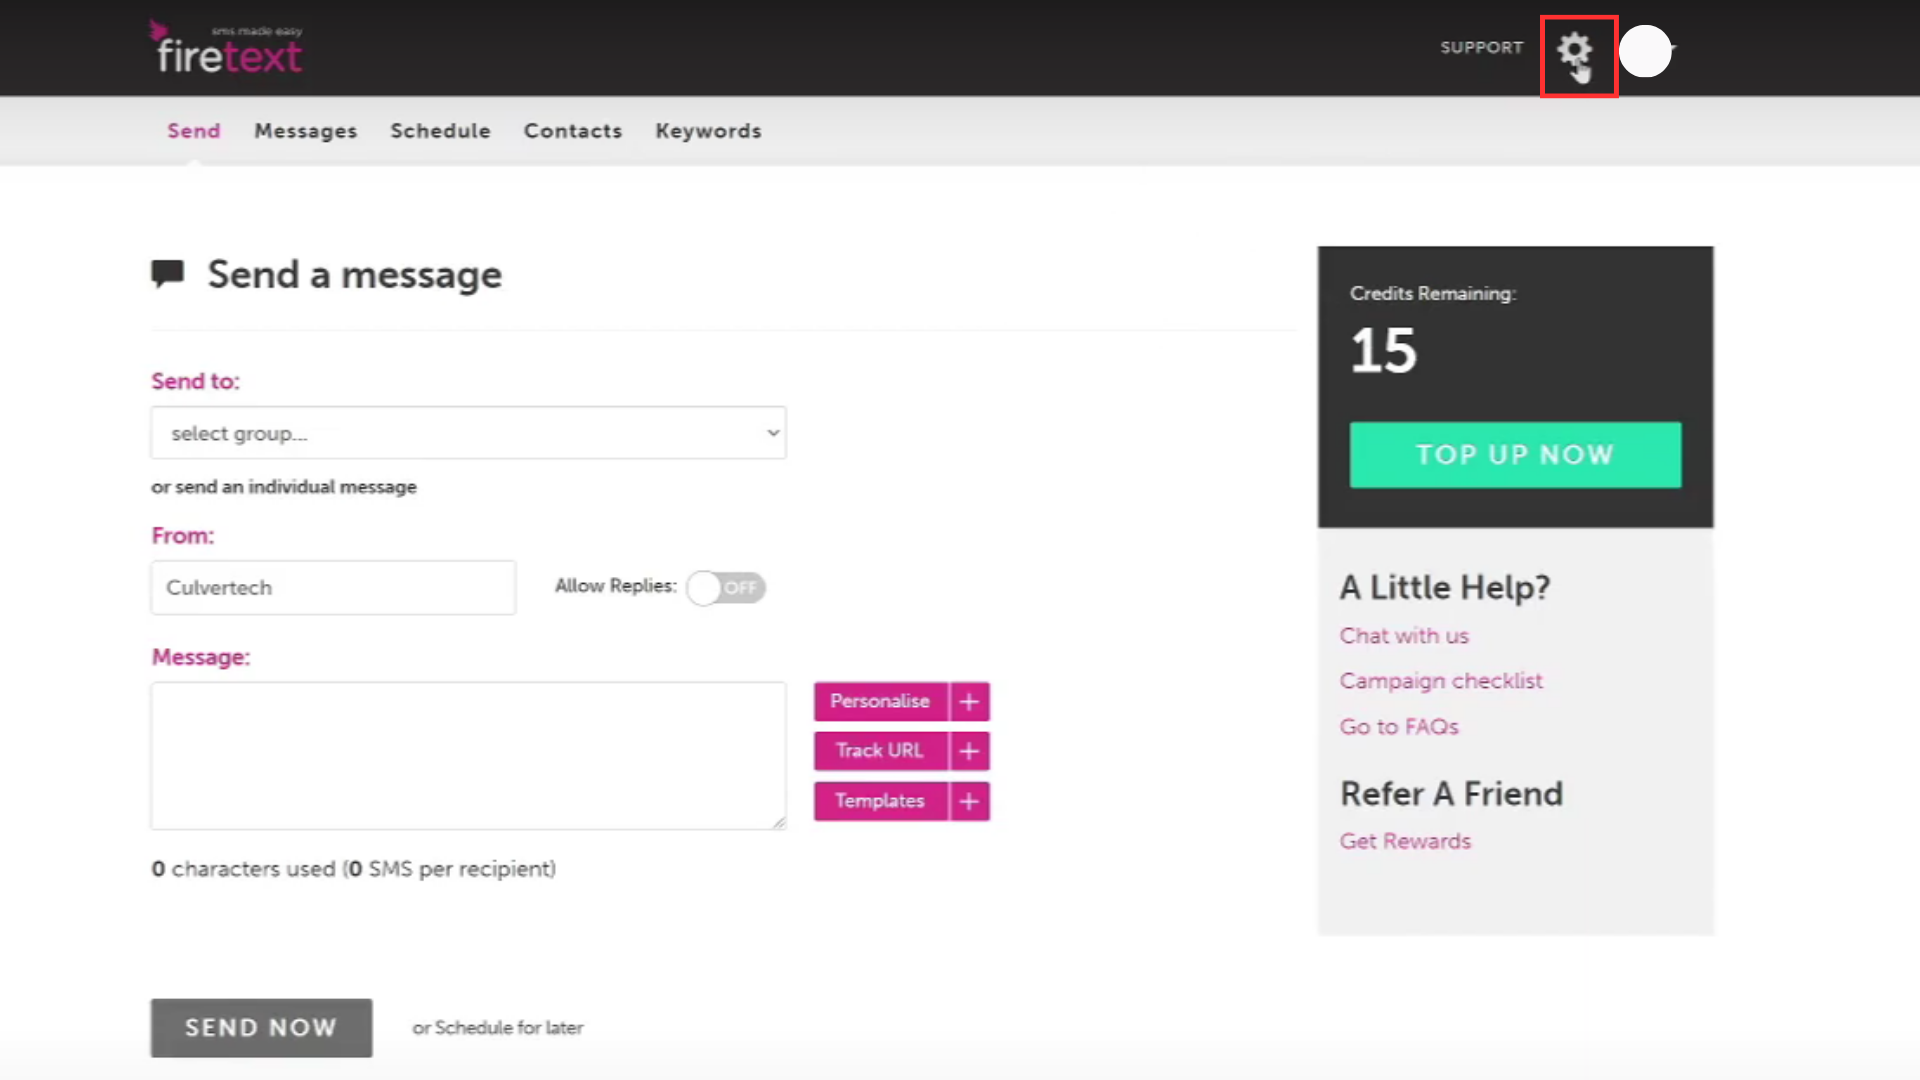
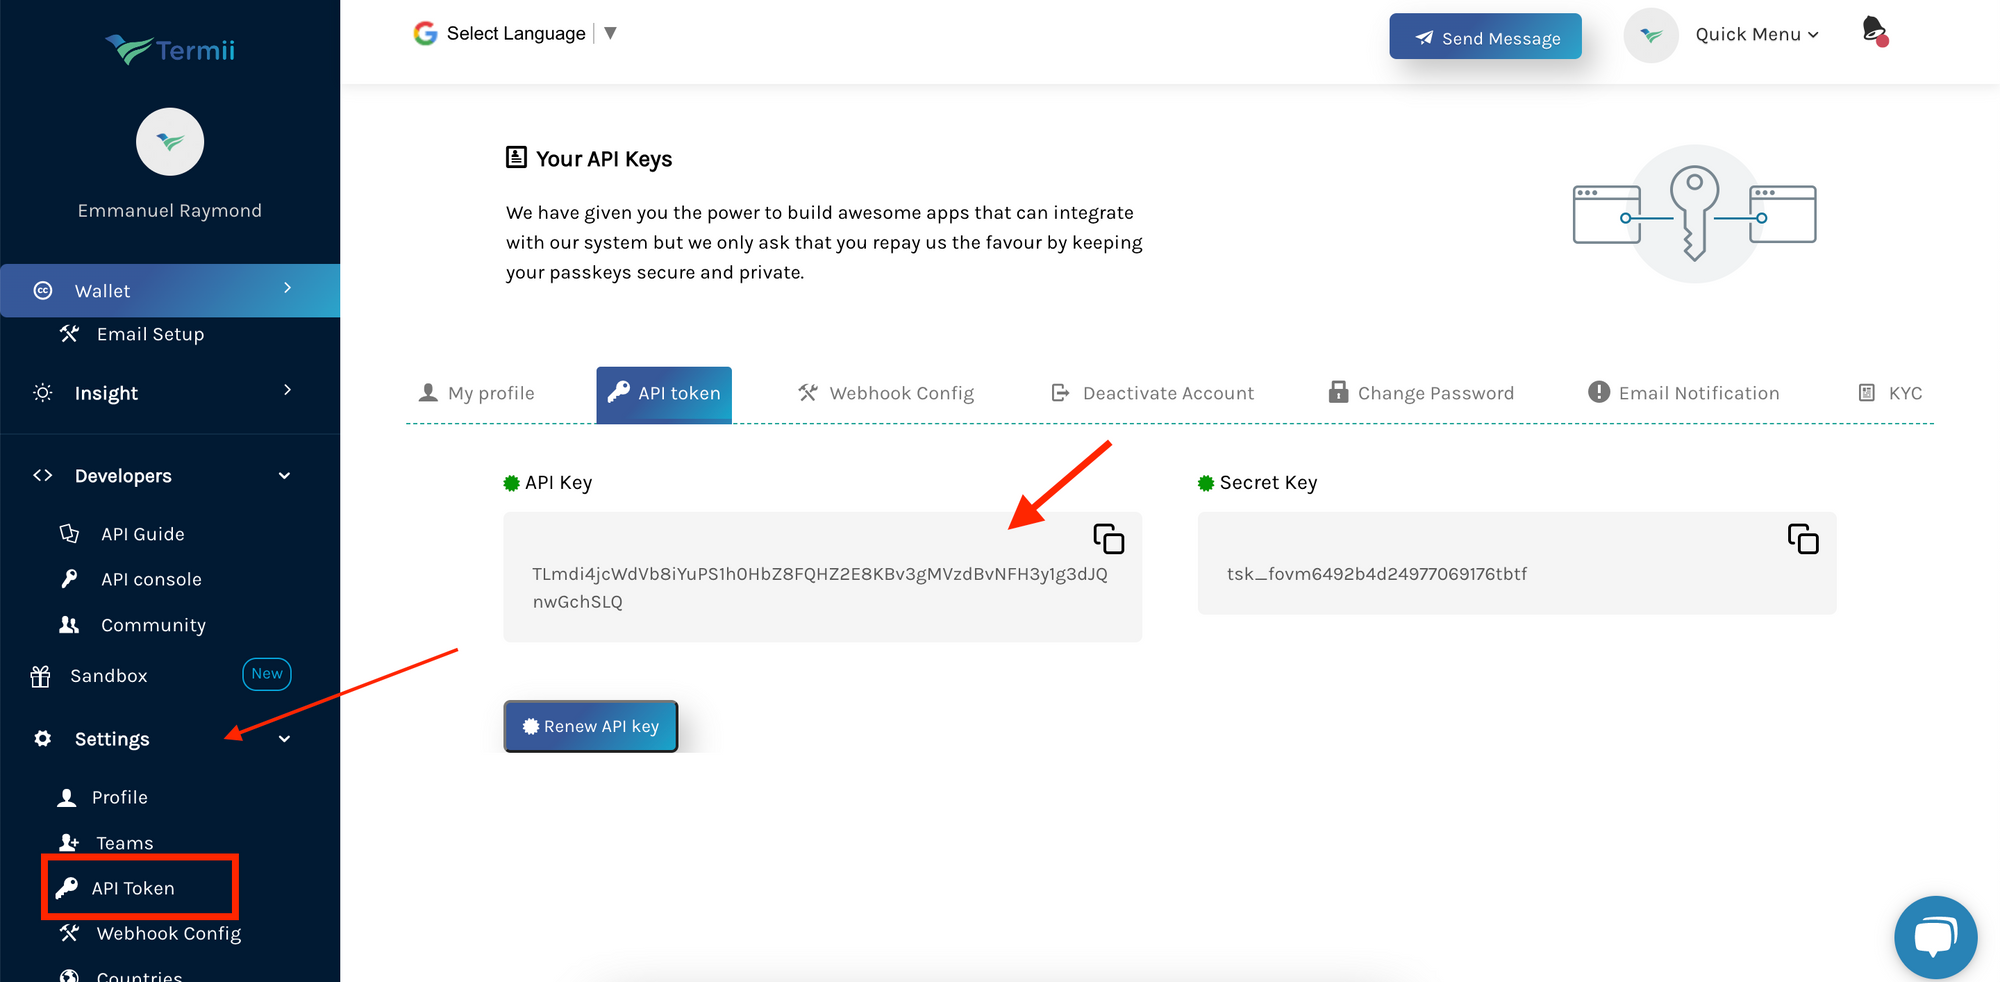
 Alternatively, you can find the API key on the Settings page:
1. Scroll to the bottom of the sidebar (on the left) and click on settings
2. Click on `API Token` from the dropdown to view your API key
Alternatively, you can find the API key on the Settings page:
1. Scroll to the bottom of the sidebar (on the left) and click on settings
2. Click on `API Token` from the dropdown to view your API key
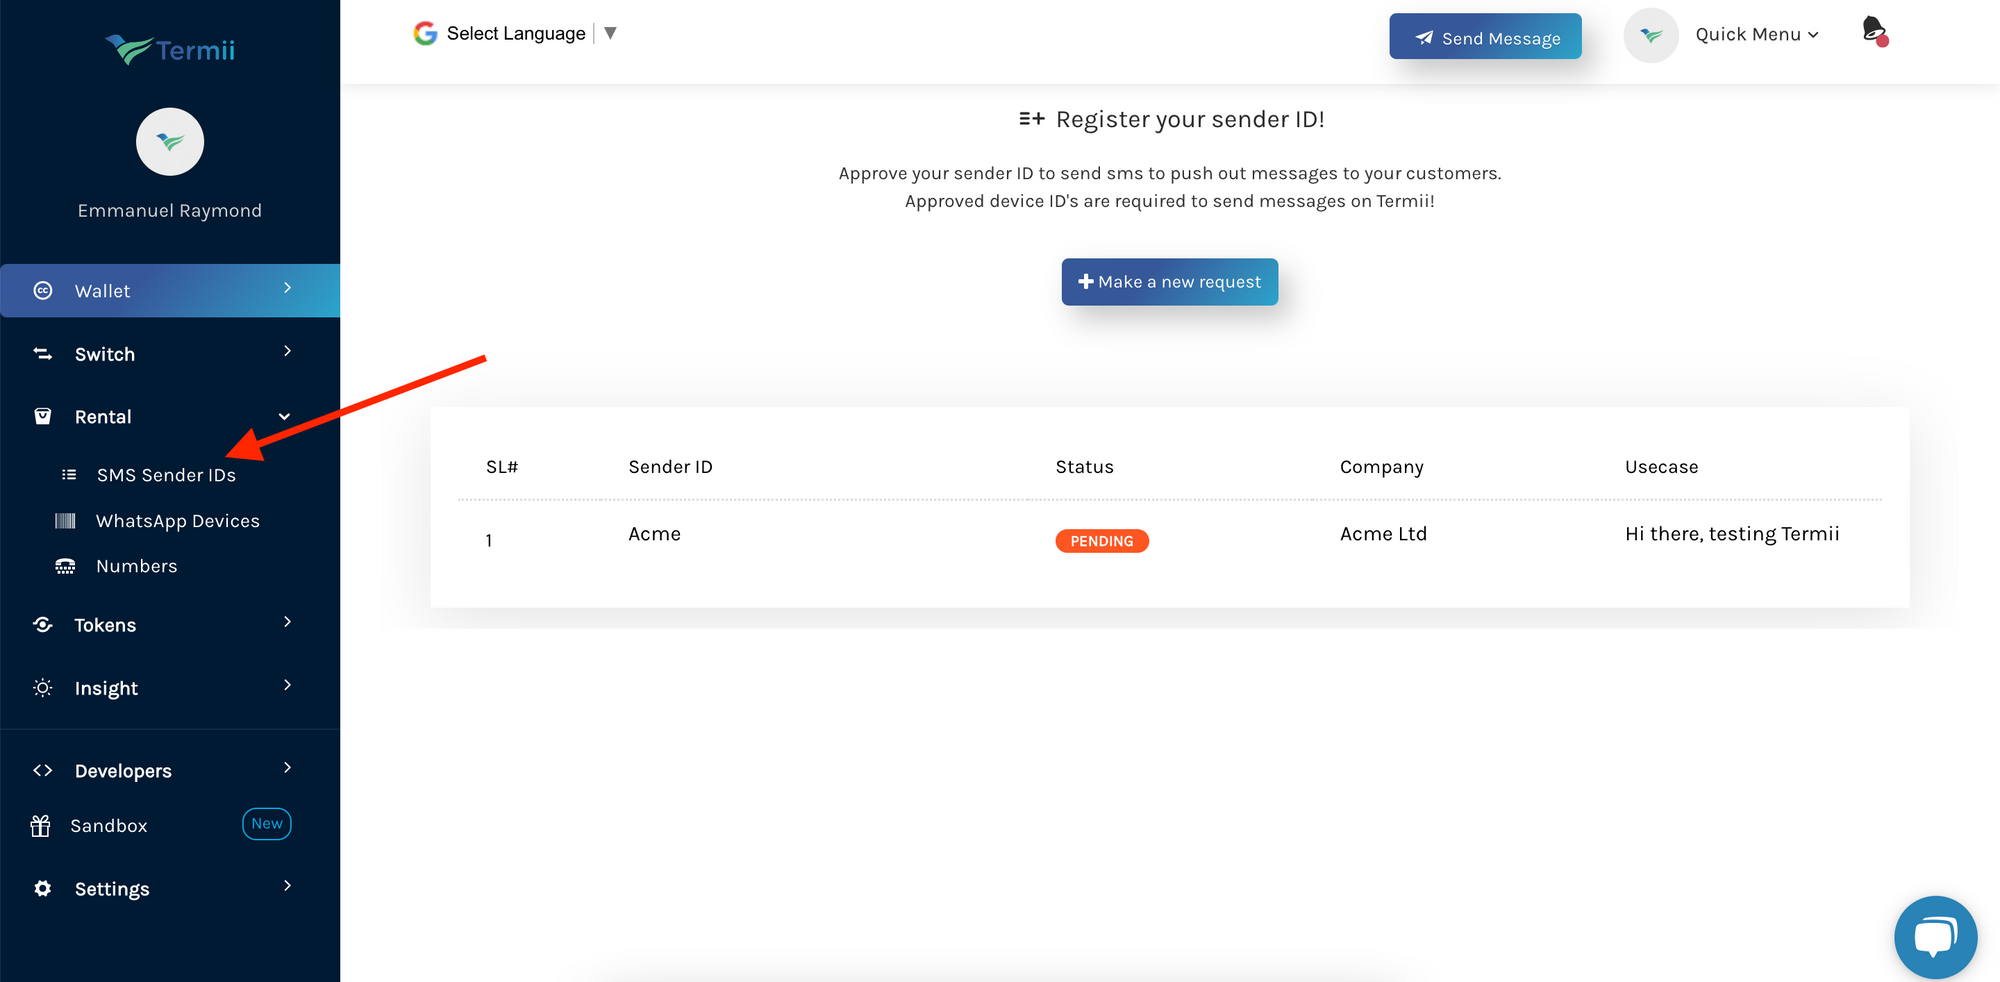 To create a new Sender ID:
1. Click on the `Make a new request` button
2. Fill in the form
3. Click on `Save`
To create a new Sender ID:
1. Click on the `Make a new request` button
2. Fill in the form
3. Click on `Save`

{notification.subject}
{notification.body}
{notification.subject}
{notification.body}
{notification.subject}
{notification.body}
{notification.subject}
{notification.body}
{notification.subject}
{notification.body}